Battery Relocation Kit
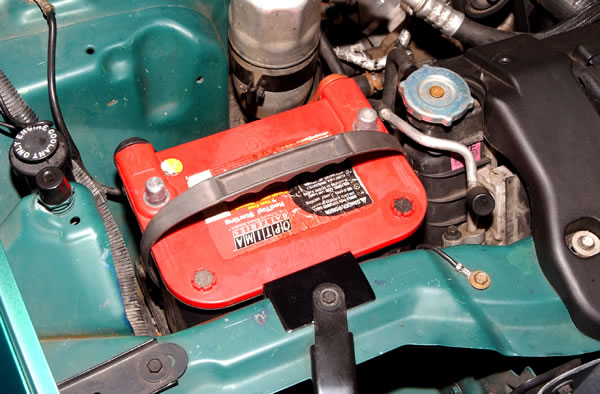
optima red top battery in a muscle car
installing mount for a Battery Relocation Kit
marking cables for a Battery Relocation Kit
grommets for holes on a Battery Relocation Kit
Battery Relocation Kit pan getting installed
Battery Relocation Kit installation diagram
putting battery in trunk with a Battery Relocation Kit
bolts through trunk floor for a Battery Relocation Kit
Battery Relocation Kit in trunk
mounting ground cable for a Battery Relocation Kit
running cable for a Battery Relocation Kit
mounting positive cable for a Battery Relocation Kit
mounting negative cable for a Battery Relocation Kit
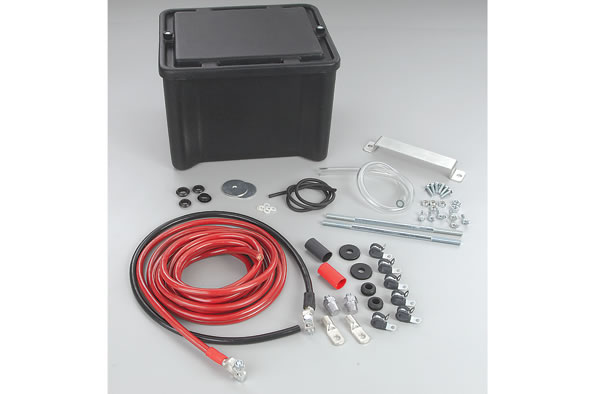
Battery Relocation Kit
Battery Relocation Kit, installed

Summit Racing’s Premium Battery Relocation Kit has everything you need to move a battery to the back of your vehicle—a marine grade vented box, one-gauge positive and negative cable, battery terminals, battery hold-down, vent tube, insulated mounting clamps, and hardware. Because the box is sealed and vents to the outside of the vehicle, the Summit relocation kit is NHRA- and IHRA-approved for competition use. Check your sanctioning body’s rulebook to ensure you are in full compliance.

It’s Moving Day for the Optima RedTop battery in our subject vehicle, a 1998 Camaro. The average weight of a RedTop battery is around 36 pounds. Moving that poundage to the rear will improve weight transfer, helping the car launch harder and run quicker ETs. The ideal battery location is on the passenger side of the vehicle, either over or behind the rear axle. The additional weight helps preload the passenger side rear tire to counter the “torque twist” effect that tends to lift the tire when the car launches.

The Camaro has an ideal battery box location just behind the rear axle and gas tank. There is nothing under the floor to damage when drilling holes—a nice plus. Curtis from AutoDynamics centered the hold-down over the battery and tapped each hold-down stud with a mallet to mark drilling locations in the bottom of the box. He will drill a 13/32-inch hole through the box and the trunk floor at each location.

After assembling the cables and terminals and mounting them on the battery, Curtis determined the cable exit locations and marked them with a white paint marker. He will drill 3/4-inch holes at those points and insert grommets in the holes to protect the cables from abrasion.

Curtis decided to route the battery cables out the side of the trunk and along the rear inner wheelwell. He marked the exit locations, drilled two more 3/4-inch holes, and inserted two more grommets.

Curtis drilled a 3/4-inch hole through the battery box and trunk floor for the vent tube. The tube will allow any sulfuric acid fumes that build up in the box to escape. The vent tube should be positioned so the fumes do not collect under the car and possibly get into the cabin and ruin your day, not to mention your life. Curtis used the hold-down studs to keep the battery box in place when he drilled the vent tube hole.

This is how the battery hold-down should be assembled. We strongly recommend adding the optional washers under the lock nuts on the battery box floor. They’re cheap insurance against stressing and cracking the plastic.

Depending on how your vehicle’s trunk floor is shaped, you might have an excess of stud thread protruding above the hold-down. You can cut the studs or use the two large fender washers included with the Battery Relocation Kit to secure the hold-down as shown.

Here’s what things look like underneath the battery box location. Make sure an ample amount of hold-down stud thread is visible below the lock nut as shown.

One Optima RedTop battery, safe and secure in its new home. There probably should be a little more clearance between the positive cable and the hold-down washer to prevent the washer from abrading or cutting into the cable jacket.

Curtis grounded the negative battery cable to the body with a self-tapping screw. Note how he scraped away the paint so the cable will make contact with bare metal. That’s the proper way to do all of your ground connections.

Curtis routed the positive battery cable across the passenger side inner wheelwell and the down alongside the subframe rail and rocker panel. The Summit Racing Battery Relocation Kit comes with six insulated clamps to secure the cable to the car. If you need more clamps for your particular vehicle, Summit Racing insulated clamps are available in handy 10-packs.

The positive cable from the battery ends at the positive lug on the starter solenoid. Some electrical tape and convoluted tubing protect the cable from damage. The red cable at the upper right is the OE positive battery cable. It runs from the positive lug to the old battery tray, where it splices into the power lead that runs to the Camaro’s main electrical junction box.

Curtis reused the OE negative battery cable as a redundant ground strap. He connected one end to the chassis as shown here, and the other end to the engine block.

The last item of business is installing the foam rubber seal in the channel of the battery box lid. The seal is self-adhesive—just route it along the channel and cut off any excess.

The finished product. The lid is secured to the box with two 1/4-inch bolts that thread into nutserts at each end of the box.

Automotive batteries are hefty fellas. Many OE batteries check in at 40 pounds or more, and even “lightweight” racing batteries tip the scales at 20 pounds or so. While that might not seem like much weight to worry about, think about where it’s located. Yup, right up front with the engine—exactly where your rear-wheel drive vehicle doesn’t need it for maximum weight transfer at the track.

Mounting the battery in the trunk or truck bed gets weight off the front end of the vehicle and puts it over the rear axle. More weight over the axle plants the rear tires and improves traction. Furthermore, less weight up front allows the car’s front suspension to rise quicker, which further improves weight transfer to the rear tires.

Granted, moving 40 pounds of battery isn’t going to set your ETs on fire. But combine a relocated battery with suspension and traction upgrades, and a weight-reduction program (for the car, not you) and you’ll definitely notice an improvement on your time slip.

Summit Racing offers a quality battery relocation kit to make your move a no-brainer. It includes a vented, marine-grade battery box, one-gauge positive and negative battery cable, terminals, a battery hold-down, insulated clamps, vent tube, and hardware. The vented box is a nice feature—the vent tube runs from the box to the outside of the car, keeping battery acid fumes from building up and hastening your demise. The relocation kit is also NHRA- and IHRA-accepted for competition use.

We snapped photos at AutoDynamics in Akron, OH as they installed a Summit Racing battery box kit in a 1998 LS Camaro. It took them a couple hours to do, and that’s with us getting in the way. Since we won’t be around while you’re working, it should take you less time to move that battery out back.

Share this Article
Author: Sean Cutright

Sean Cutright is the OnAllCylinders.com Managing Editor.