You may ask why anyone outside of a concours restorer would be using a points-ignition distributor in this age of electronically controlled everything. A properly rebuilt and tuned points distributor can in fact work perfectly fine in just about any stock or street performance engine. While you do have to keep up on the maintenance and check the points every once in a while, a points distributor has the advantage of not having any electronics that can fail suddenly and leave you stranded.
Let’s take the case of two 1960s-vintage Ford distributors—an Autolite C4AF used on small blocks from 1962 to 1964 and the improved Autolite C5AF (actually C8TF) used from 1965 on up. These single-point distributors are easy to tune.
Under a light load and part-throttle, ignition timing is controlled by the vacuum advance as intake manifold vacuum increases under initial acceleration. This gives you power right off idle, improving throttle response and efficiency. The vacuum advance hands off to the mechanical (centrifugal) advance as engine RPM increases until total advance is all in at roughly 3,500 RPM. The challenge is getting the vacuum advance to smoothly segue into mechanical advance as revs increase.
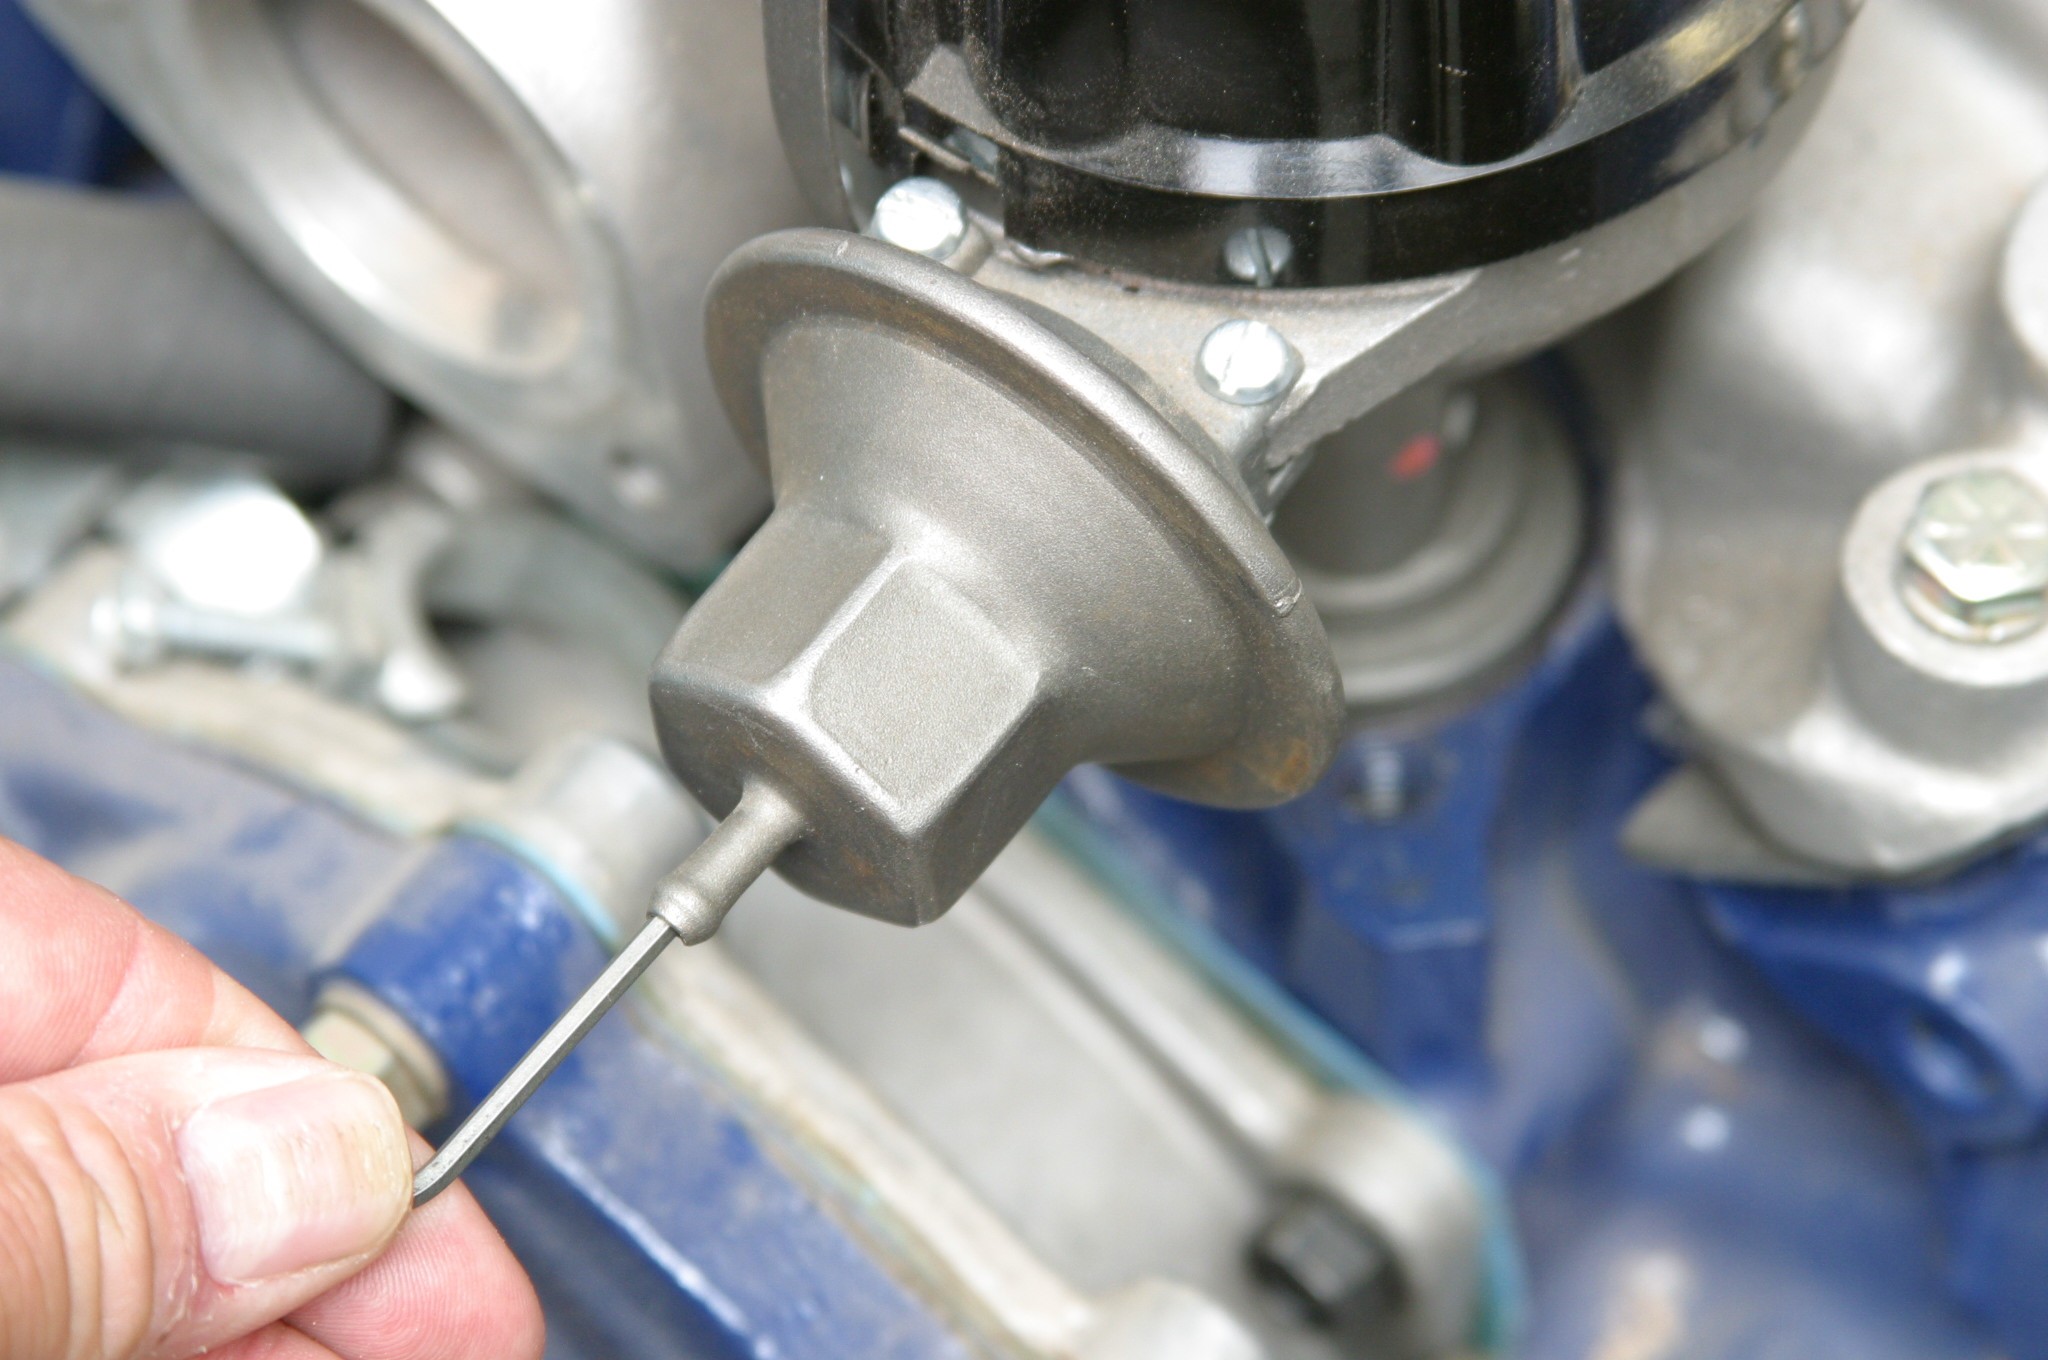
There are two types of vacuum advance modules for Ford distributors. The factory “shim style” advance unit is tuned by adding or subtracting shims. Add shims and the rate of advance slows down. Subtract shims and the rate of advance increases. Aftermarket vacuum advances are adjusted with an Allen wrench through the vacuum port. Turn the wrench clockwise to slow the advance rate or counterclockwise to speed up the advance rate.
We’re going to show you two generations of Ford point-triggered distributors installed on the most popular Ford, Mercury, and Lincoln vehicles.
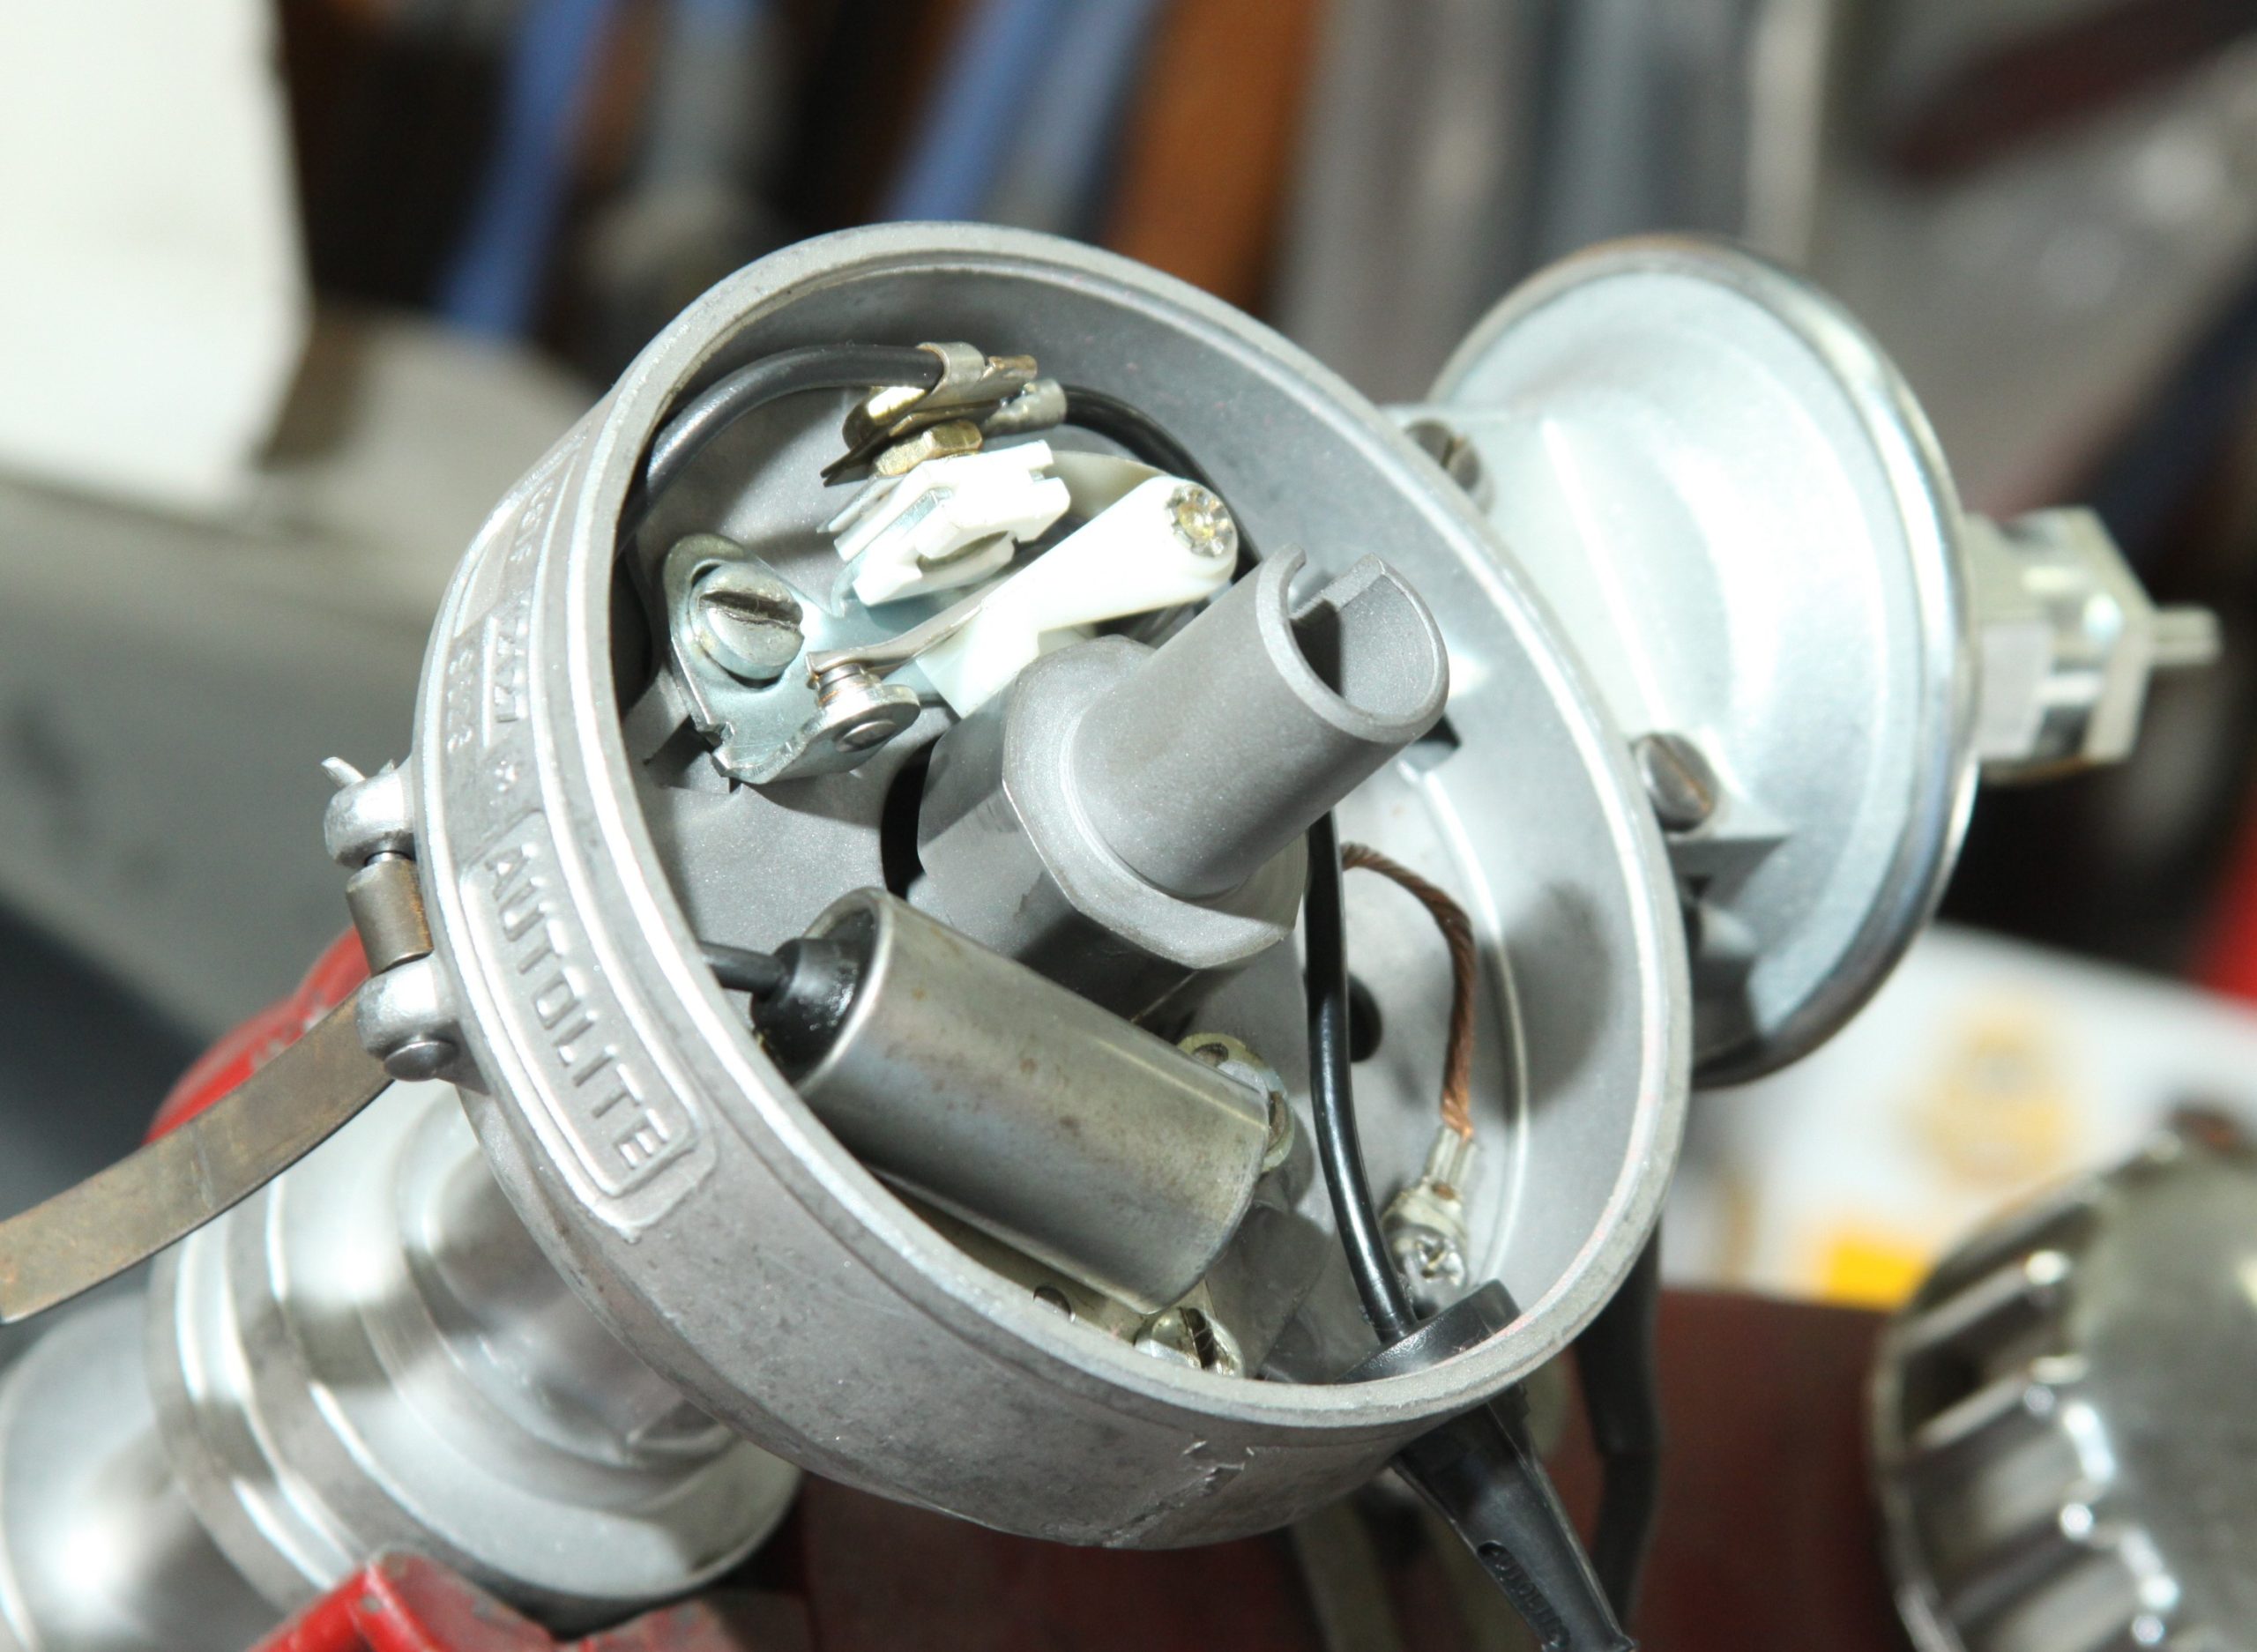
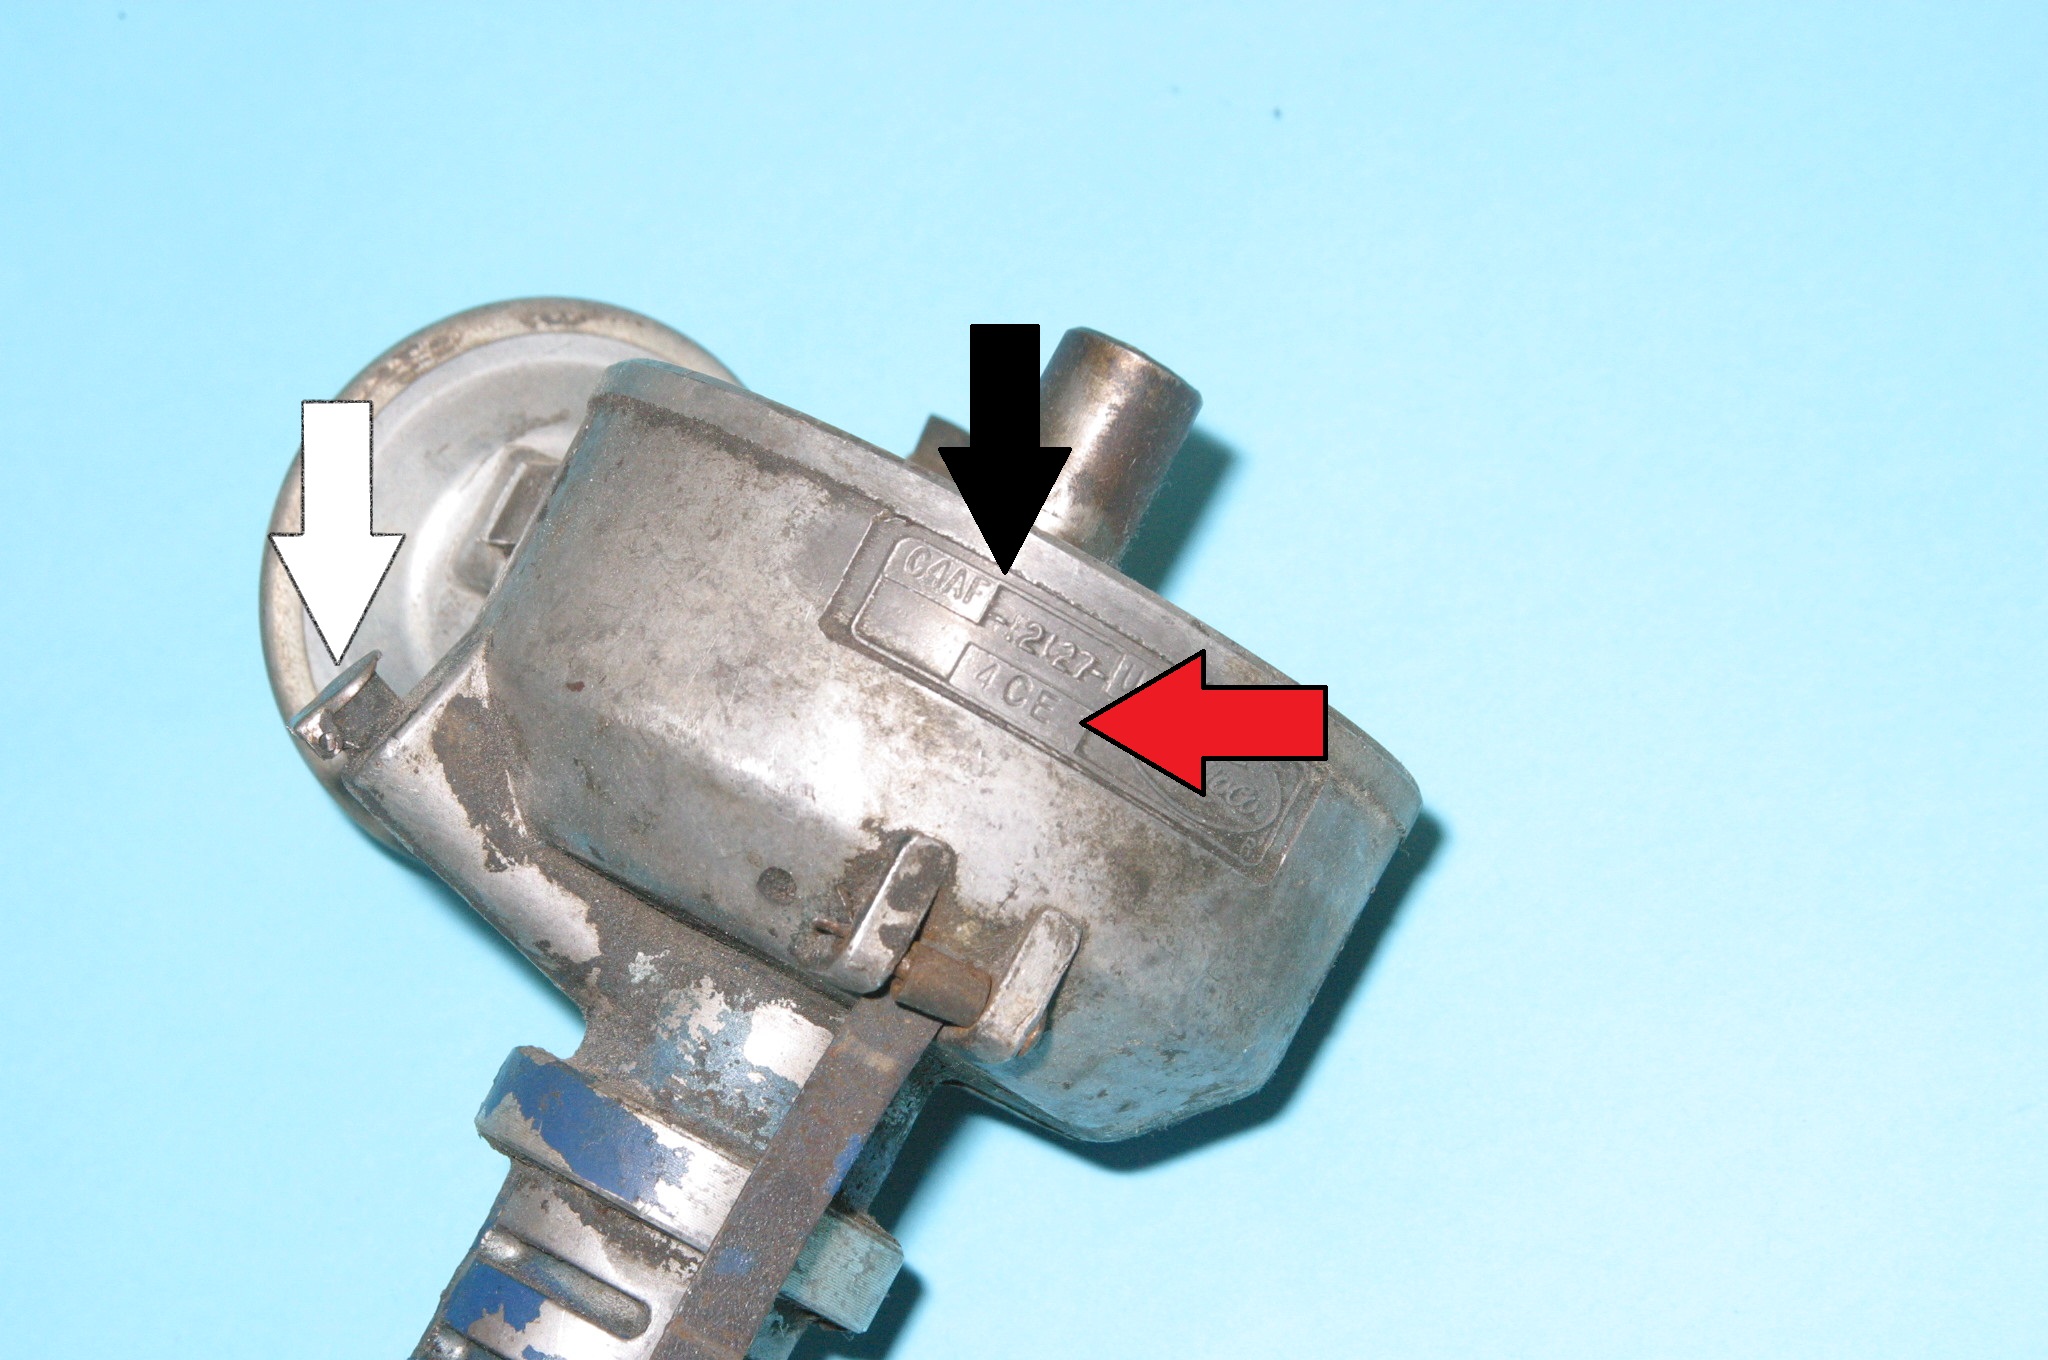
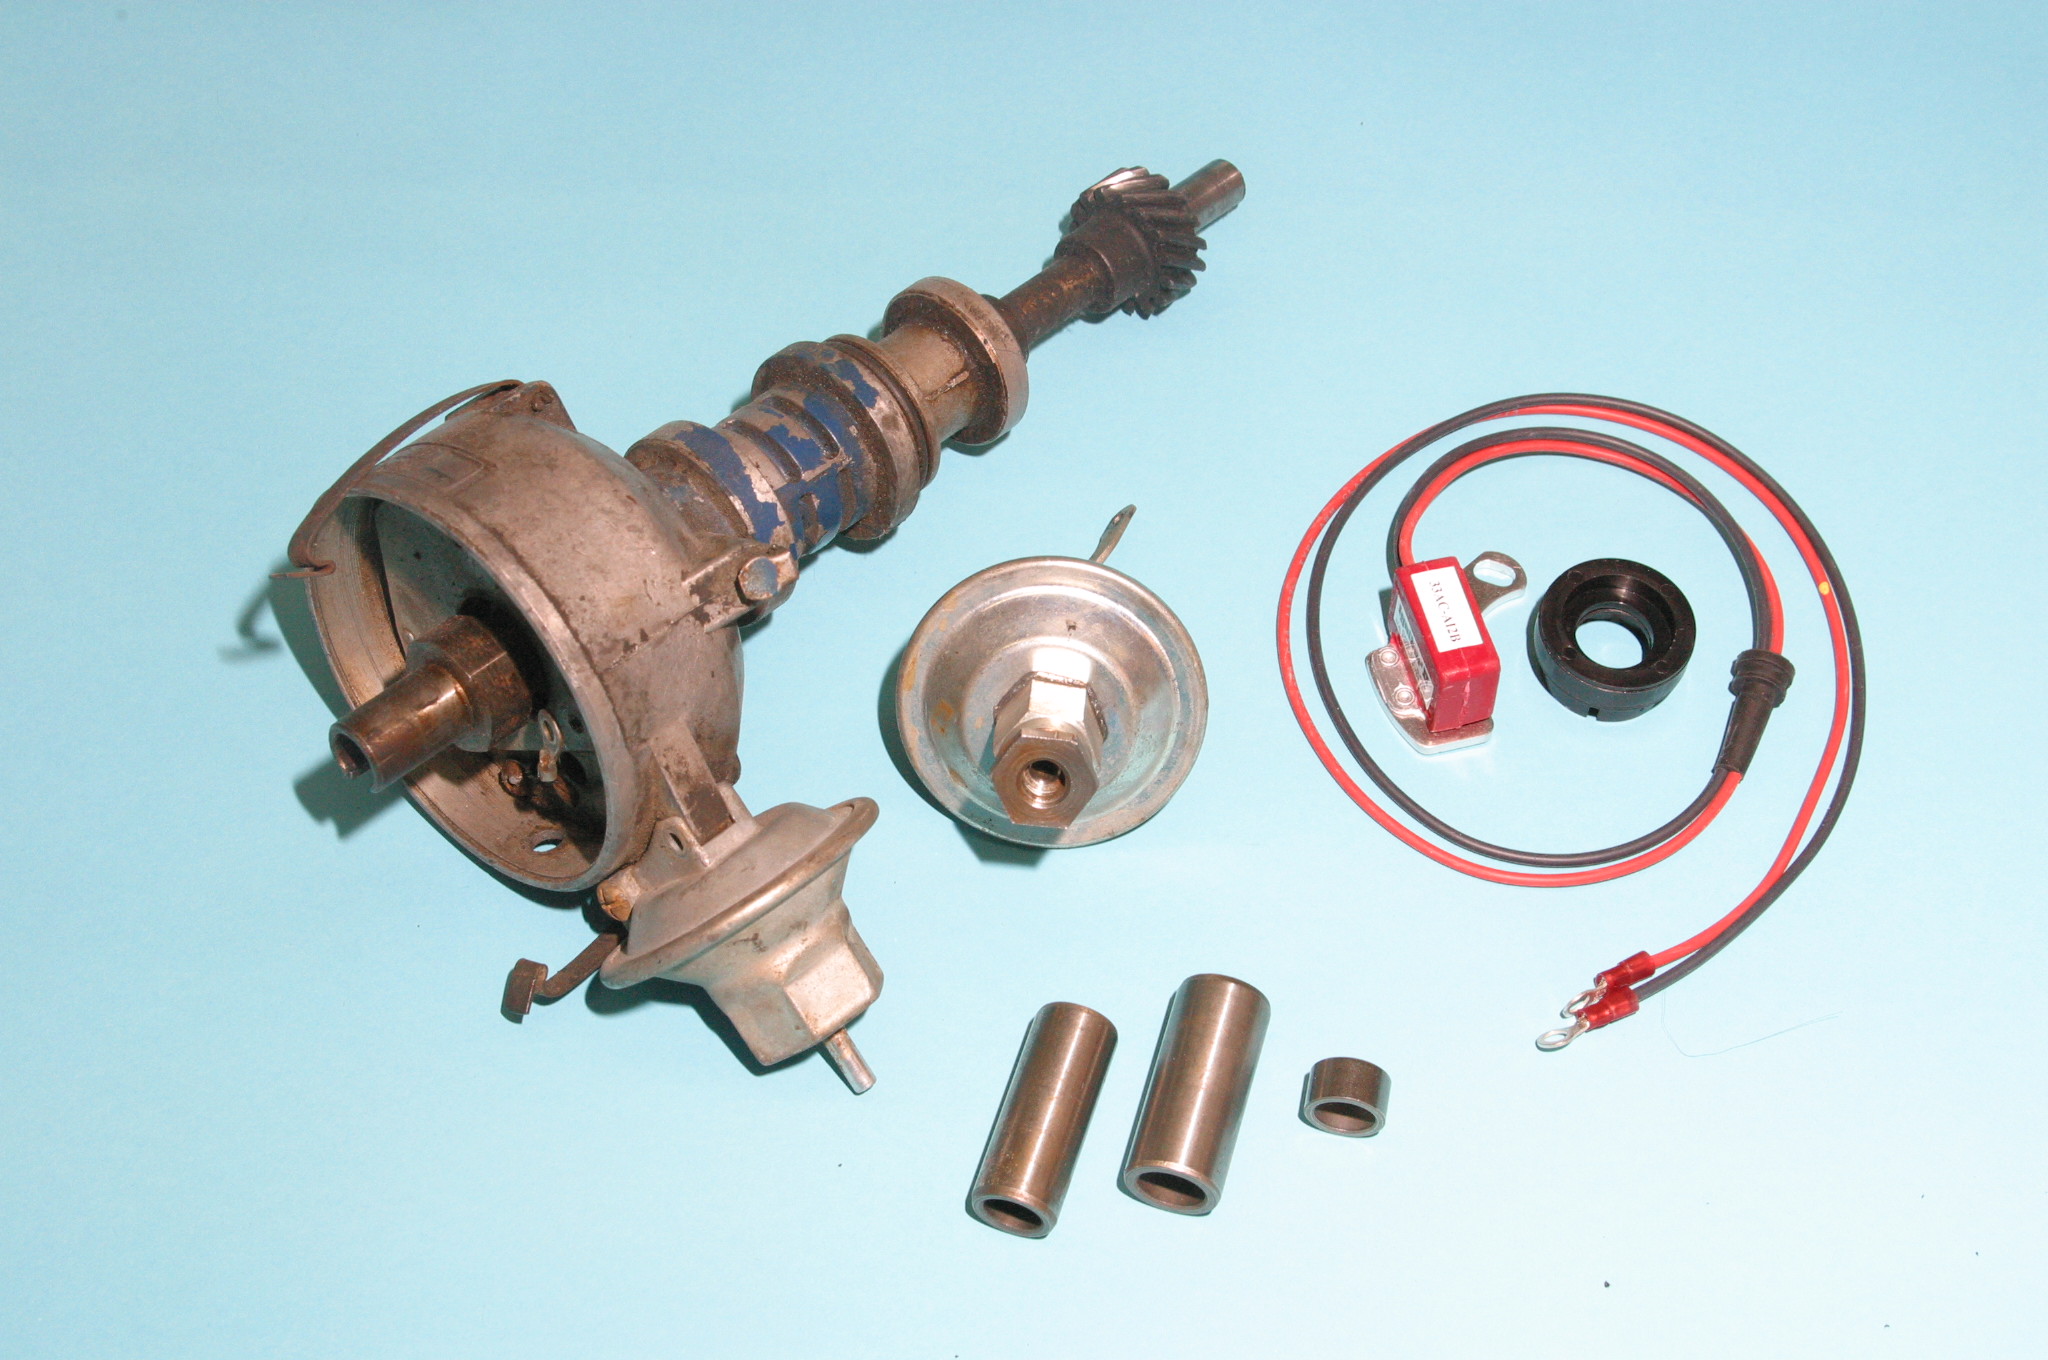
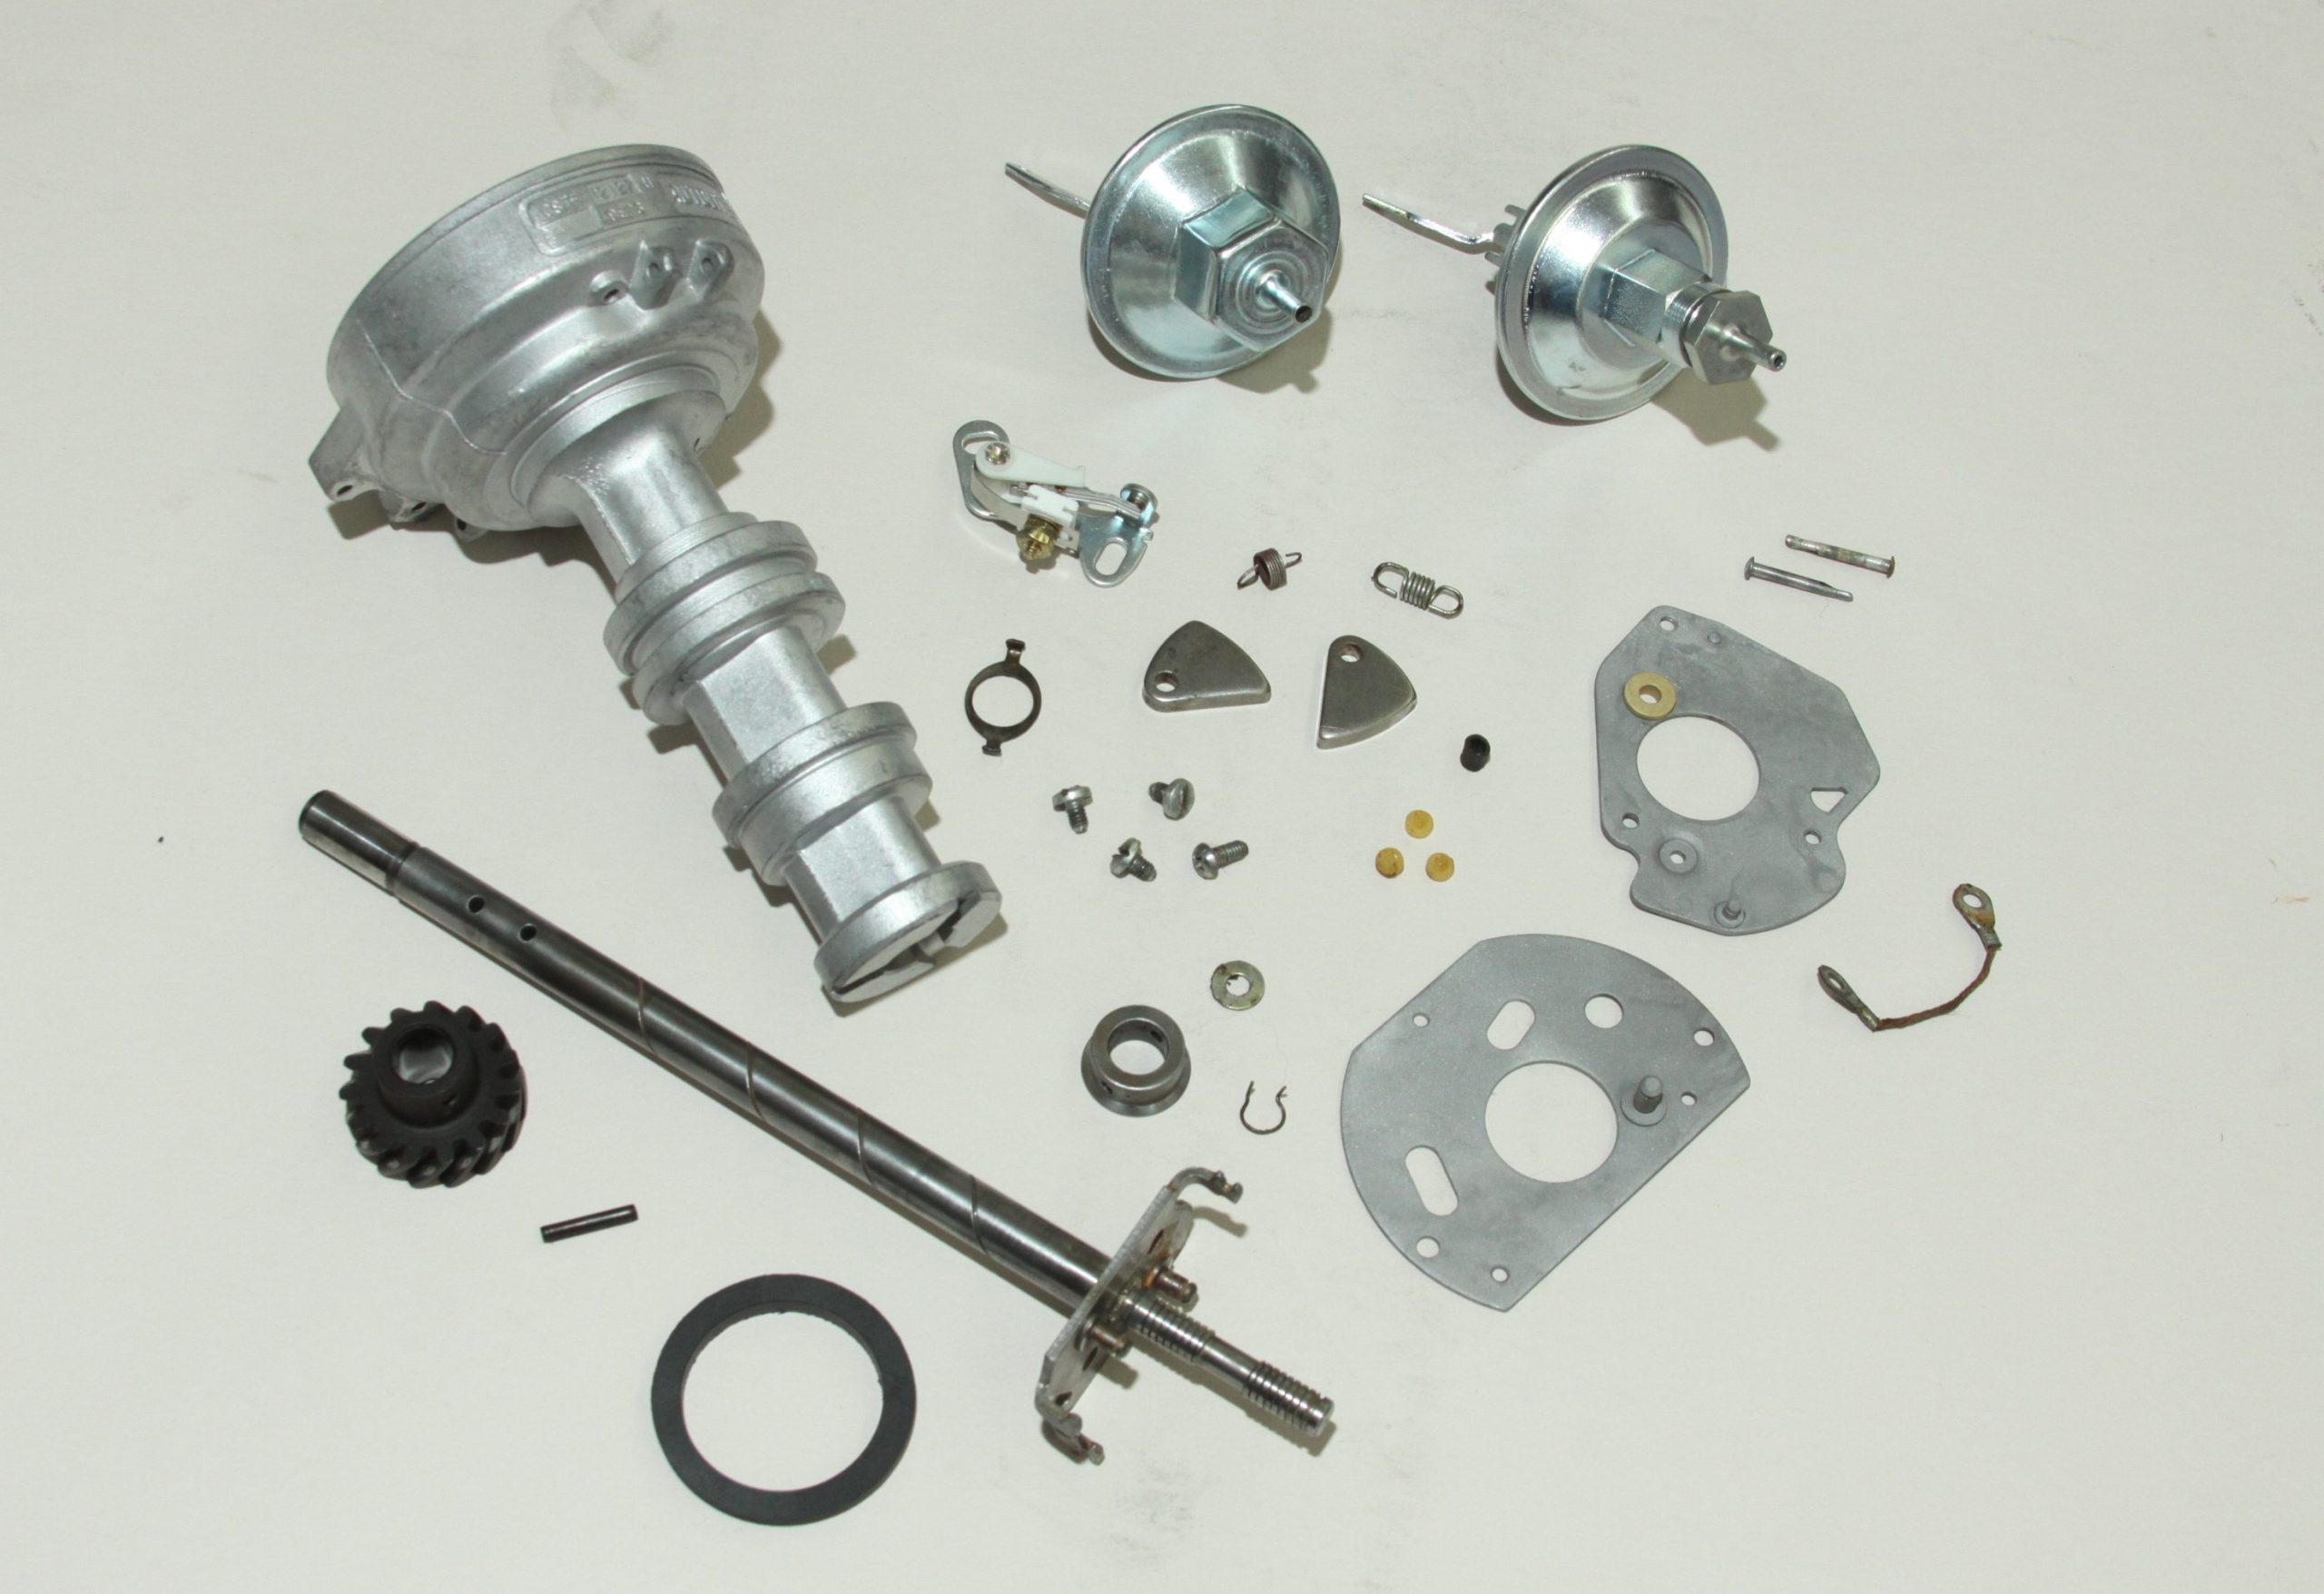
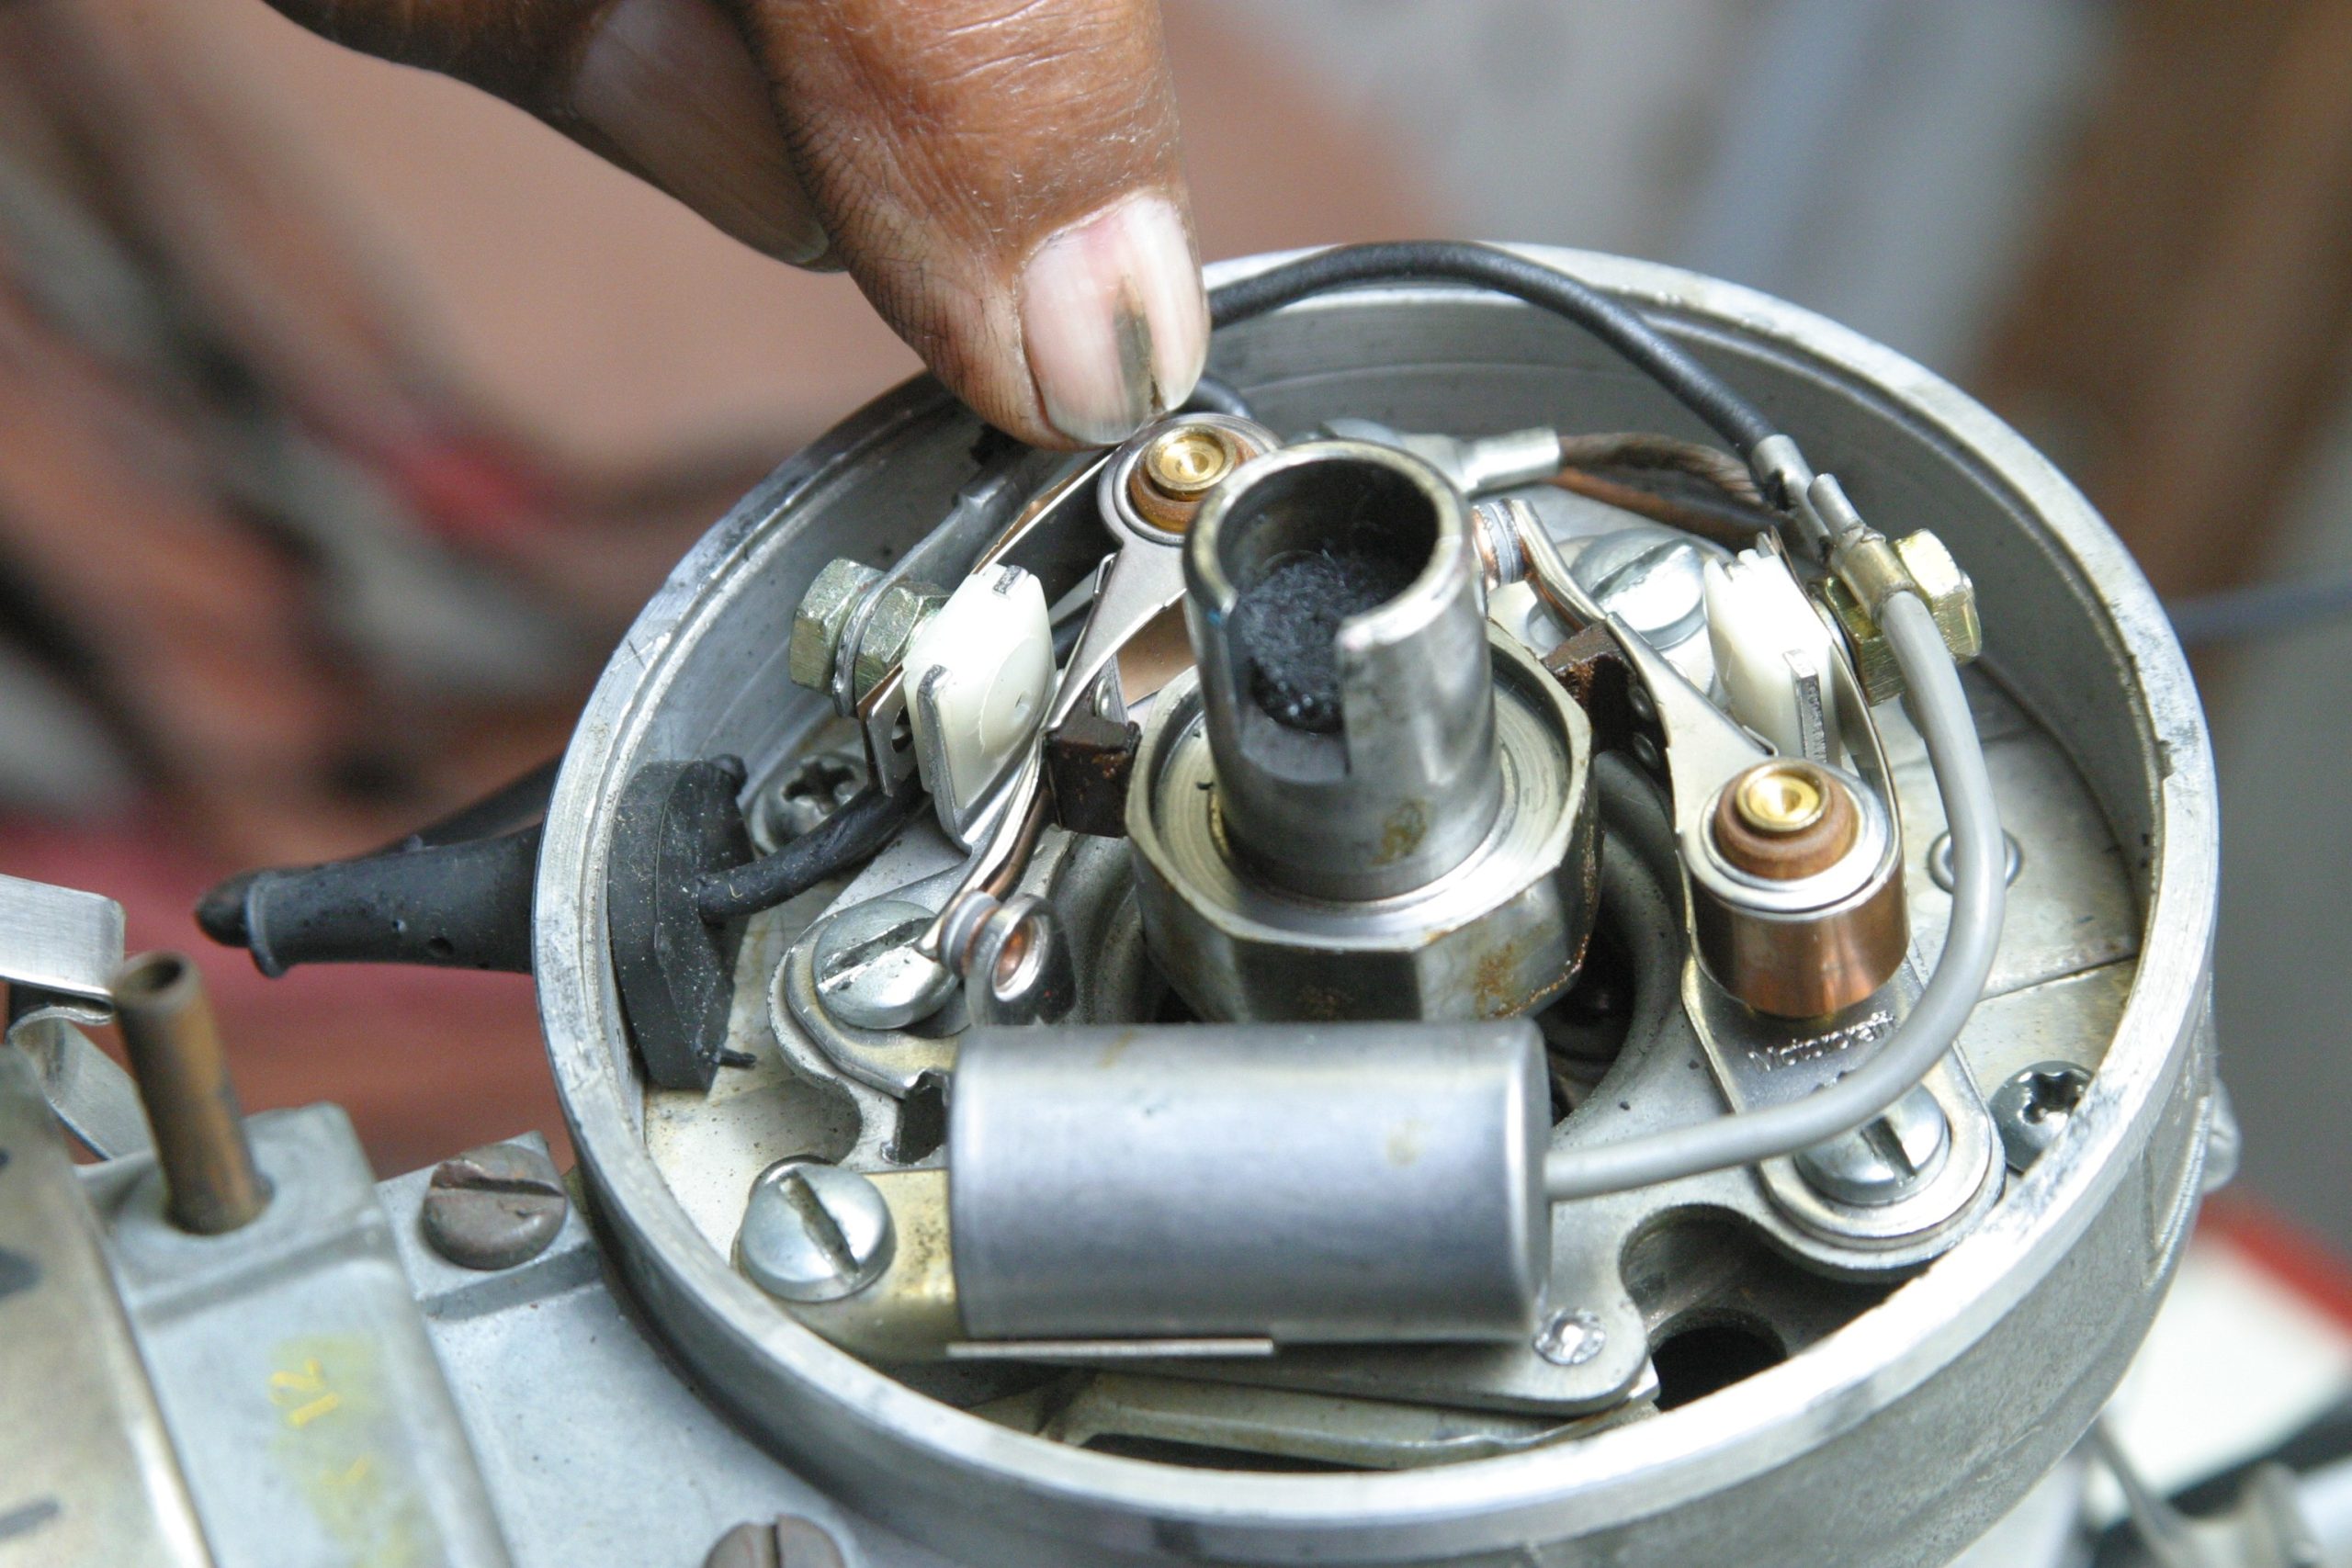
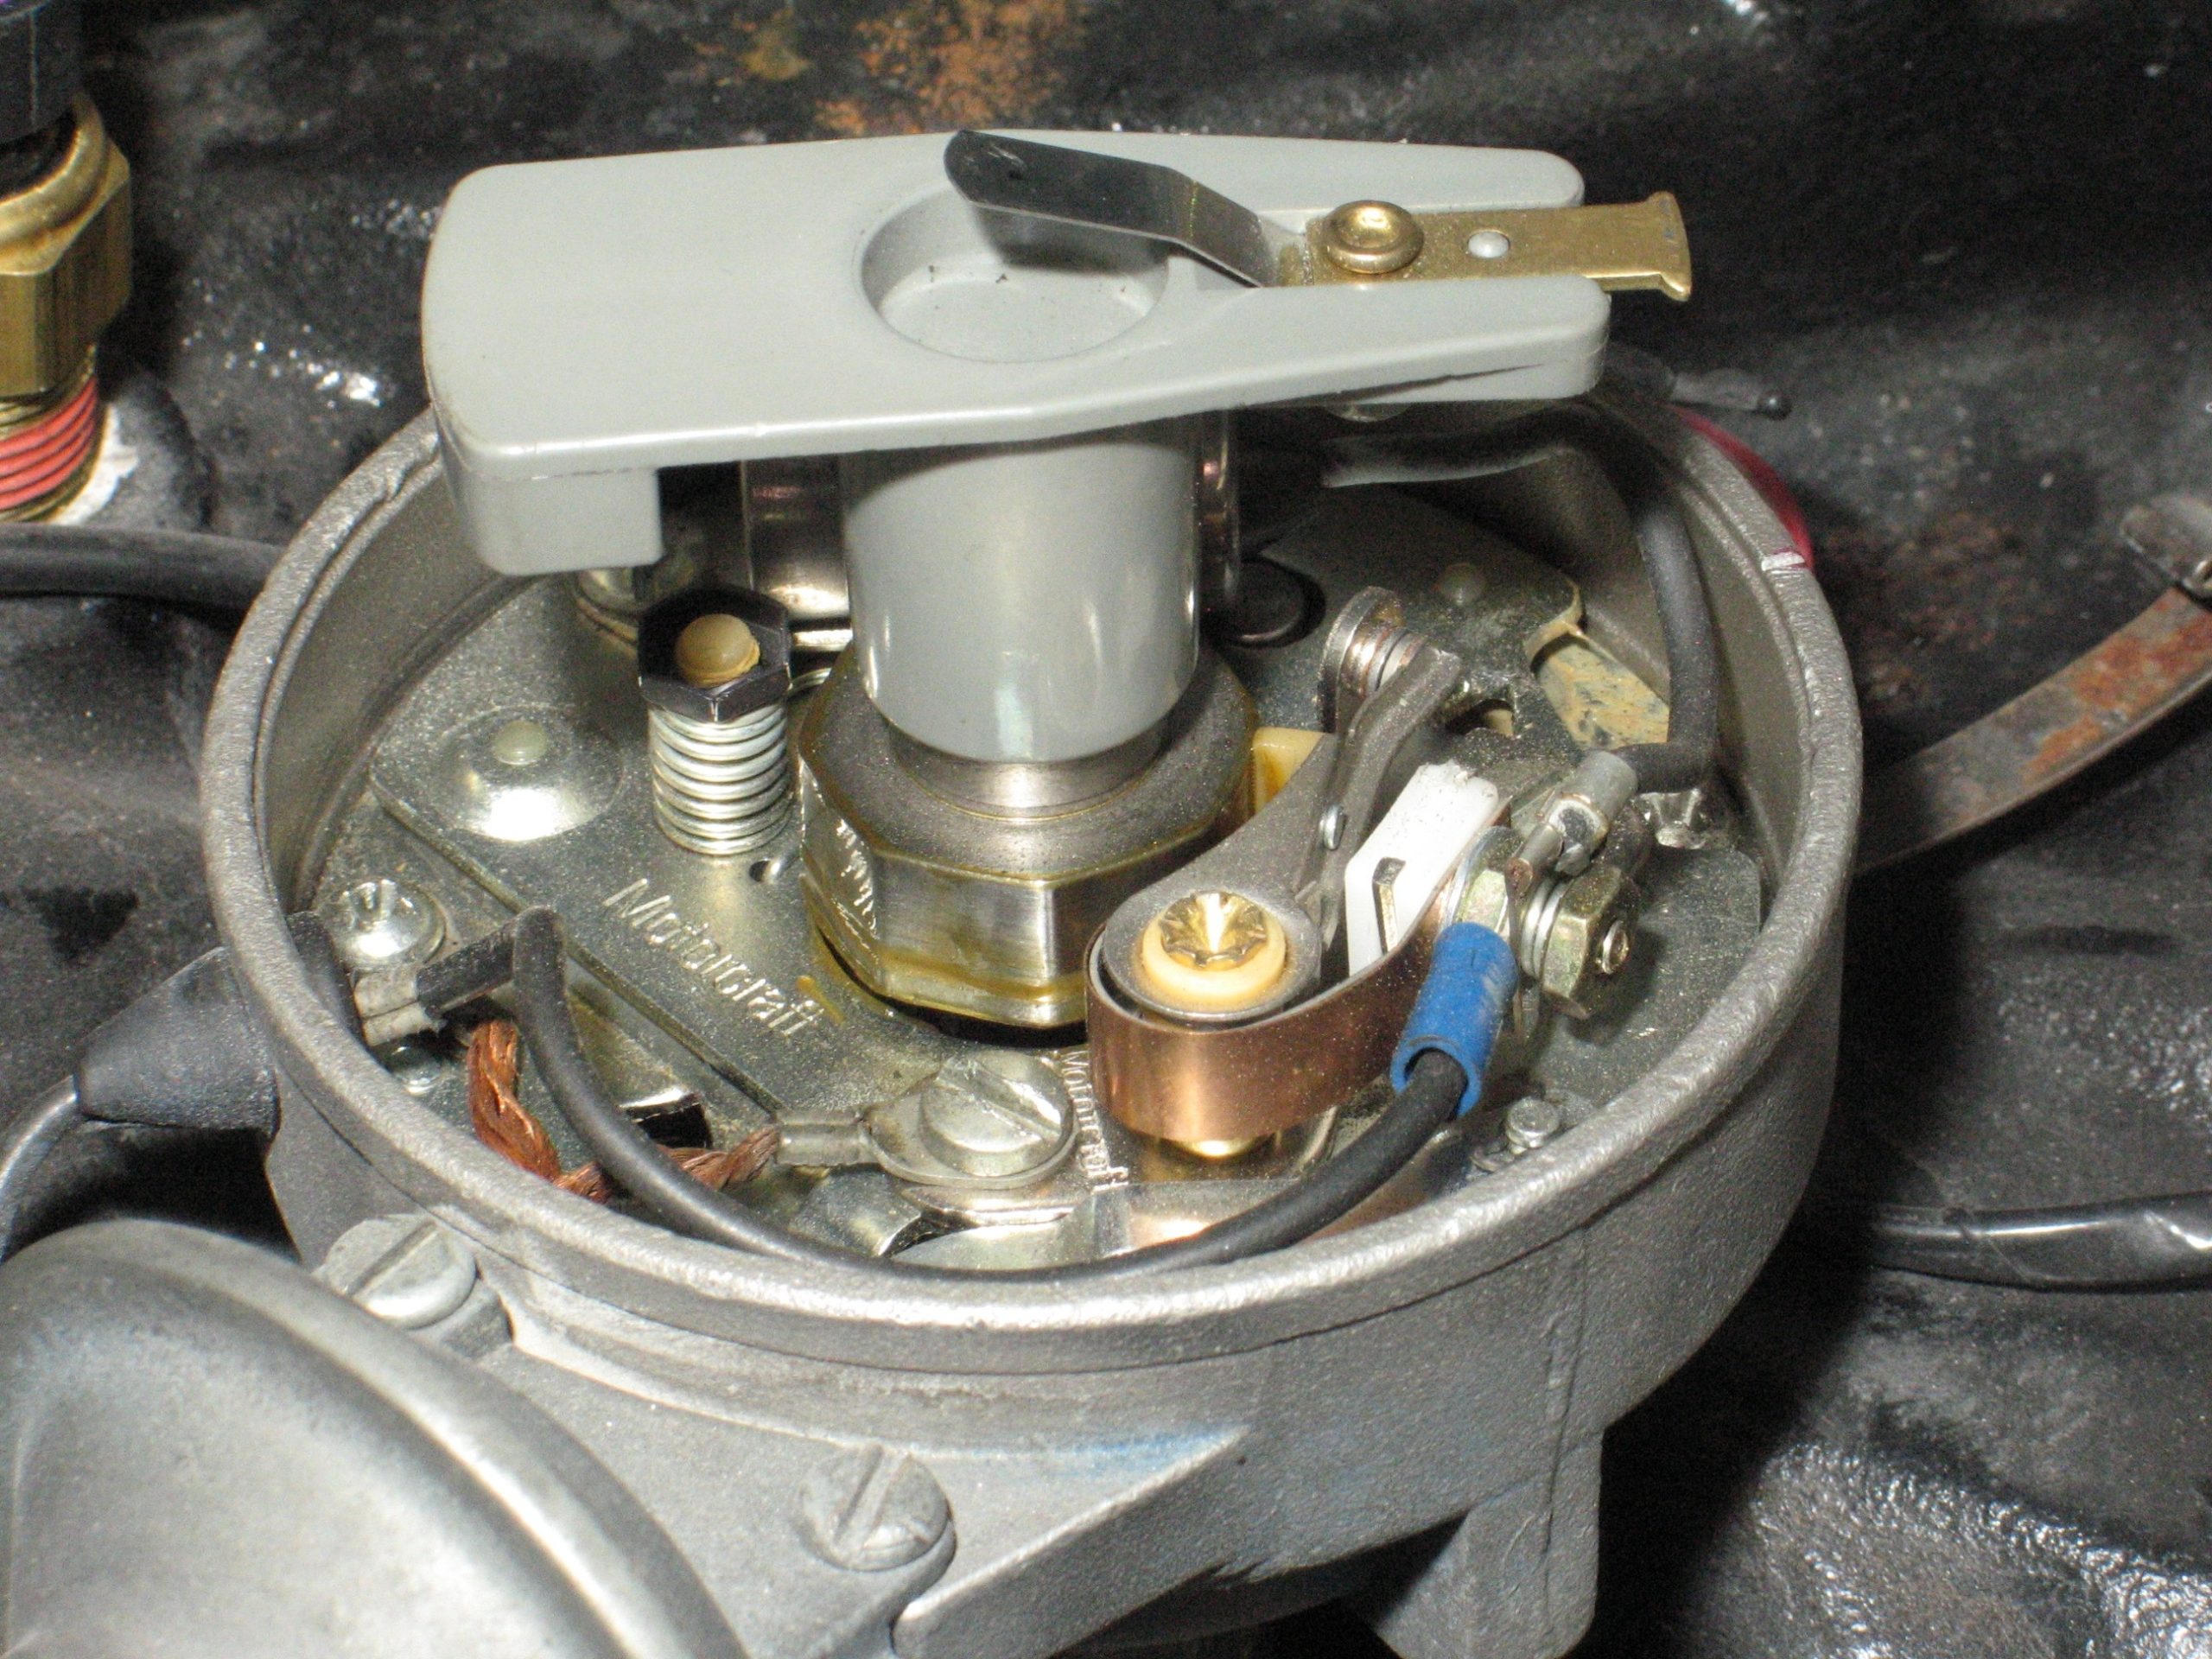
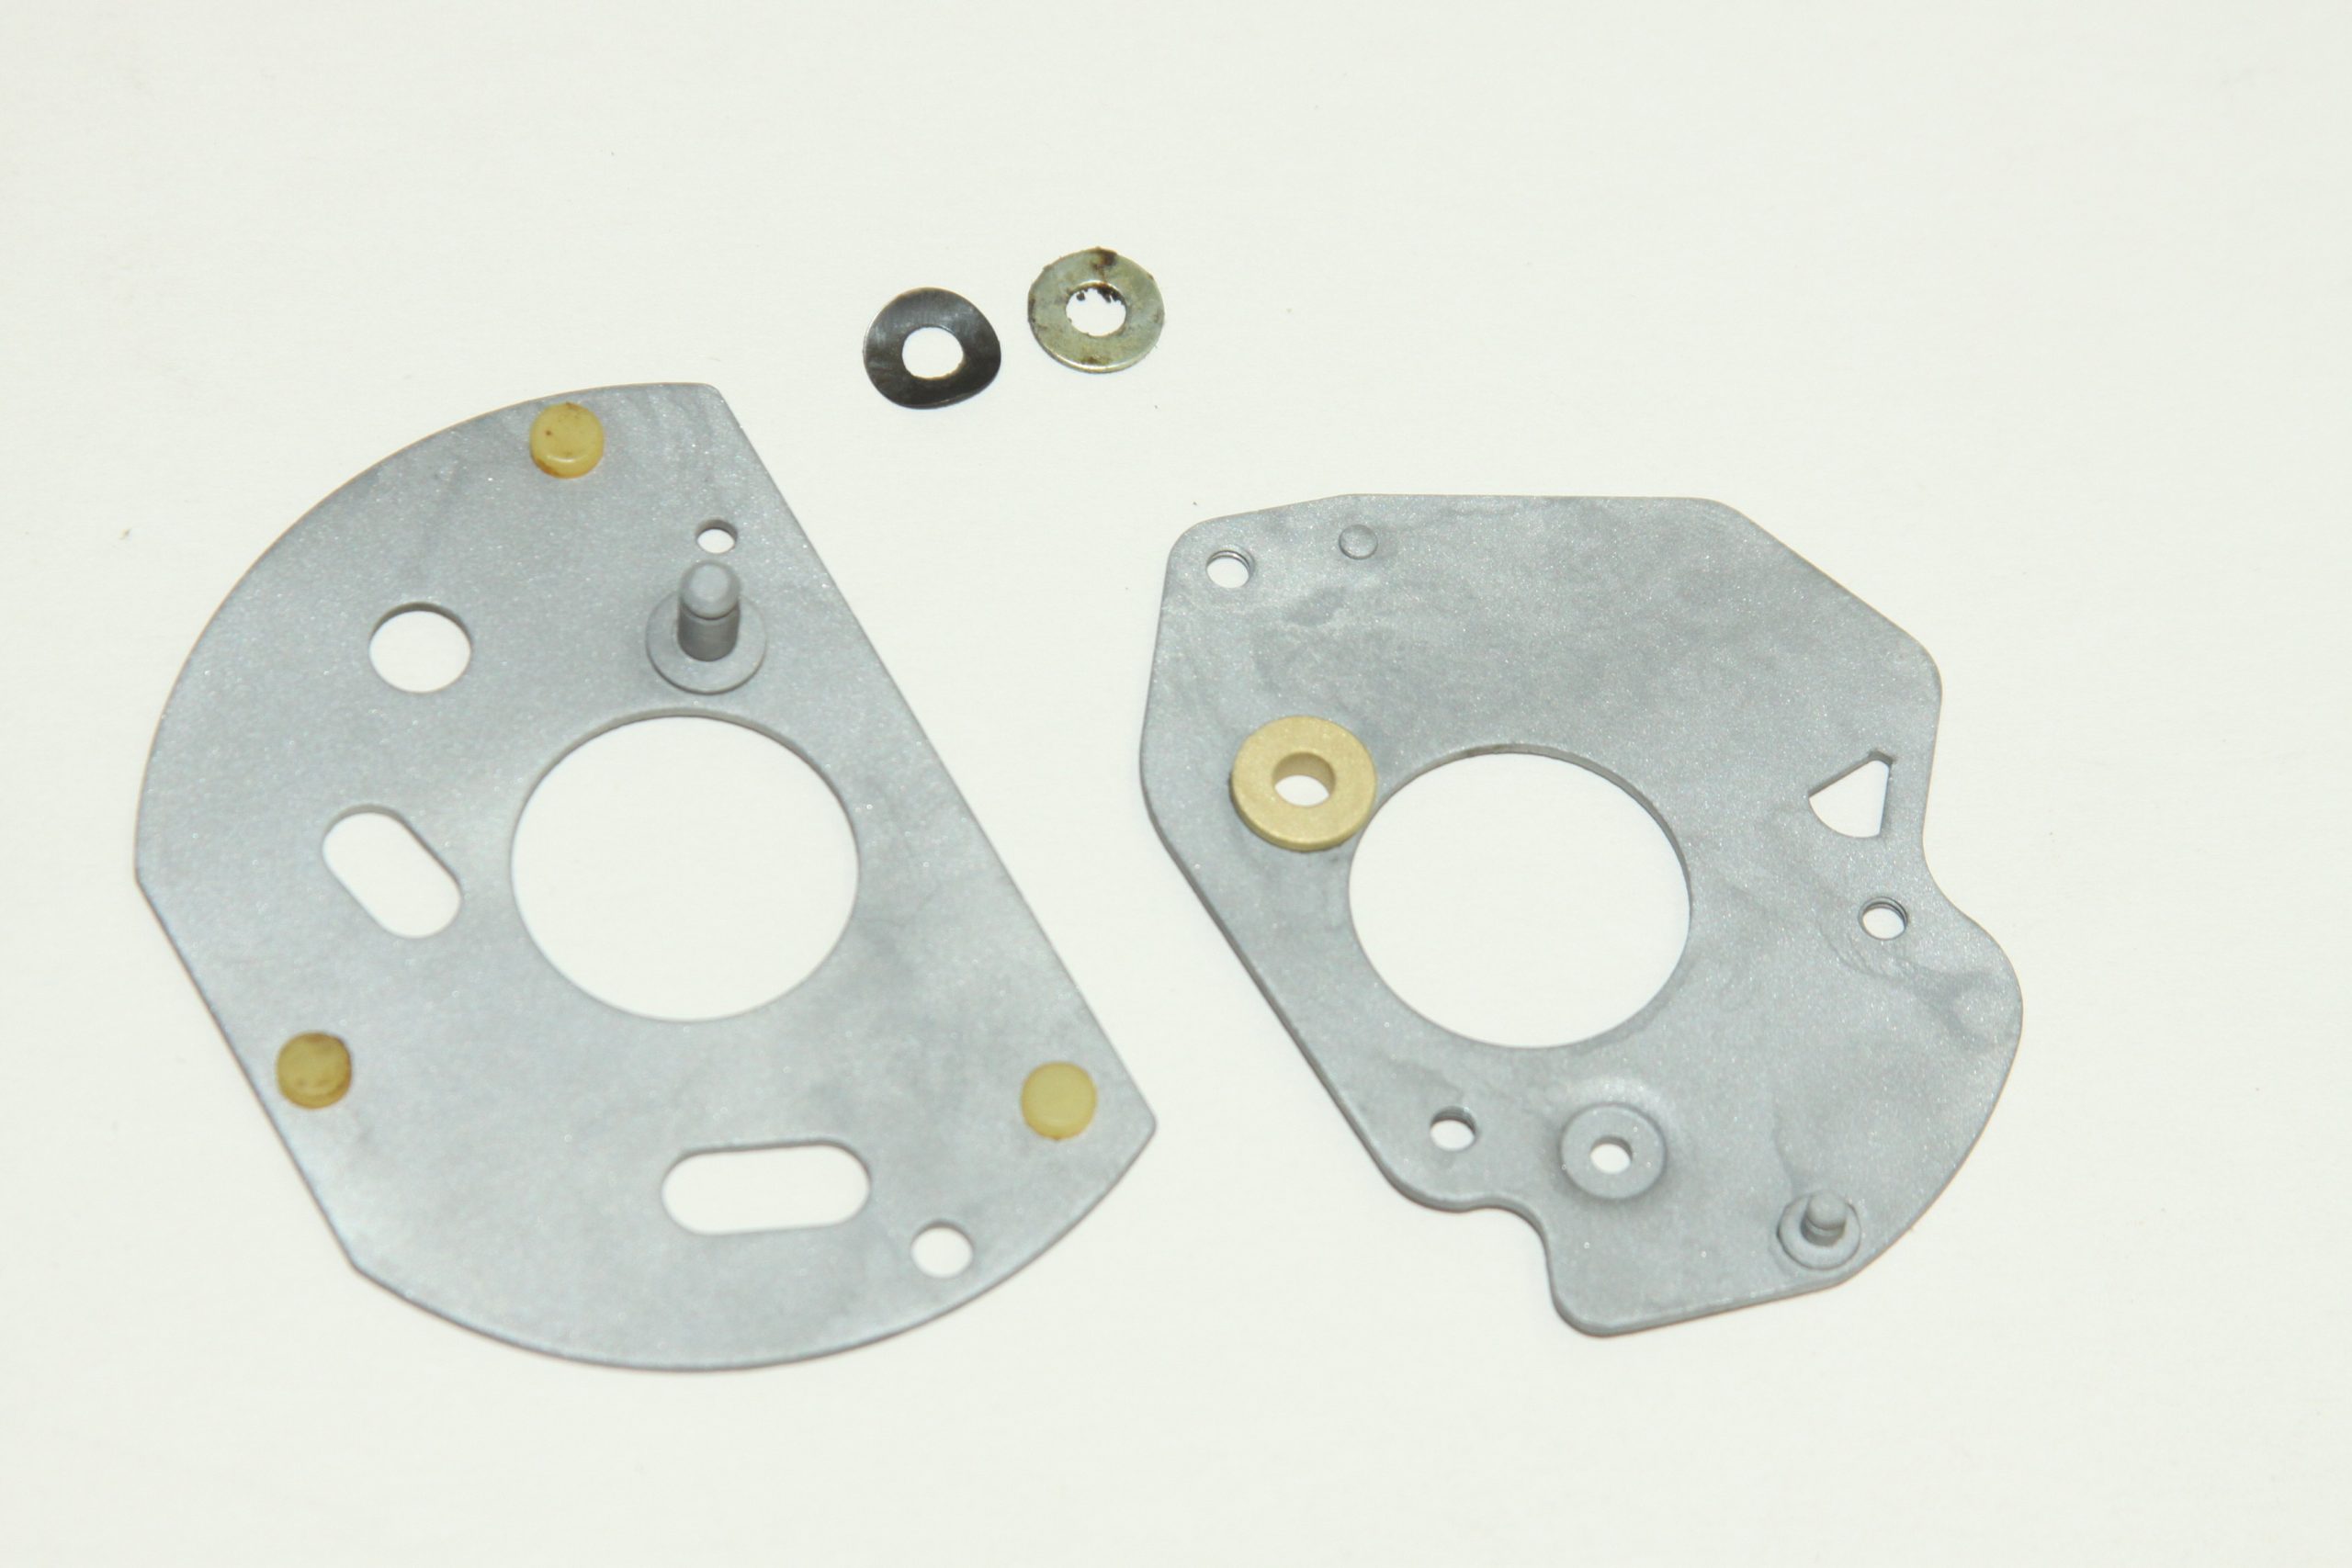
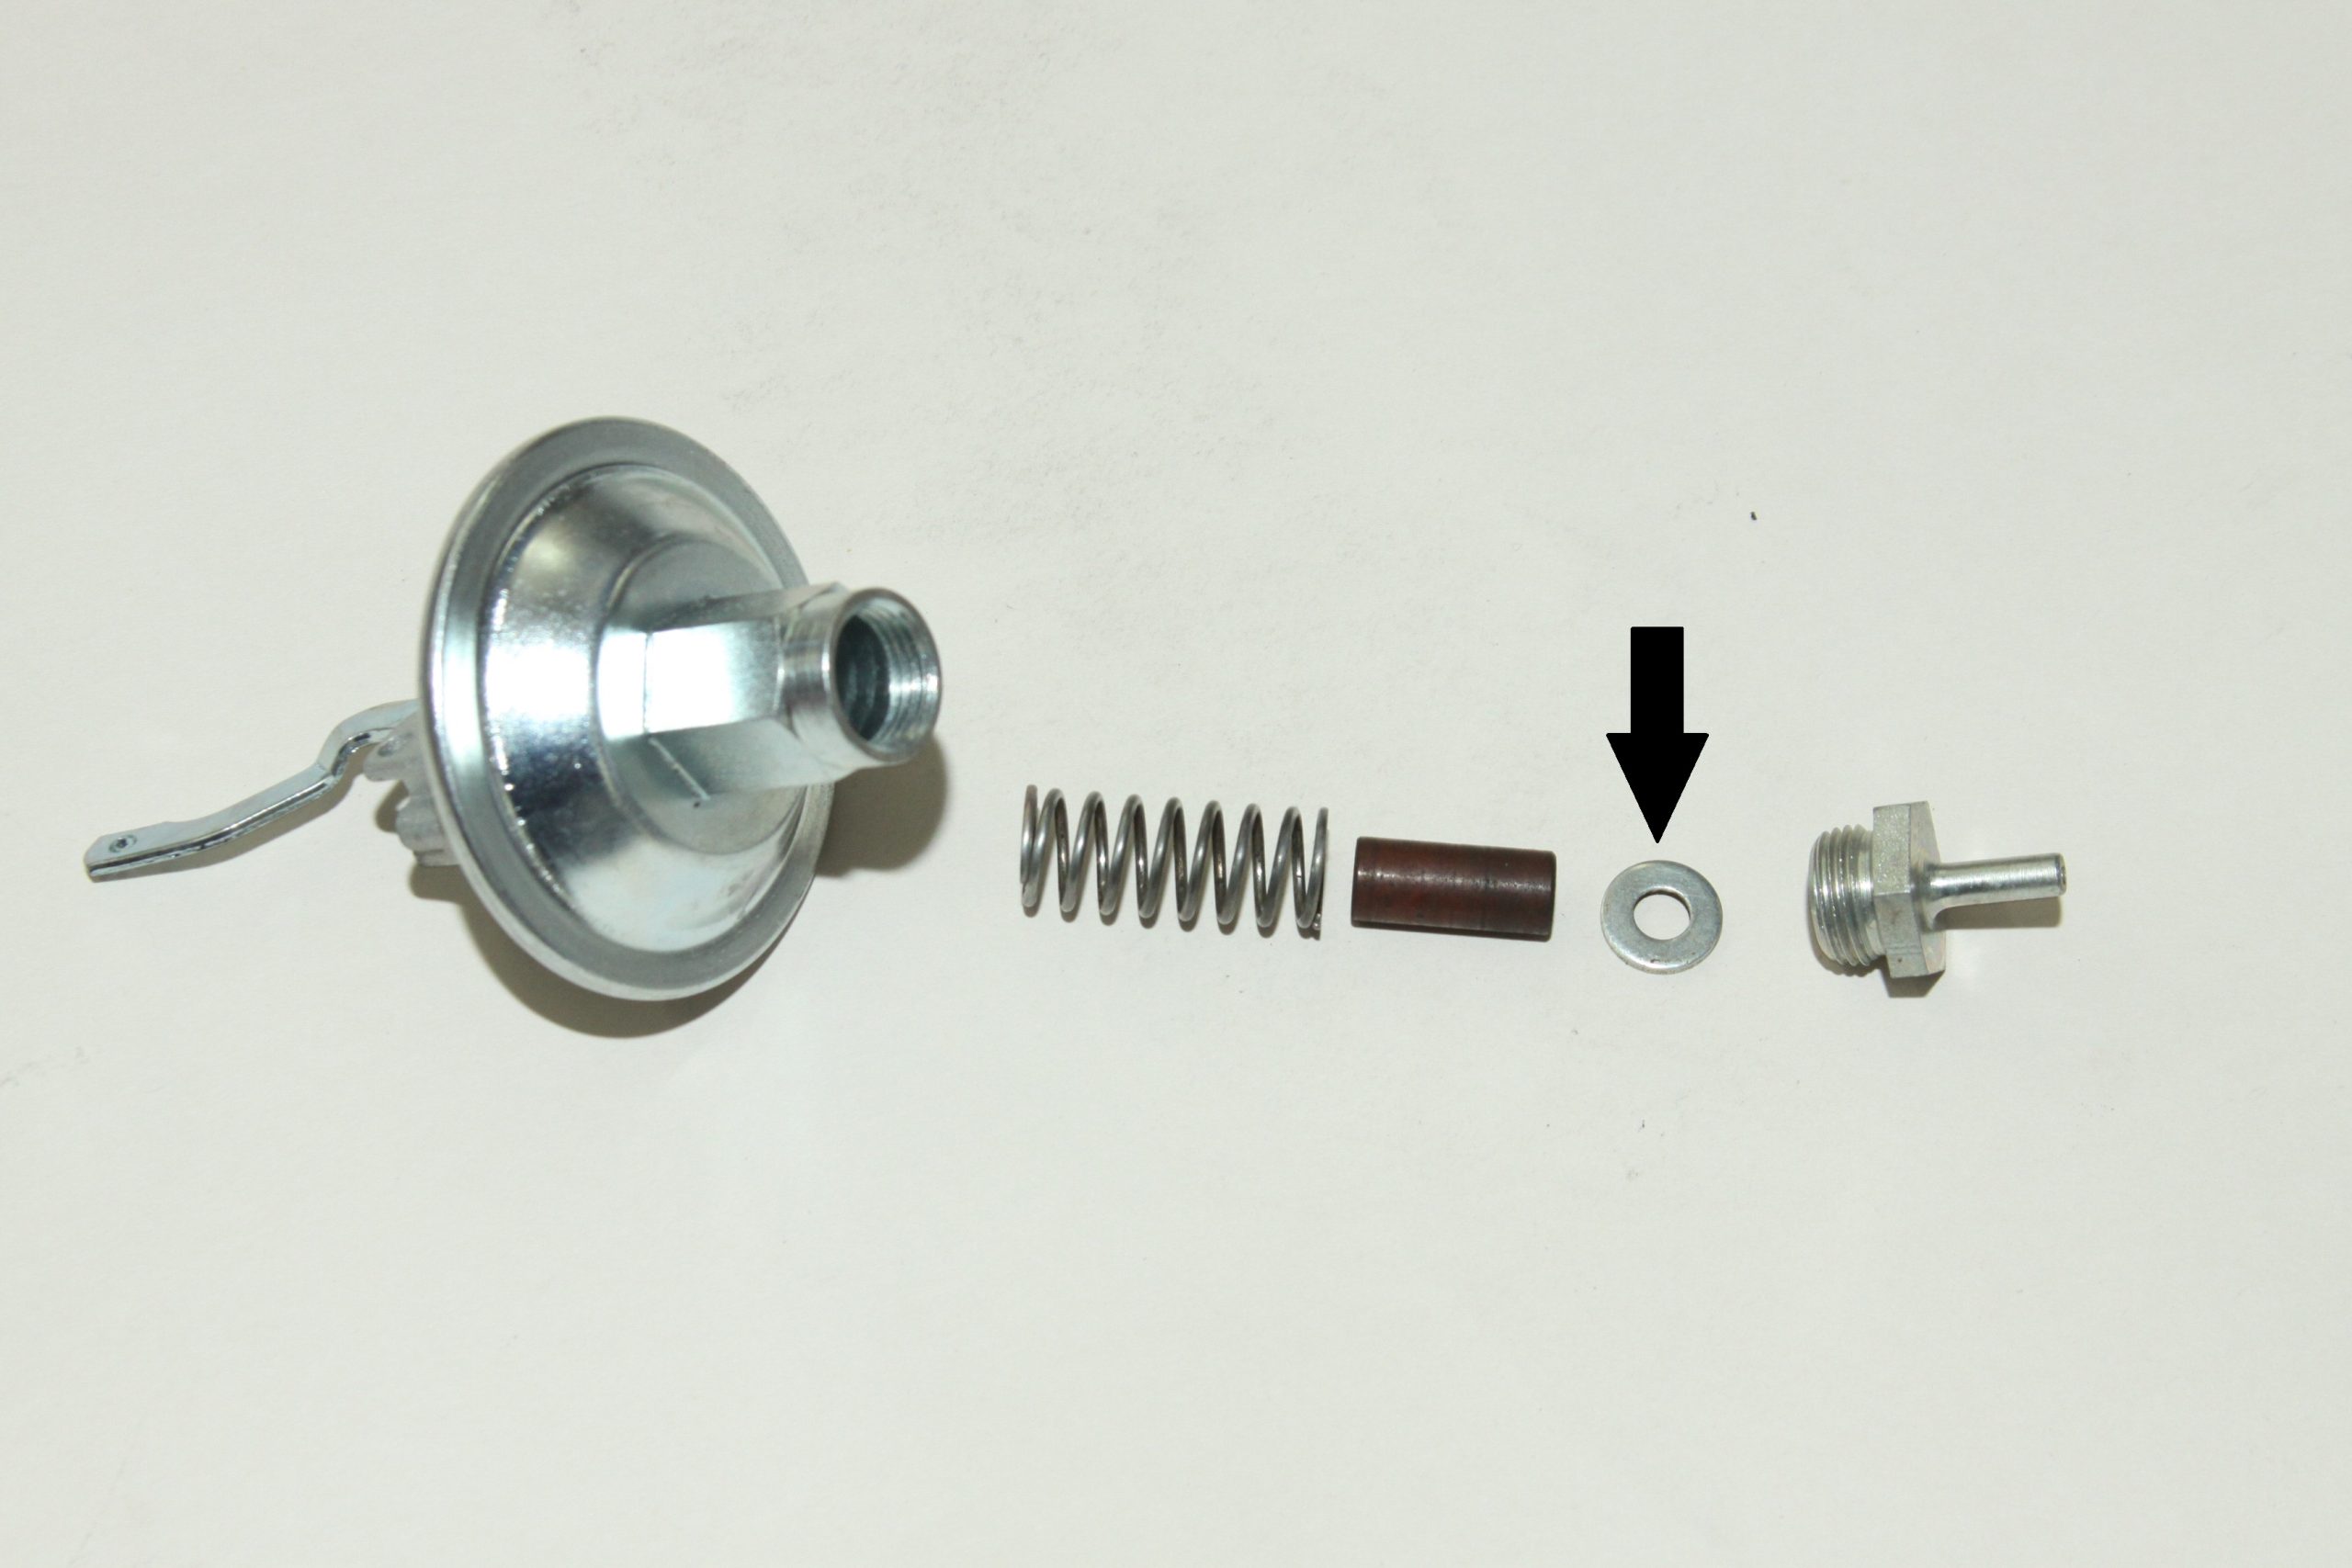
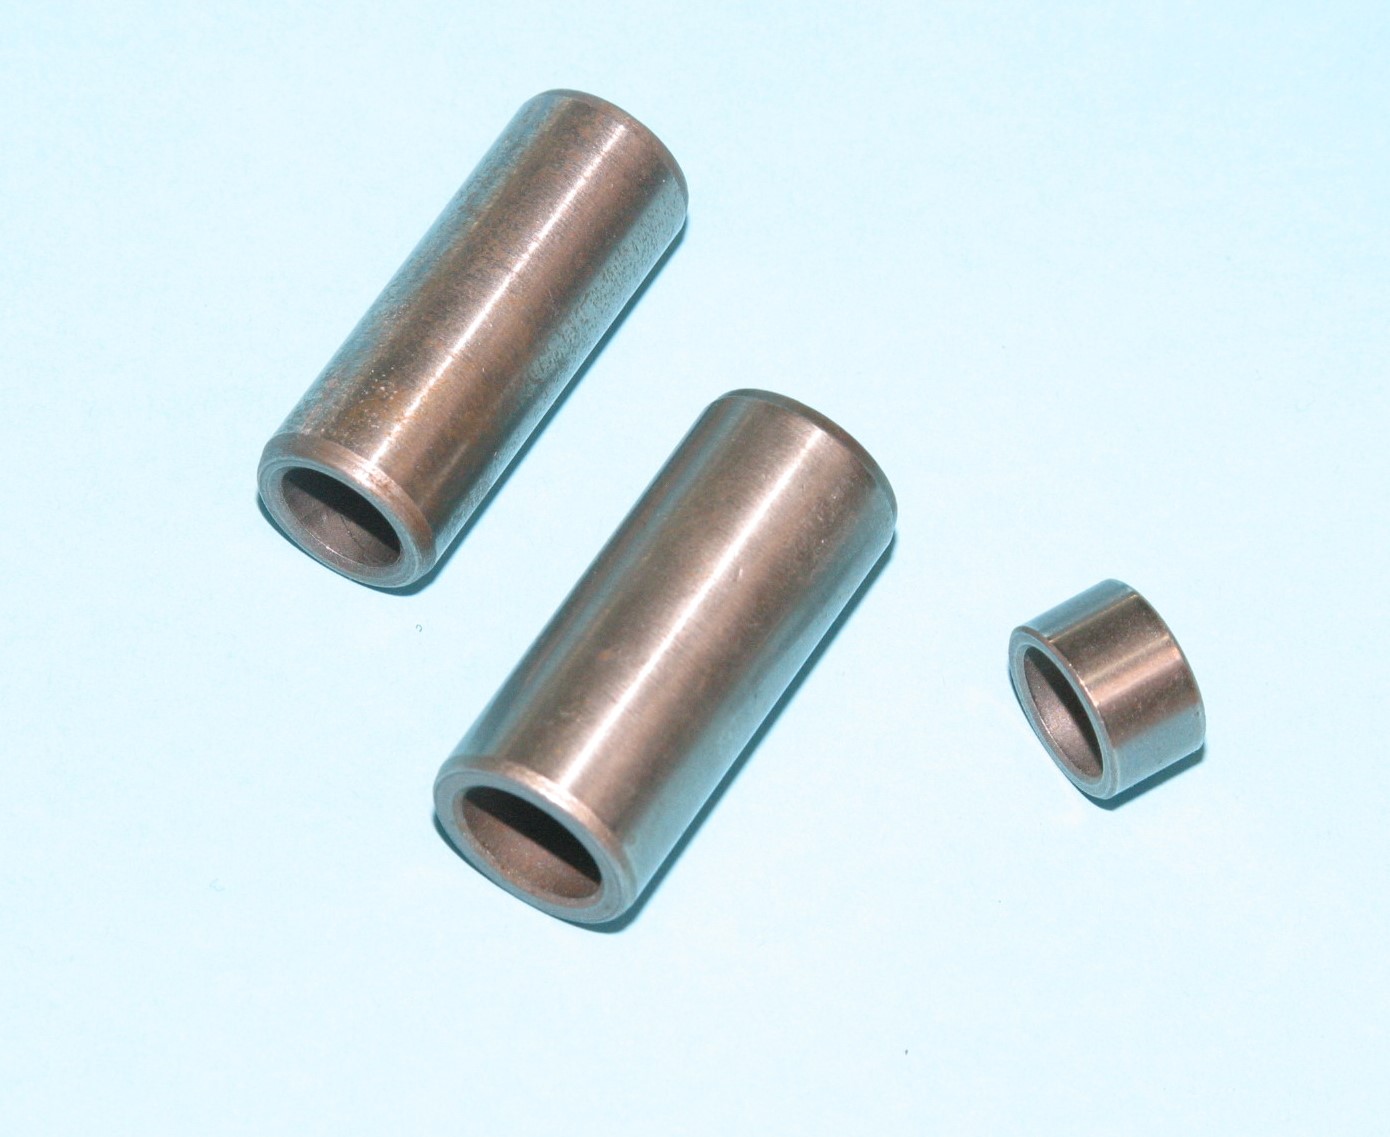
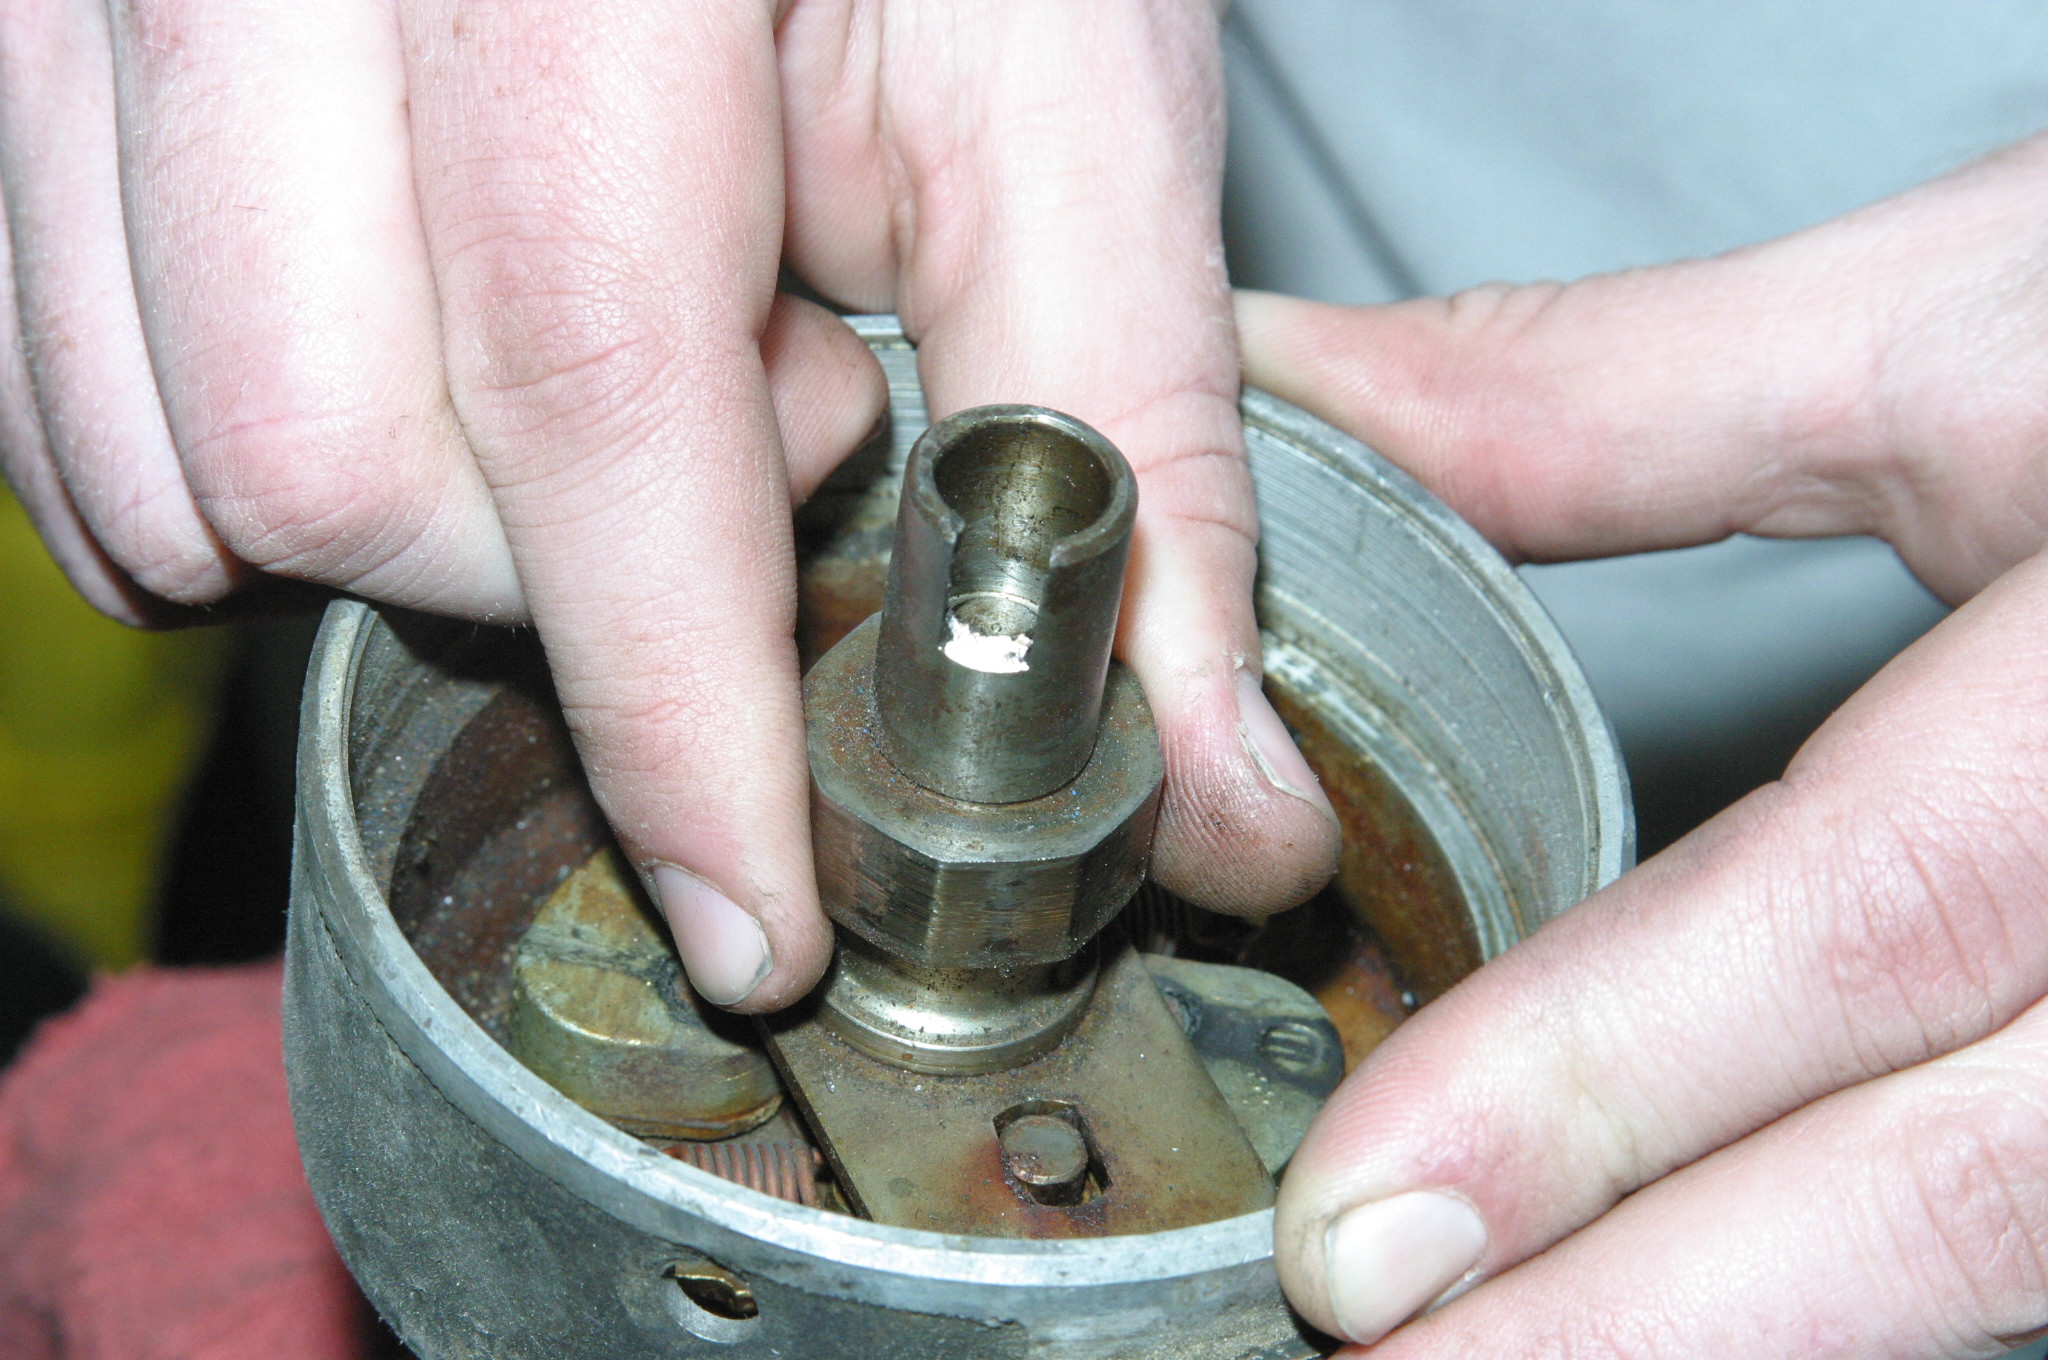
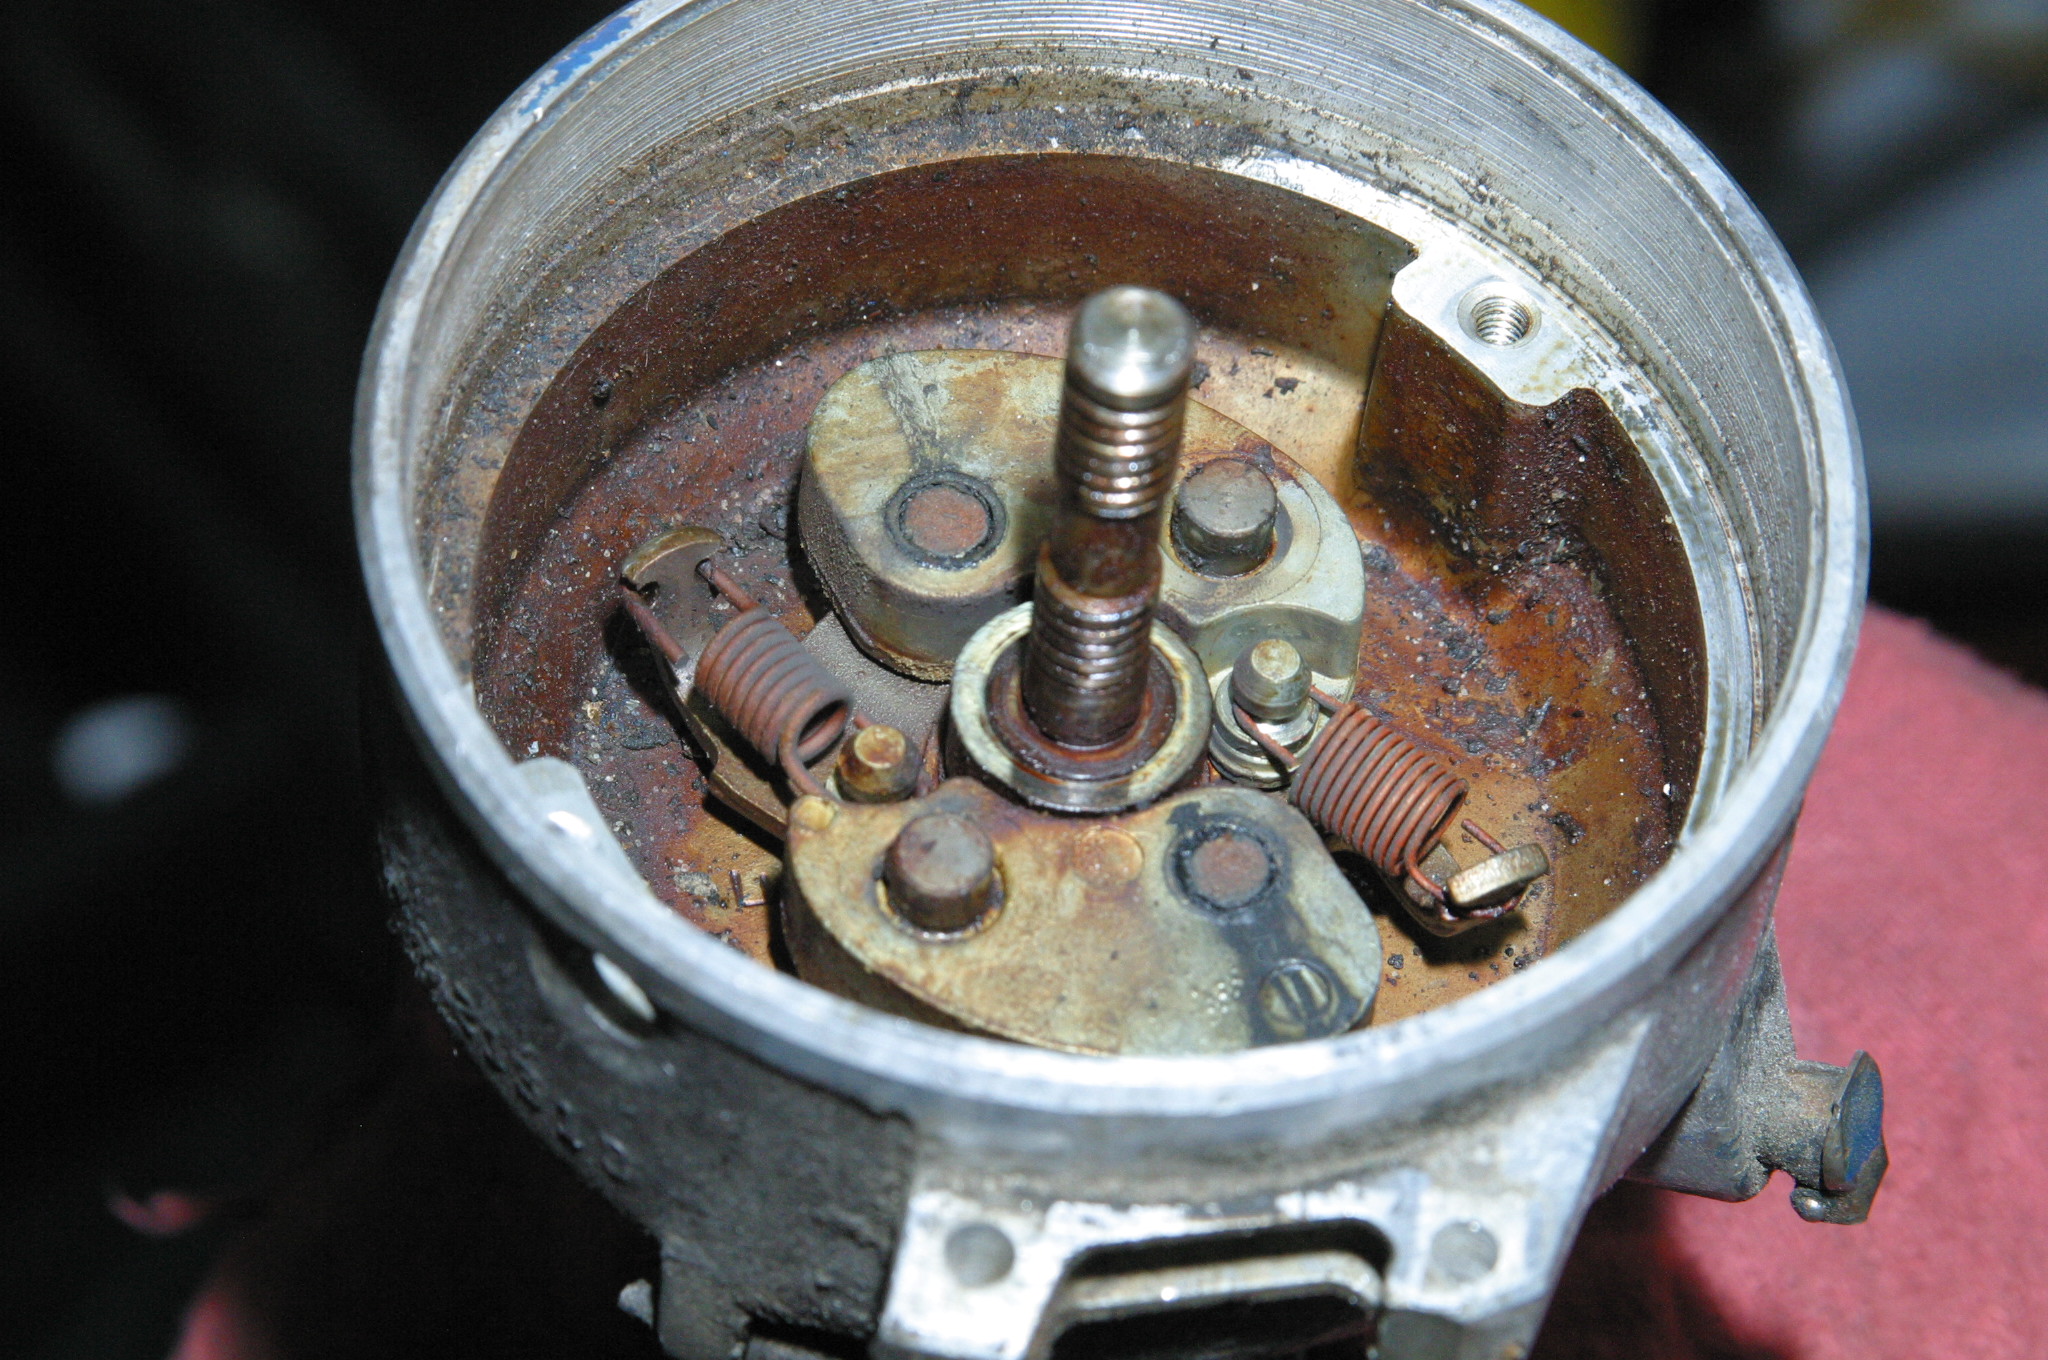
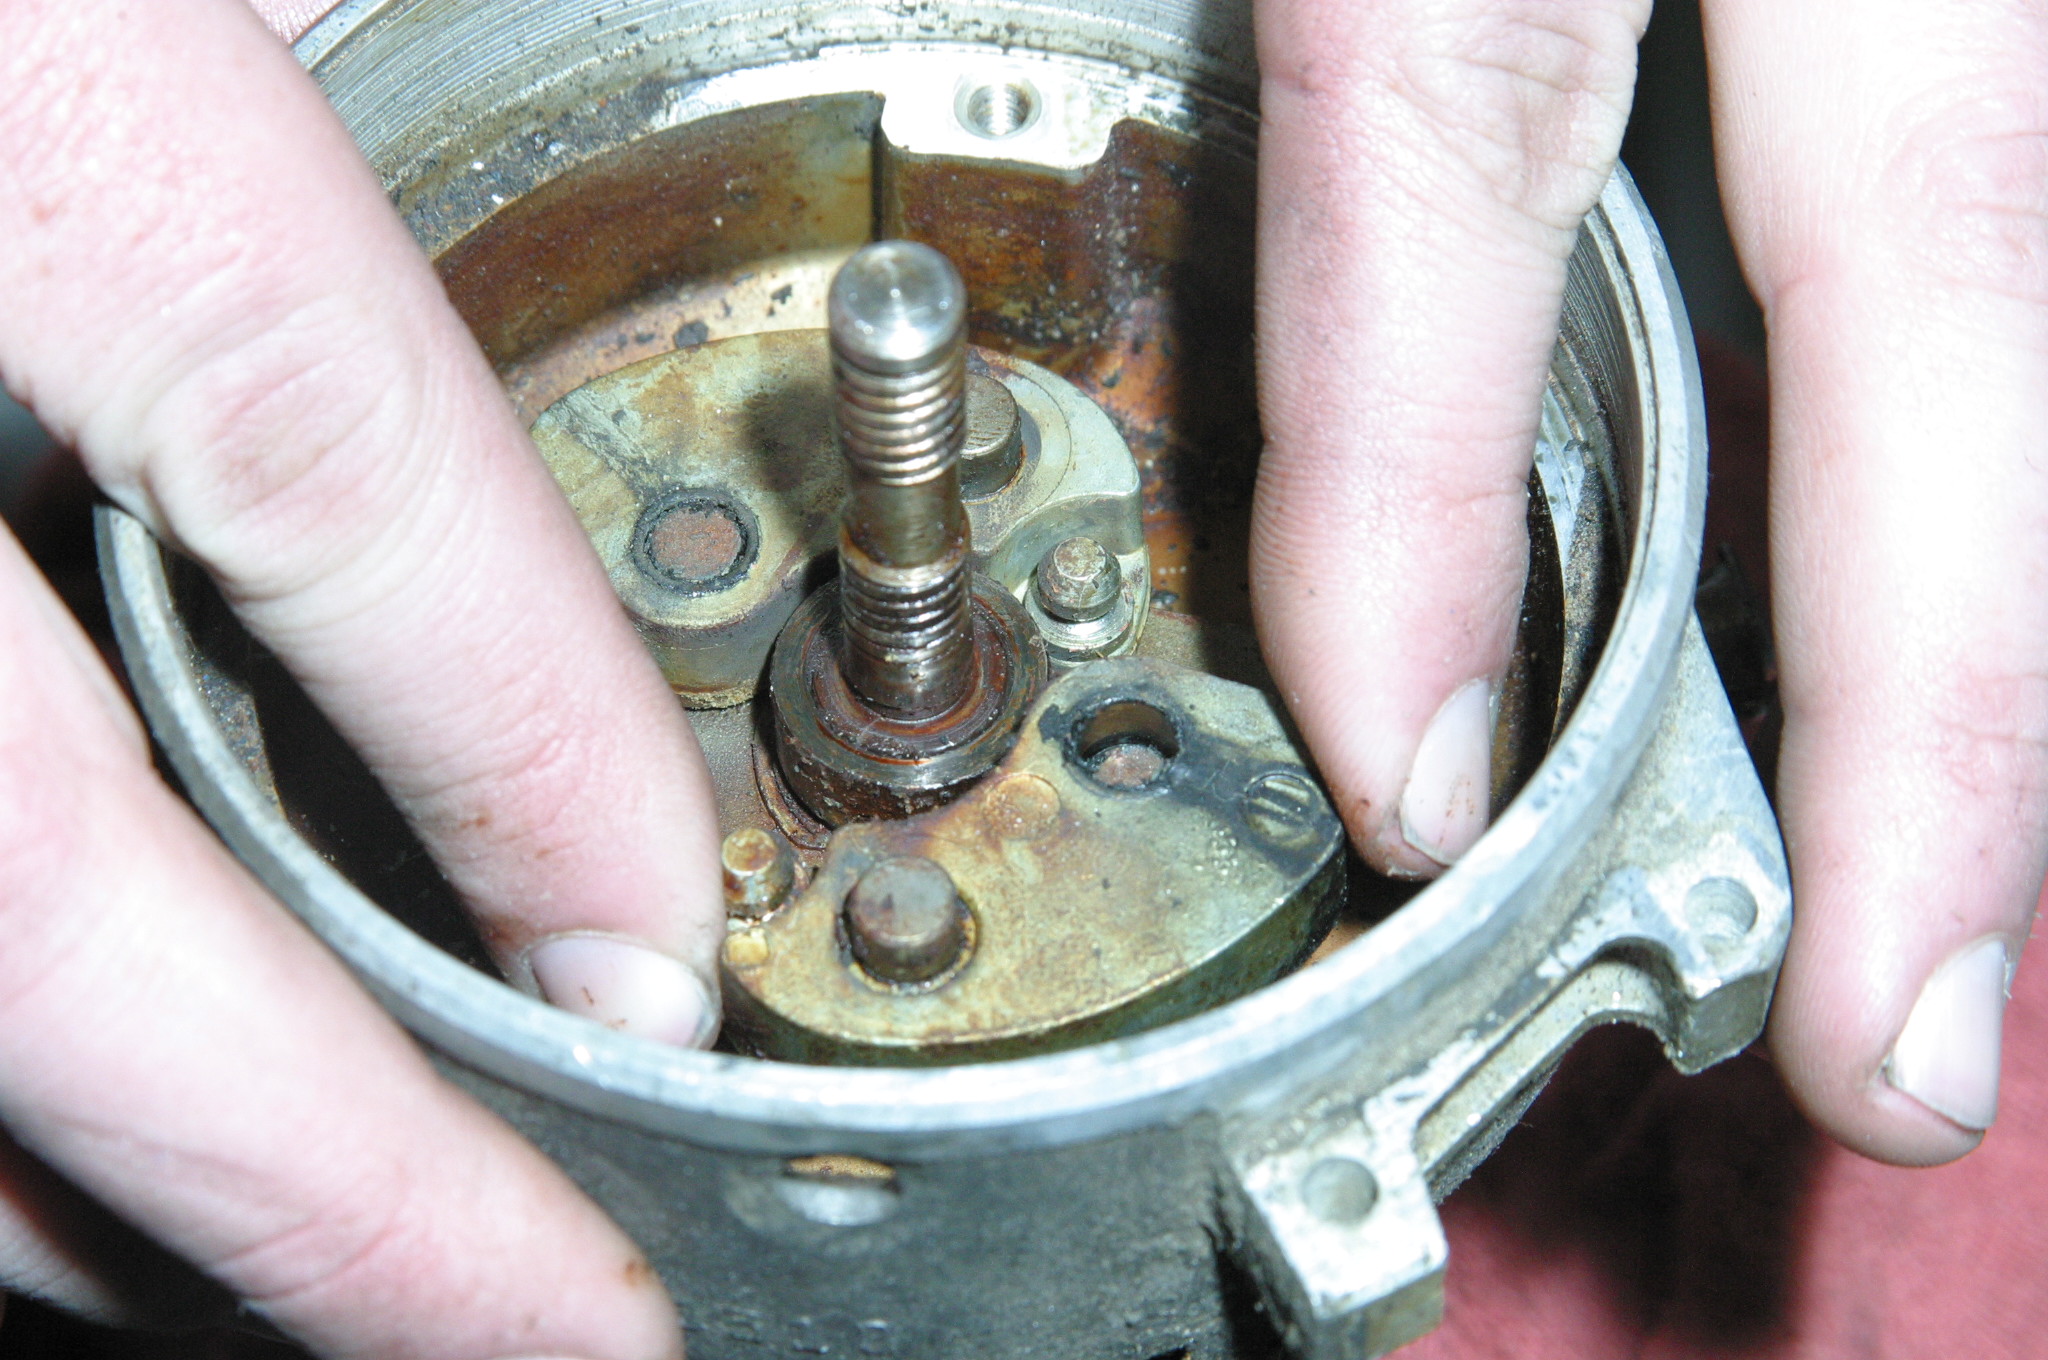
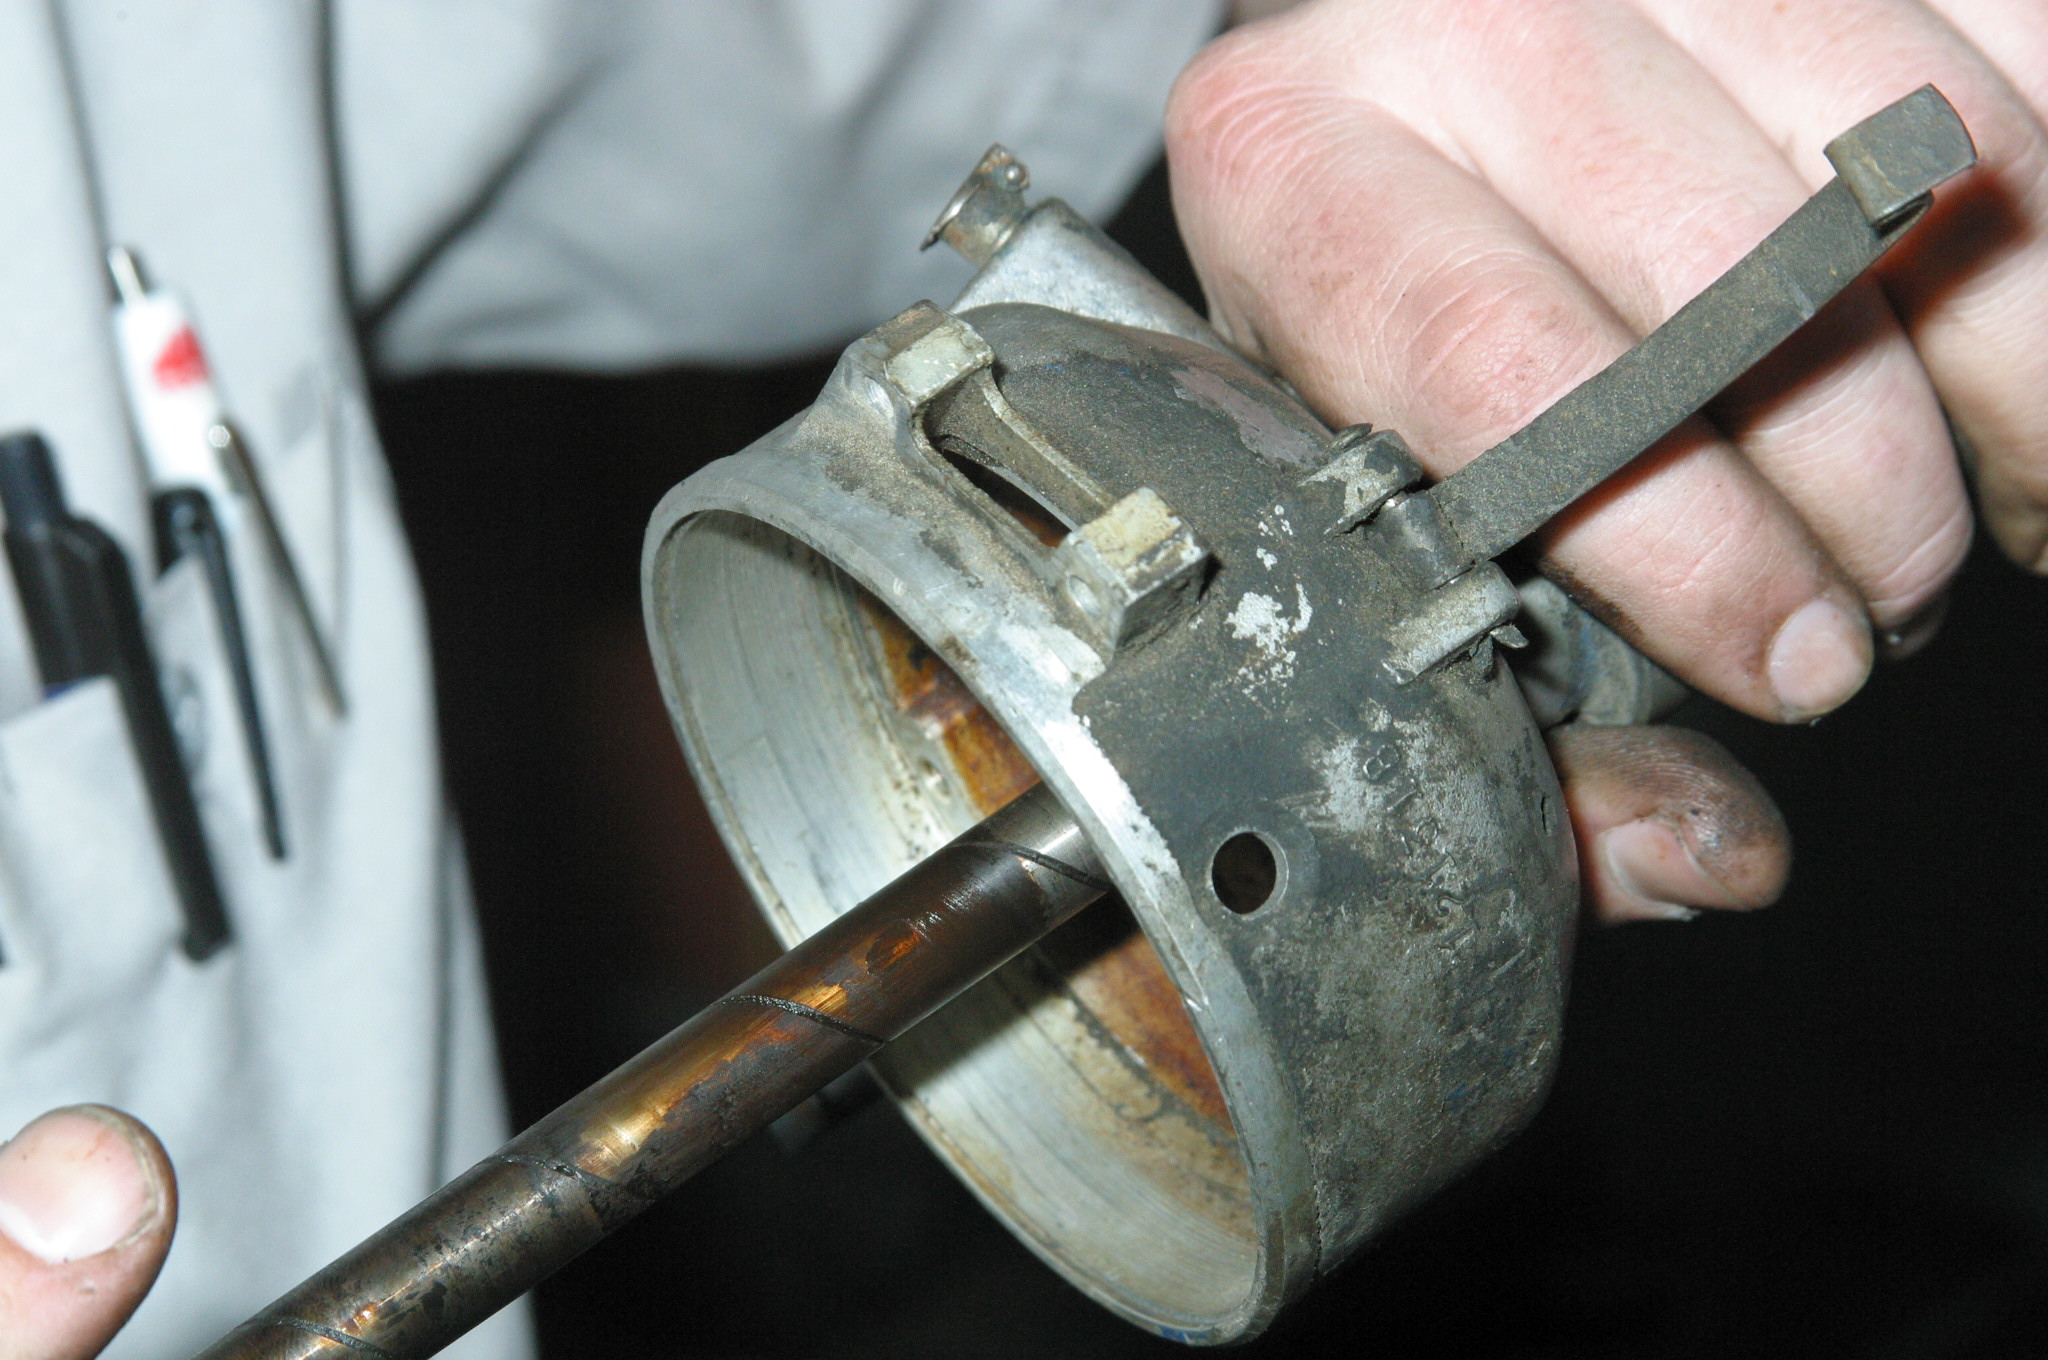
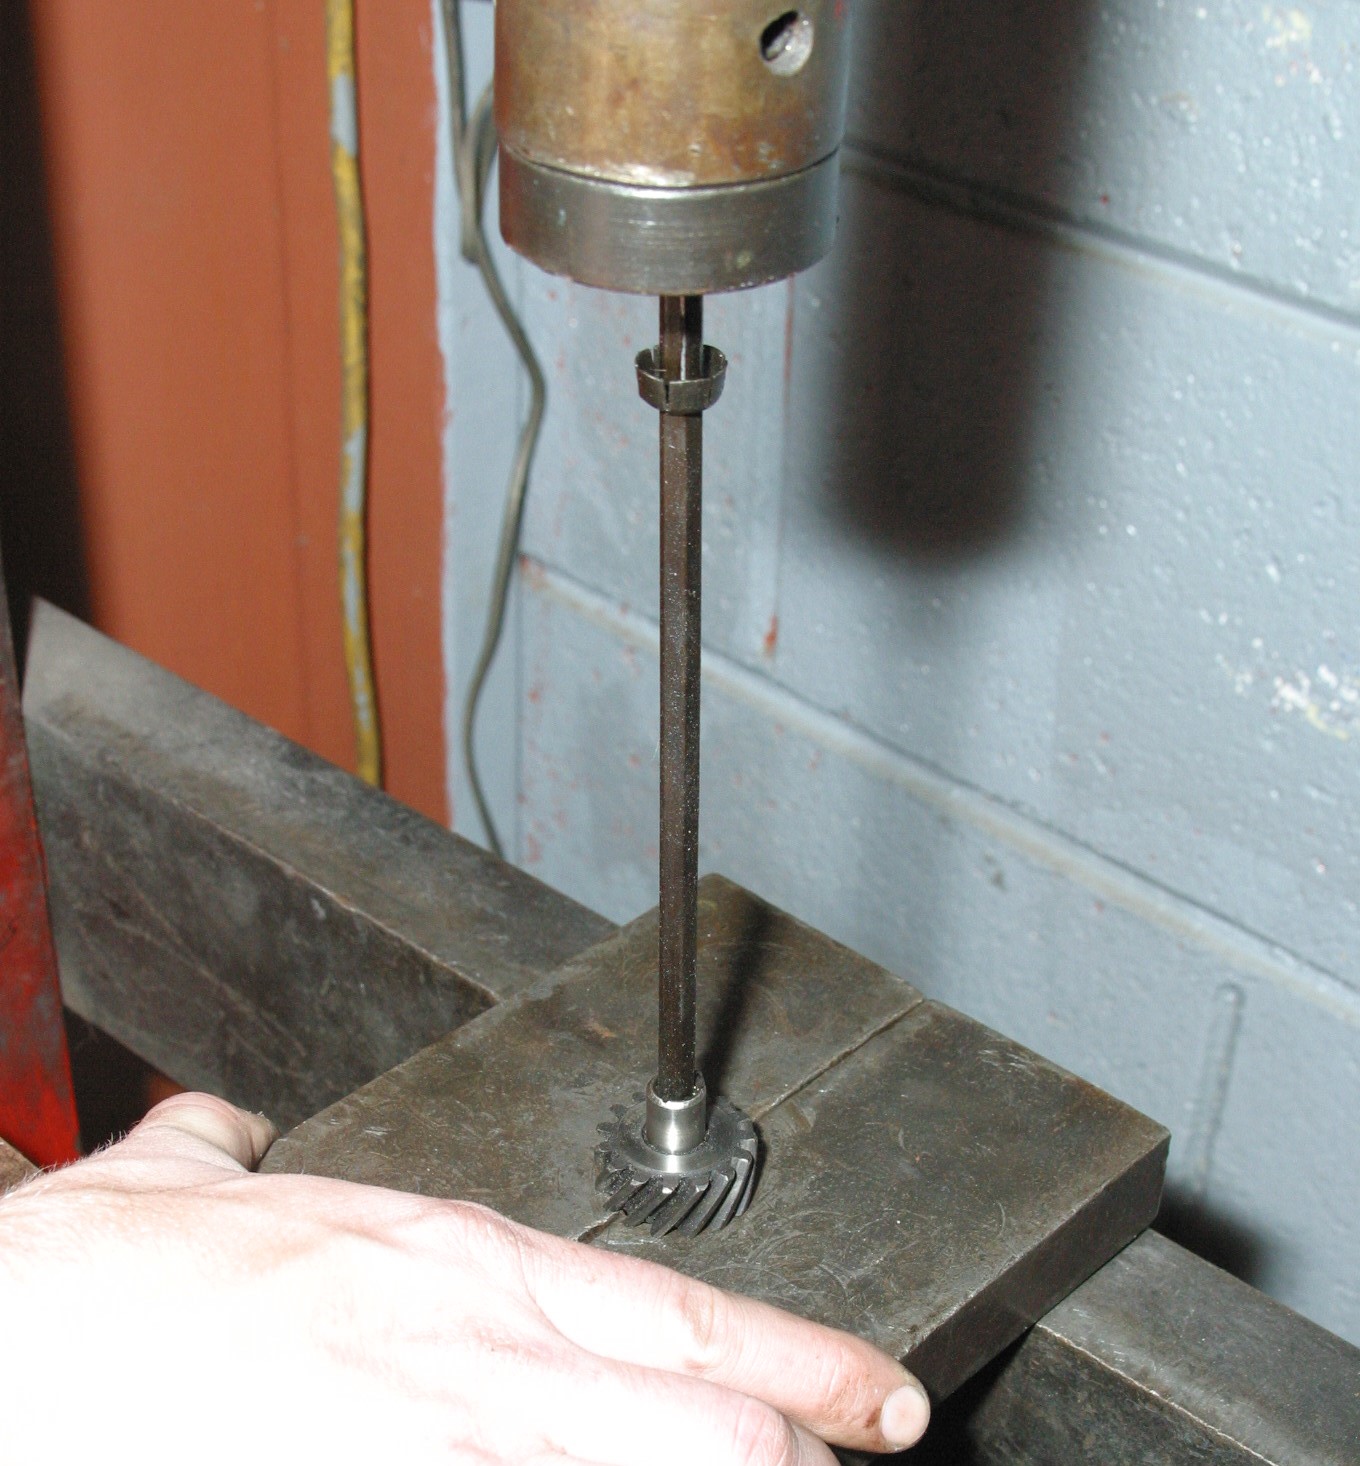
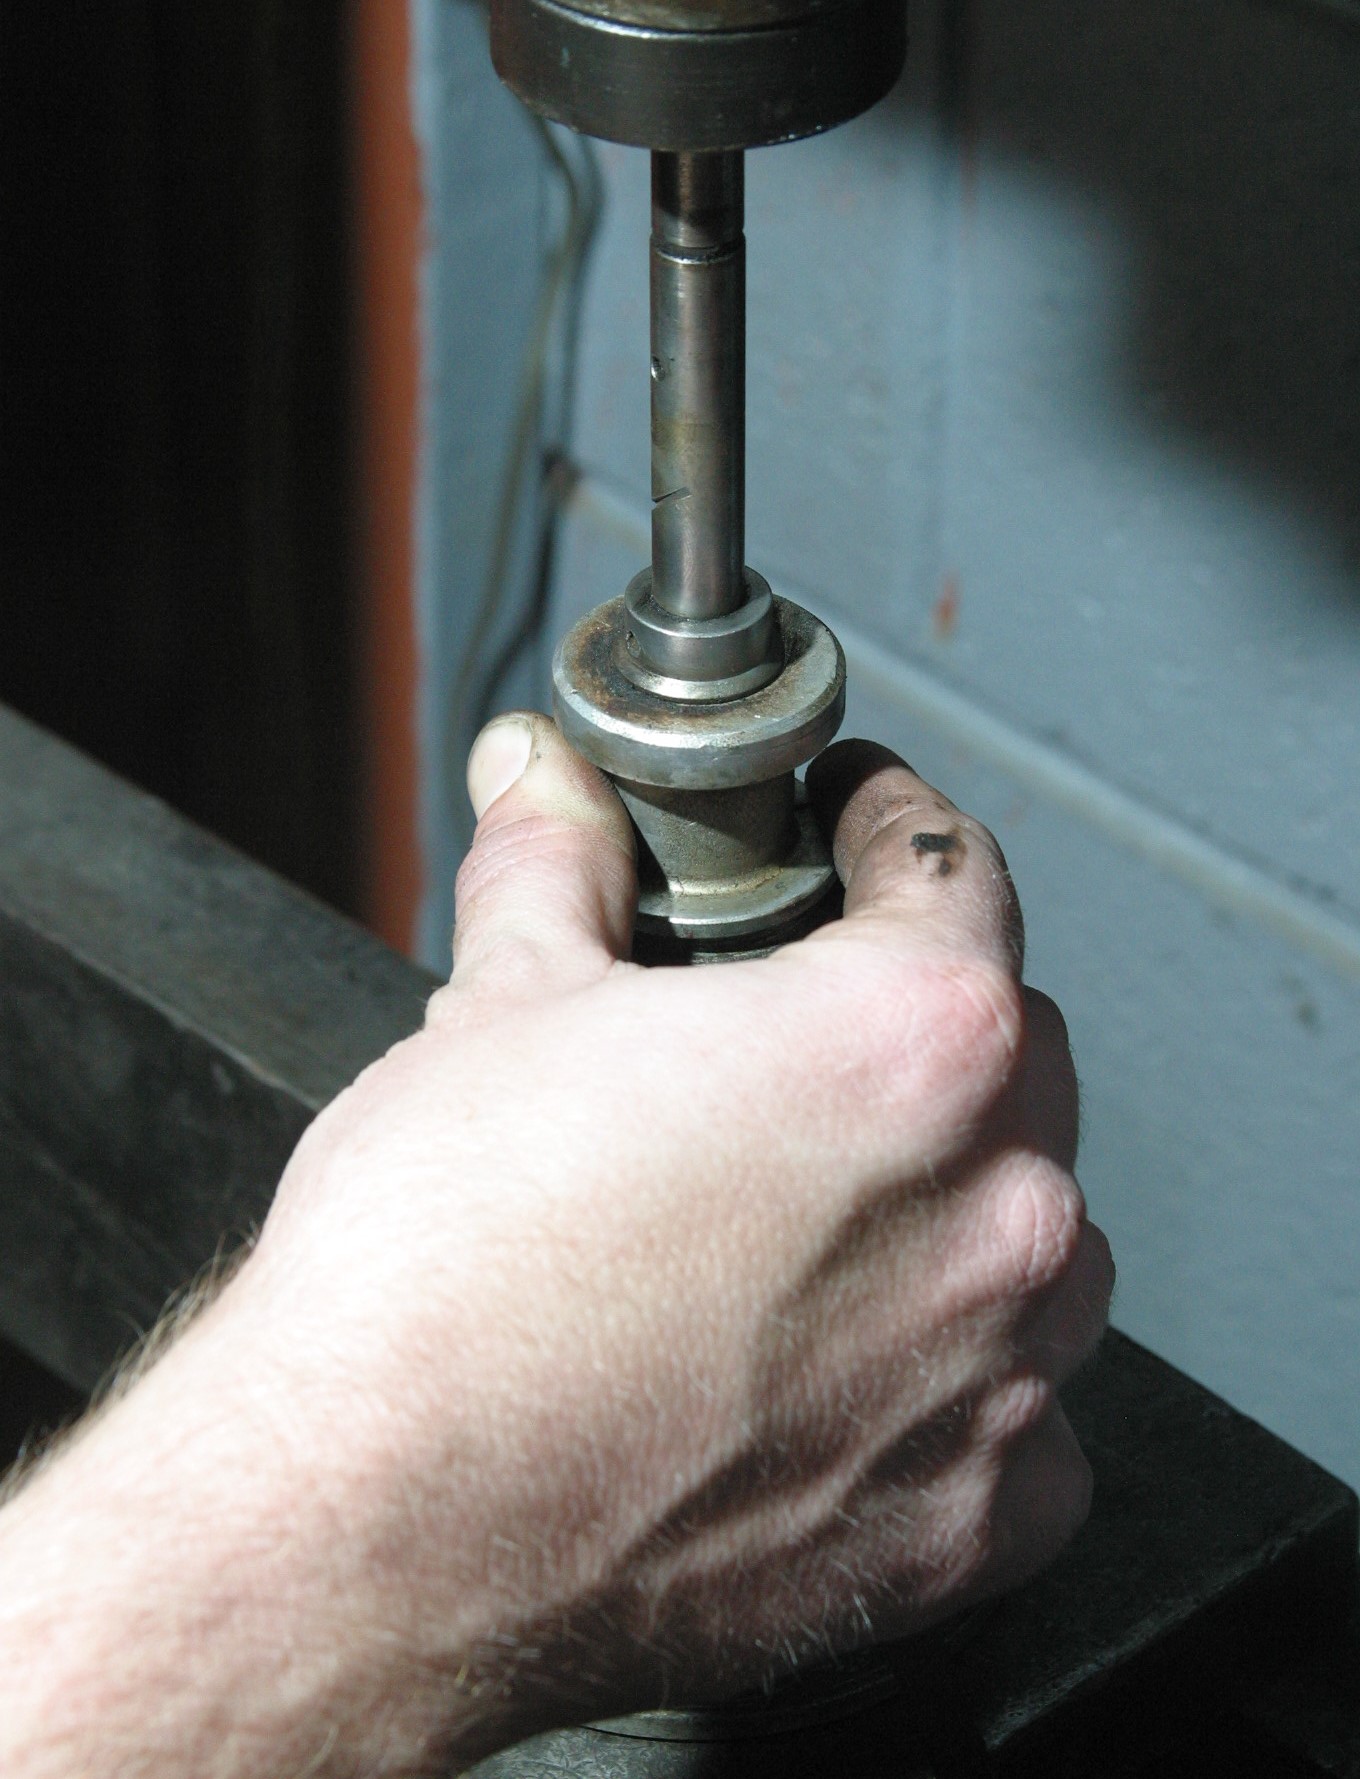
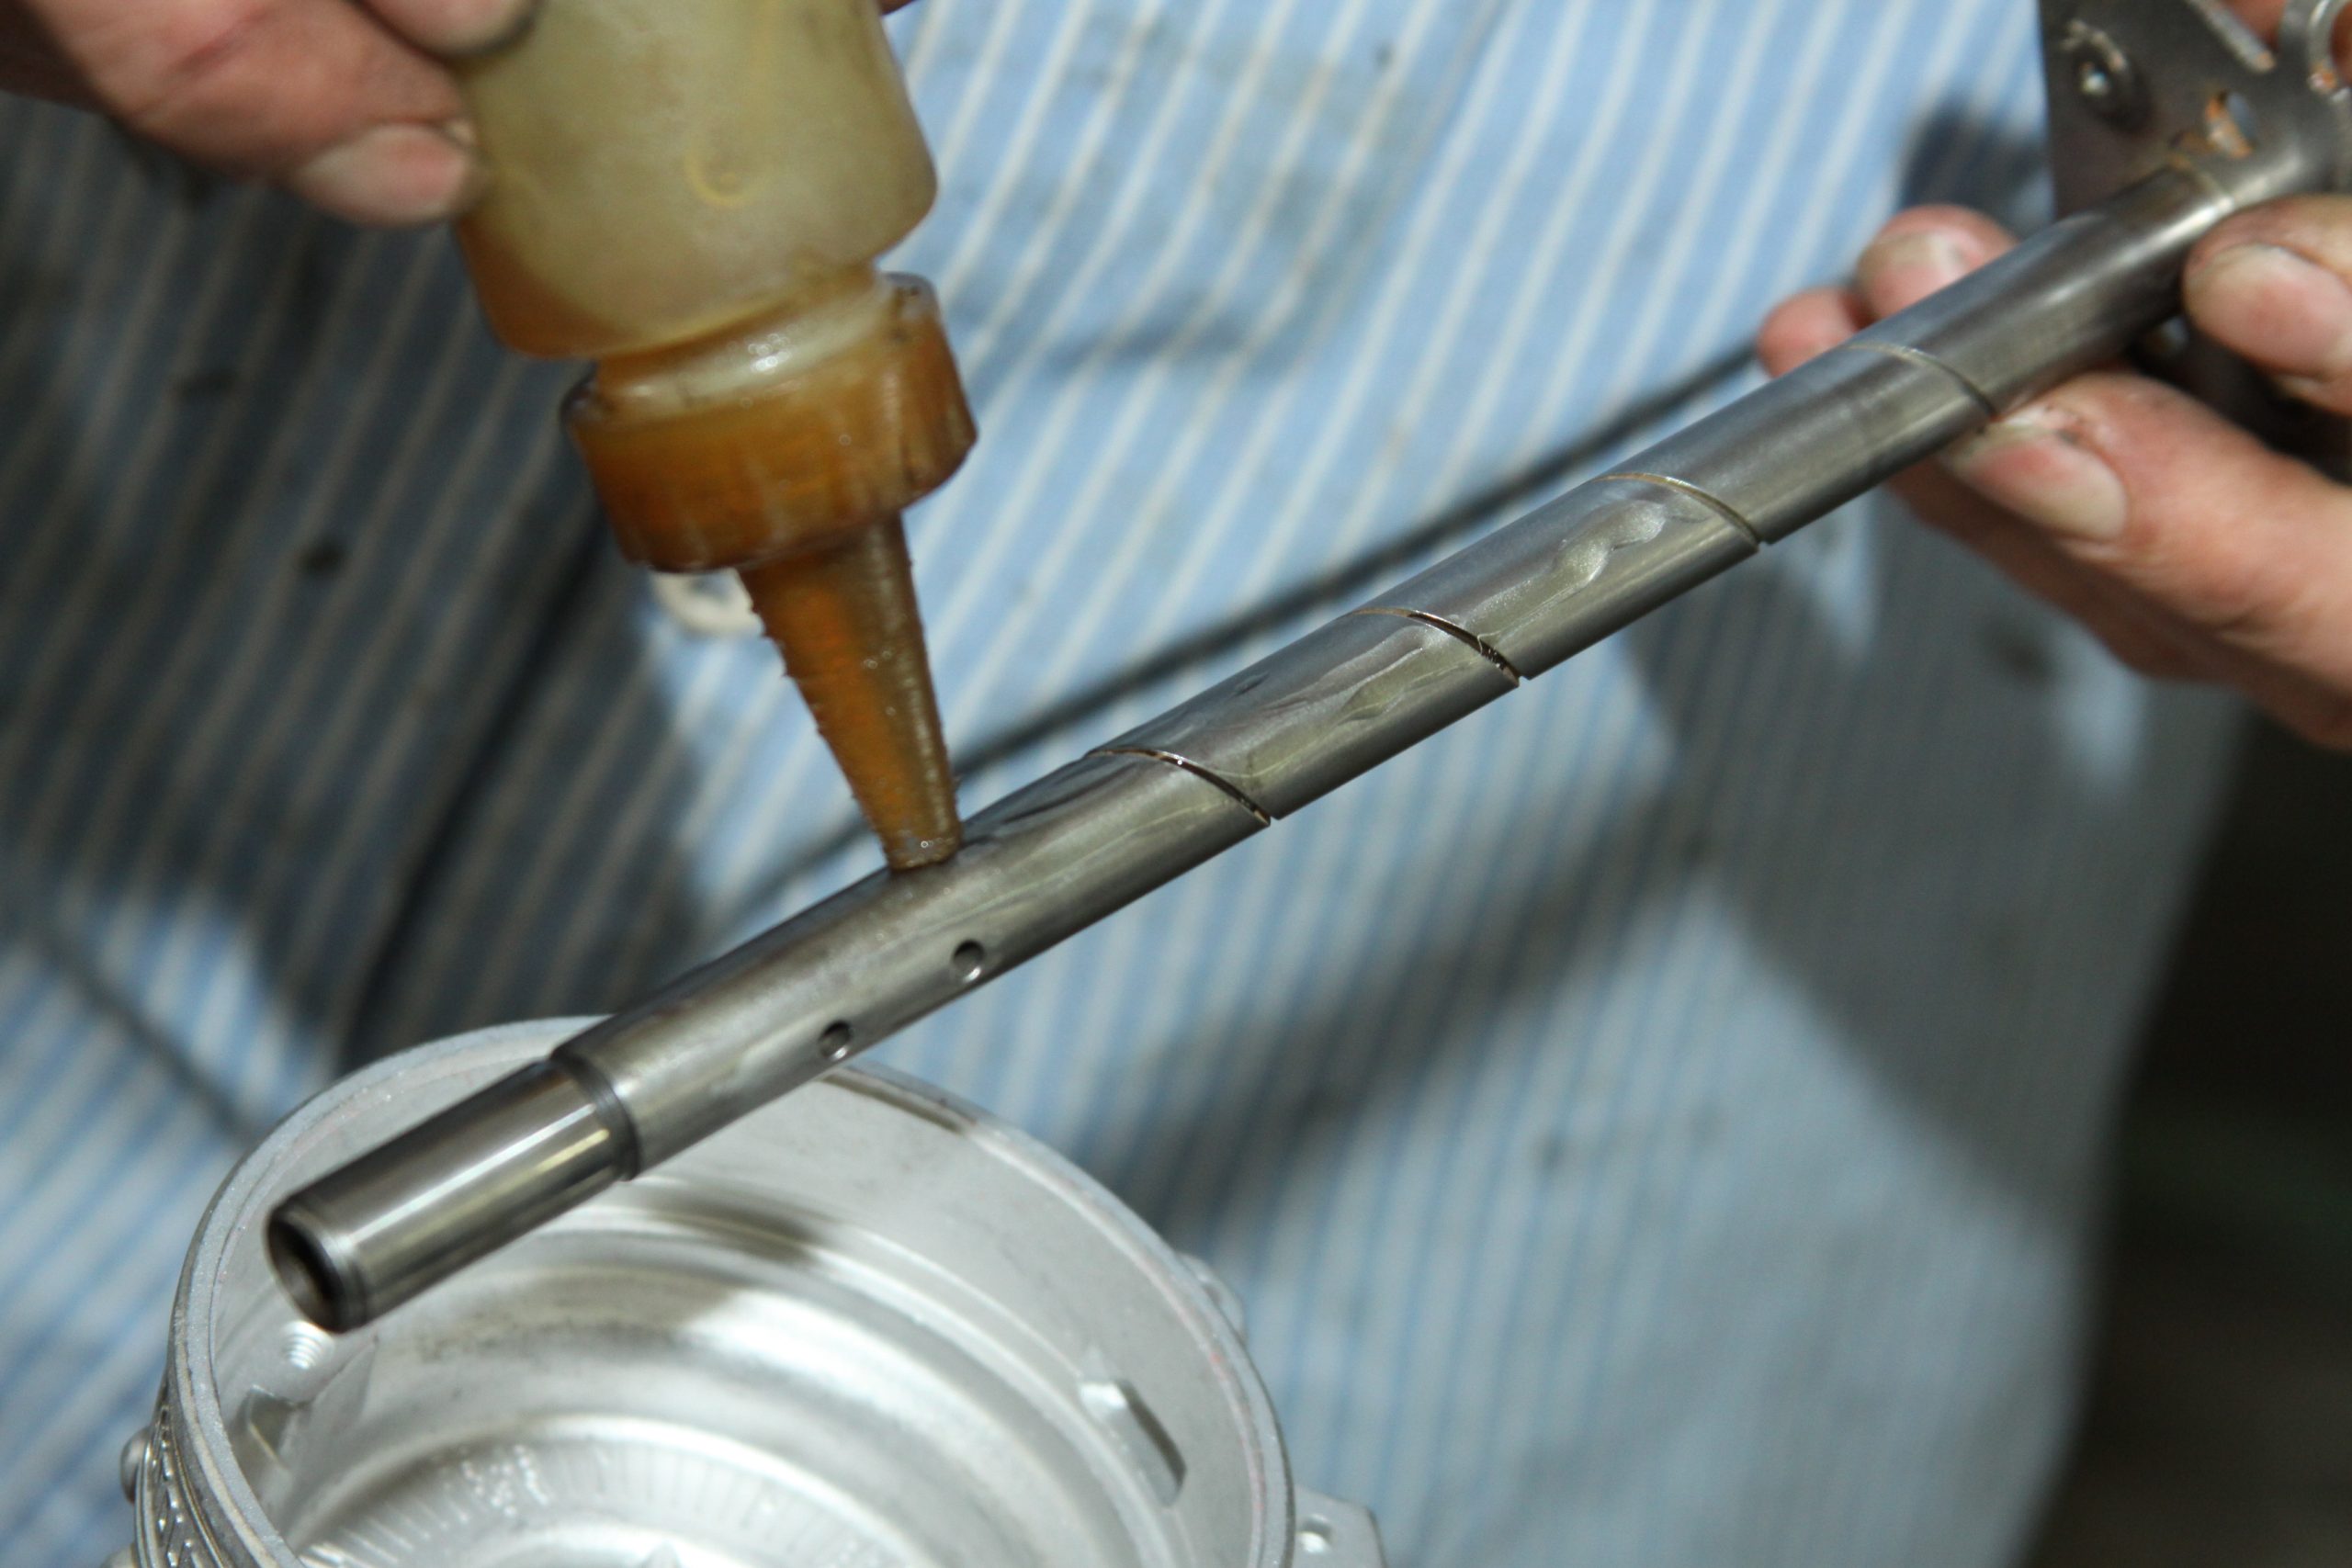
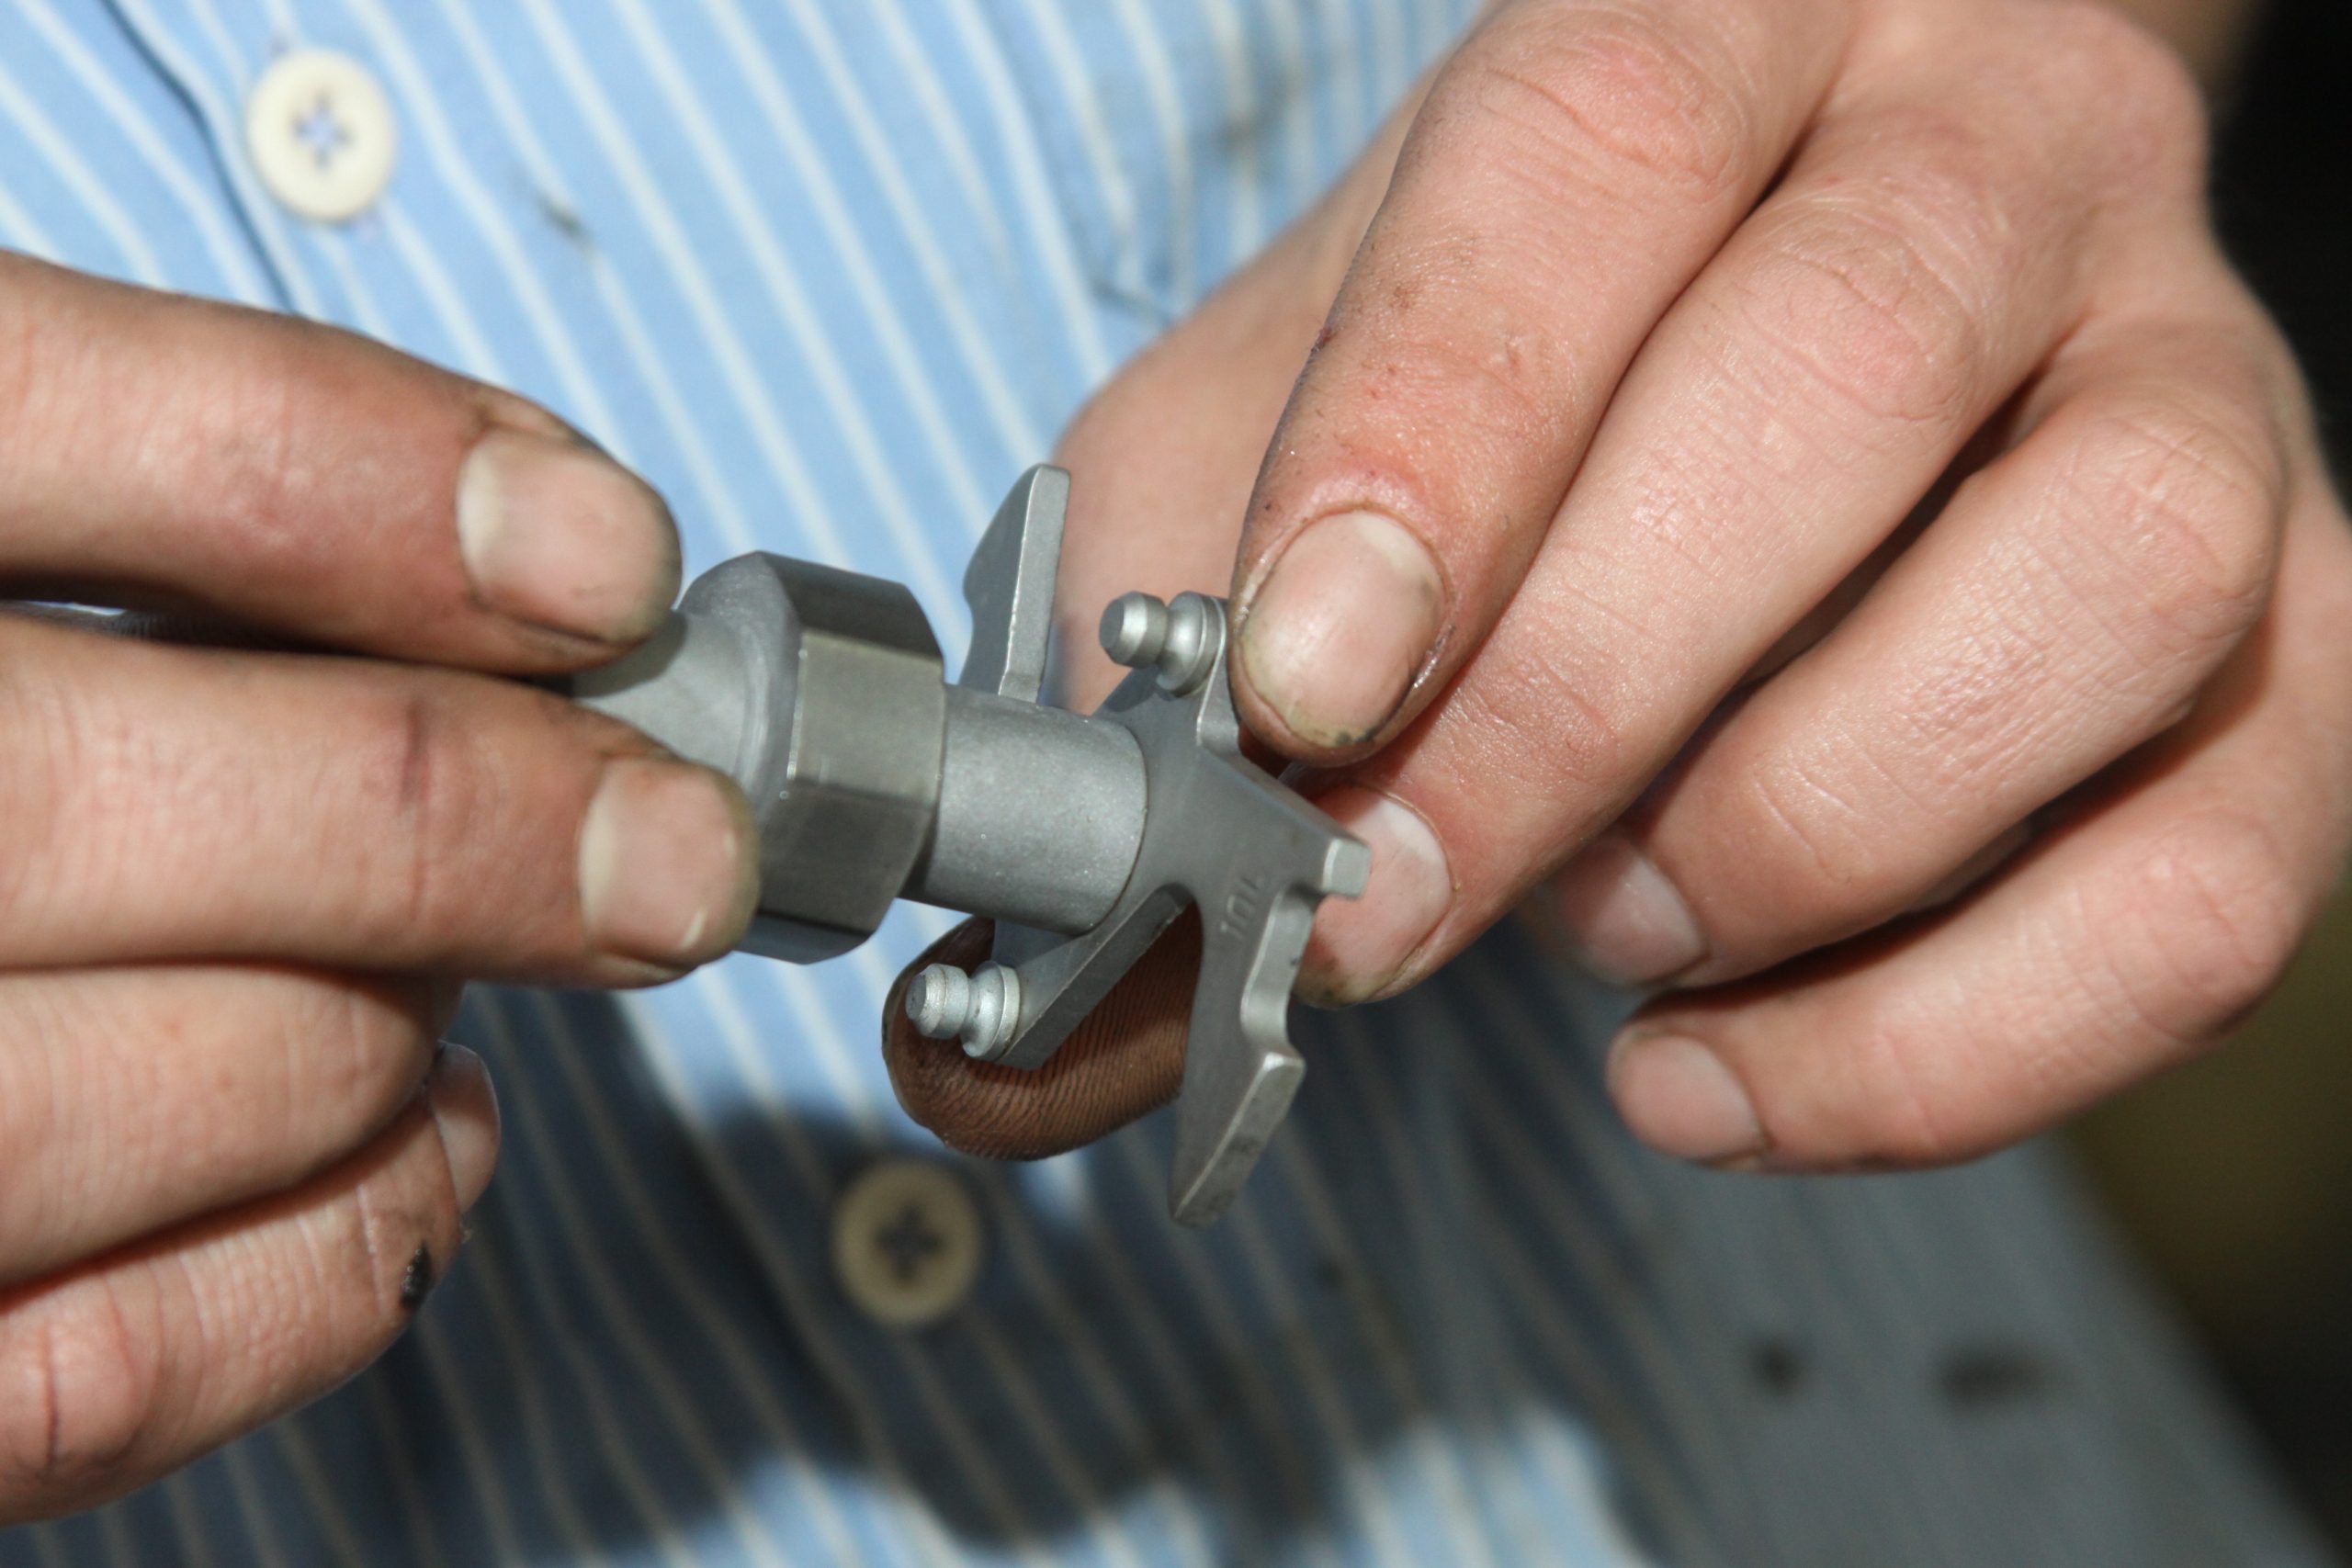
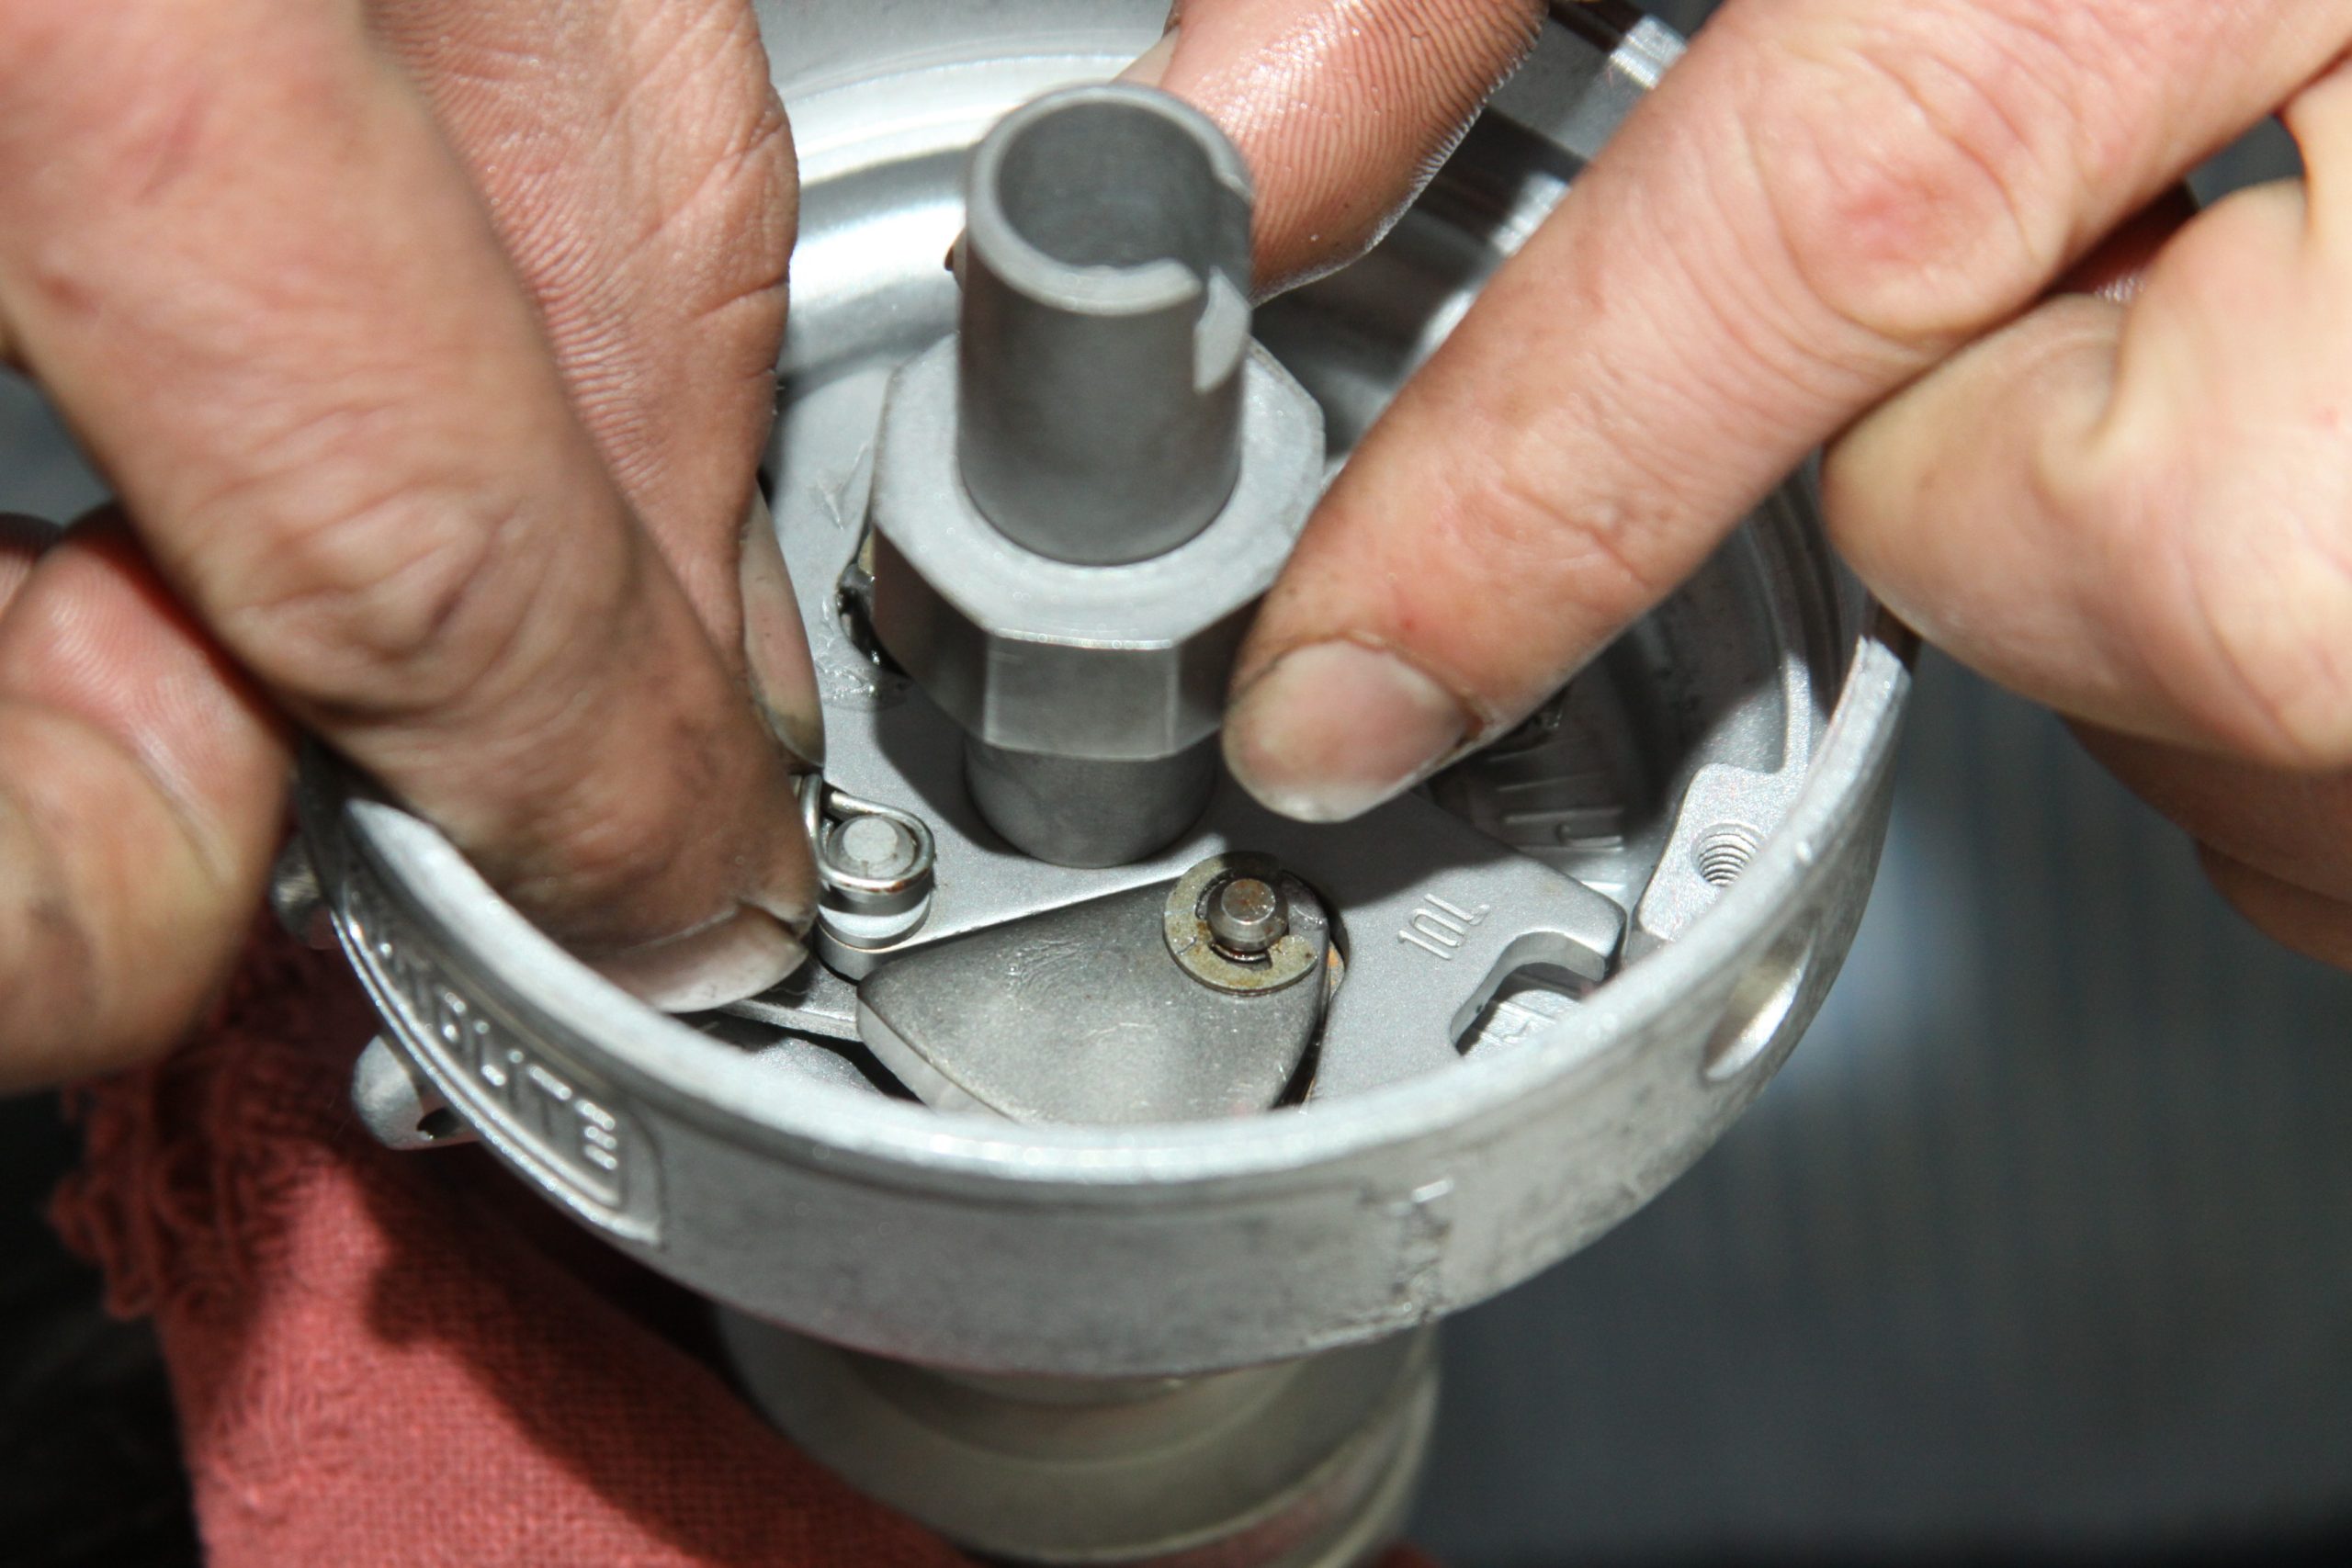
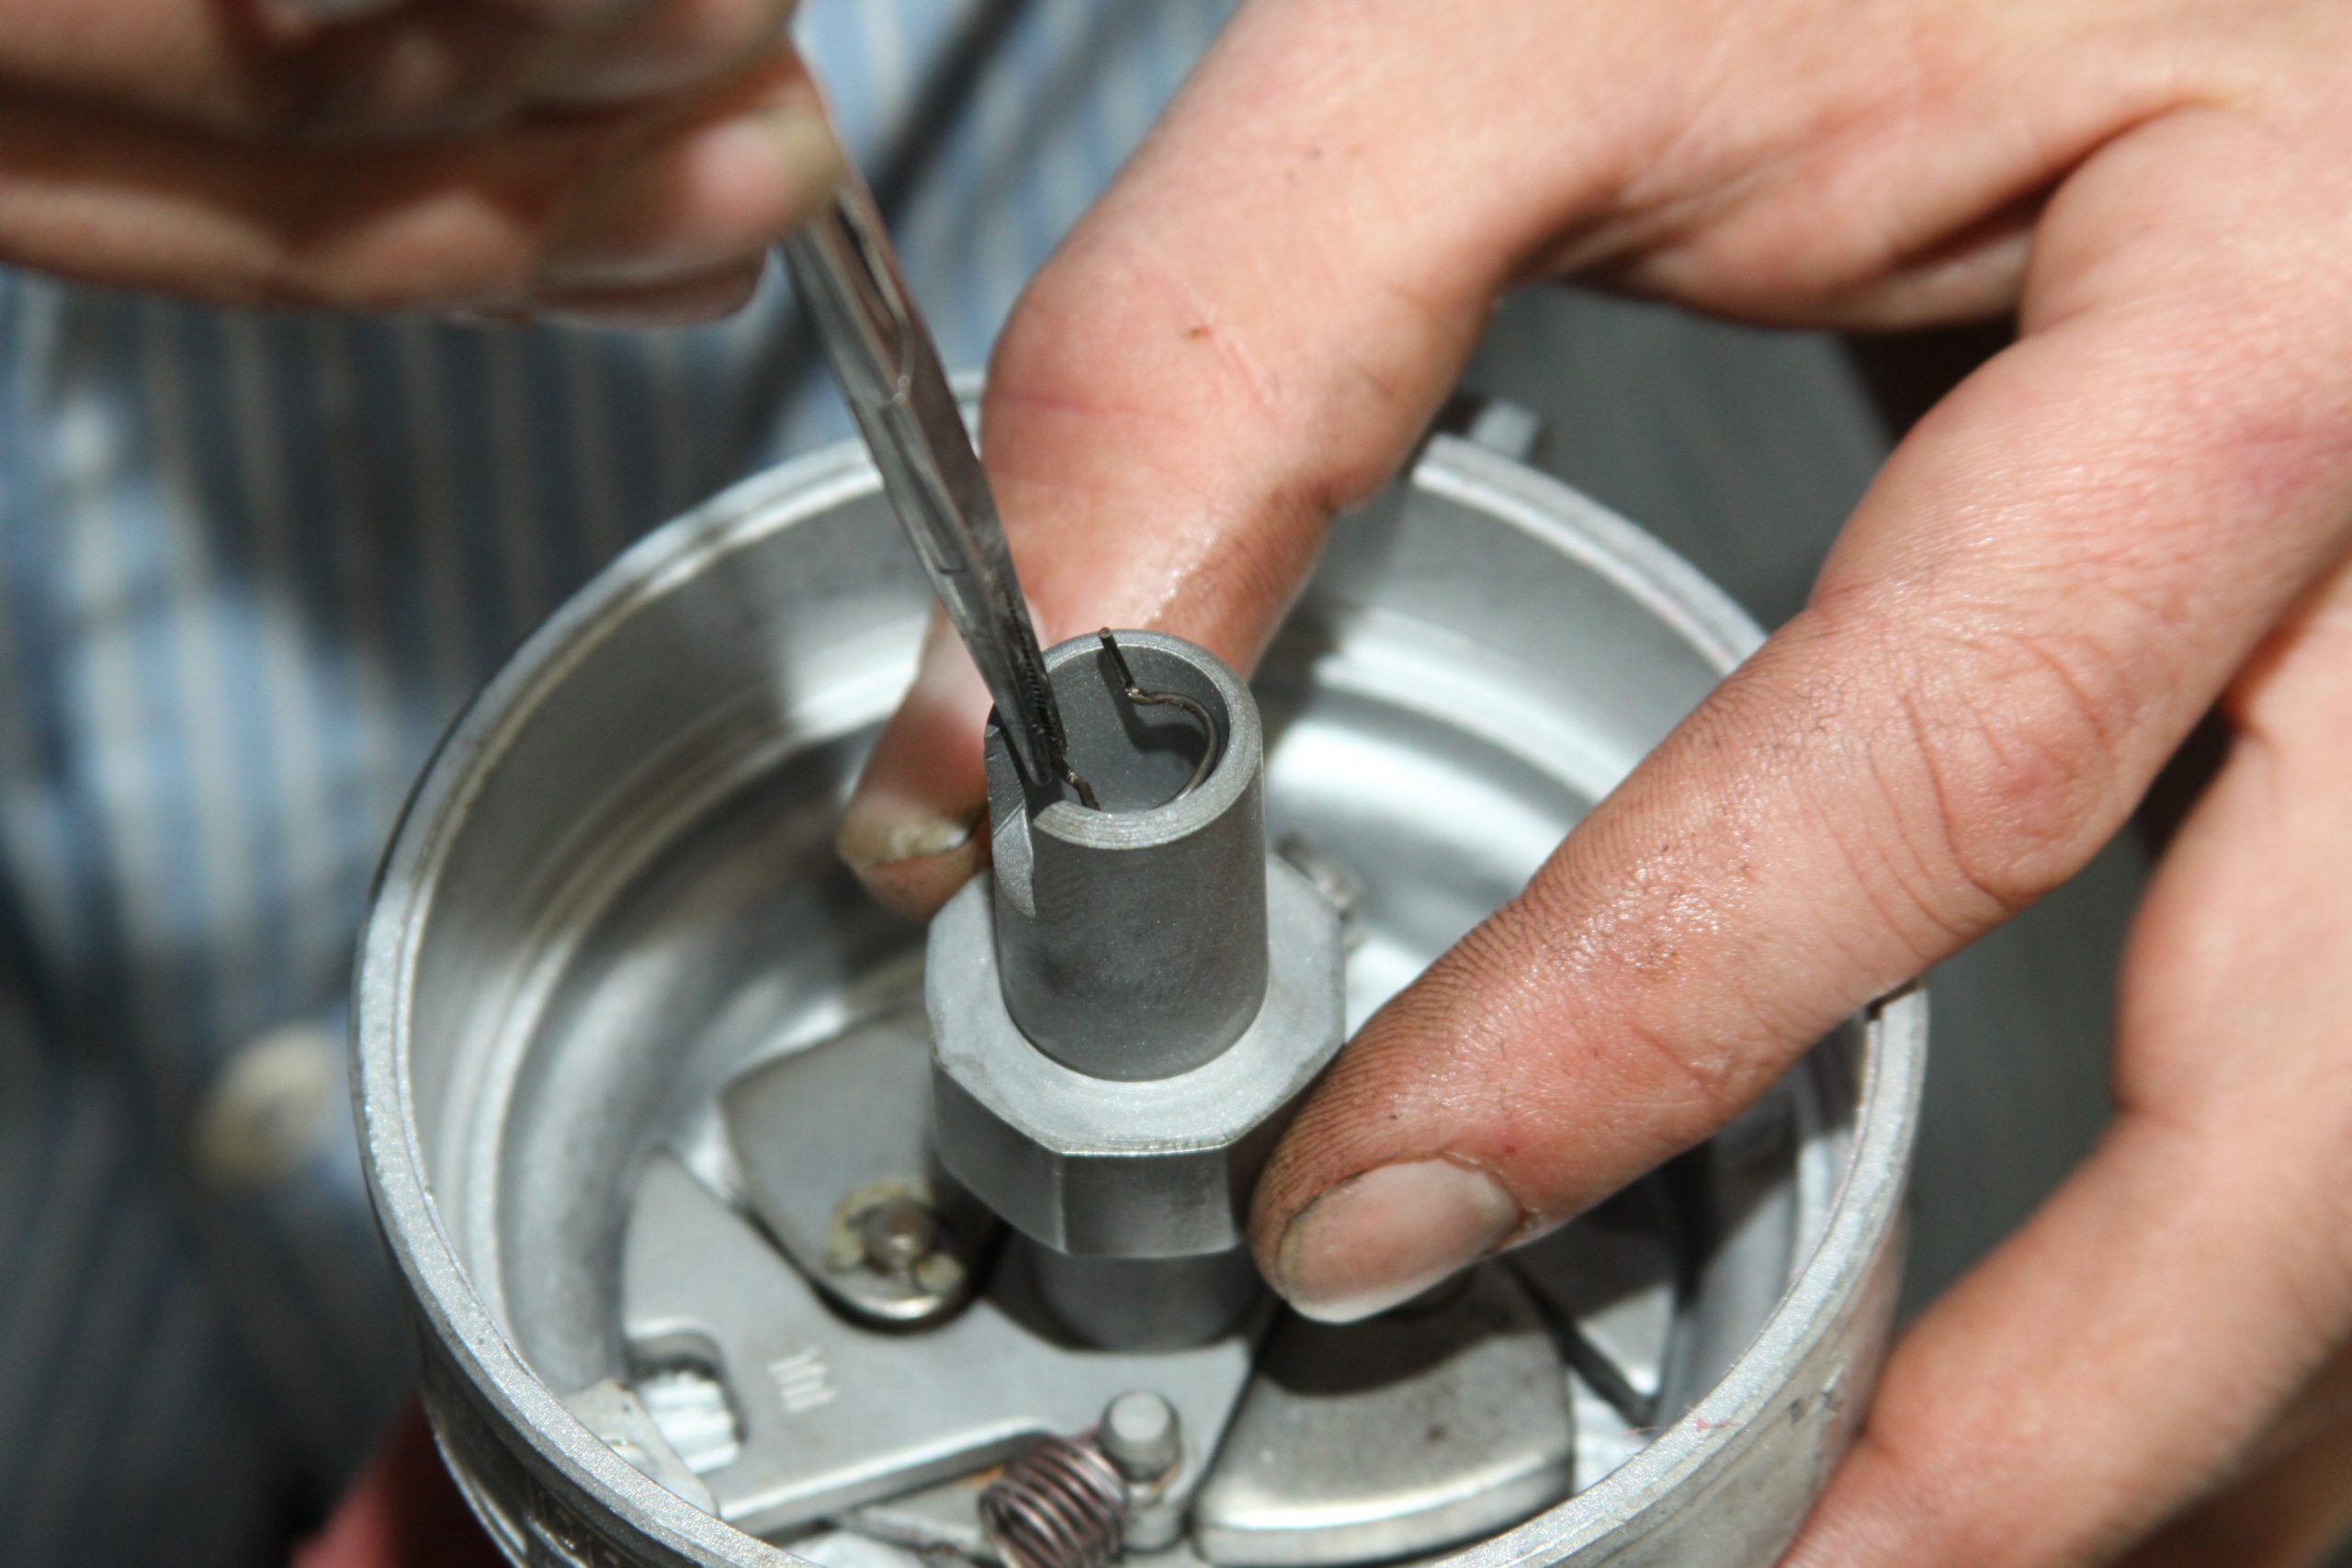
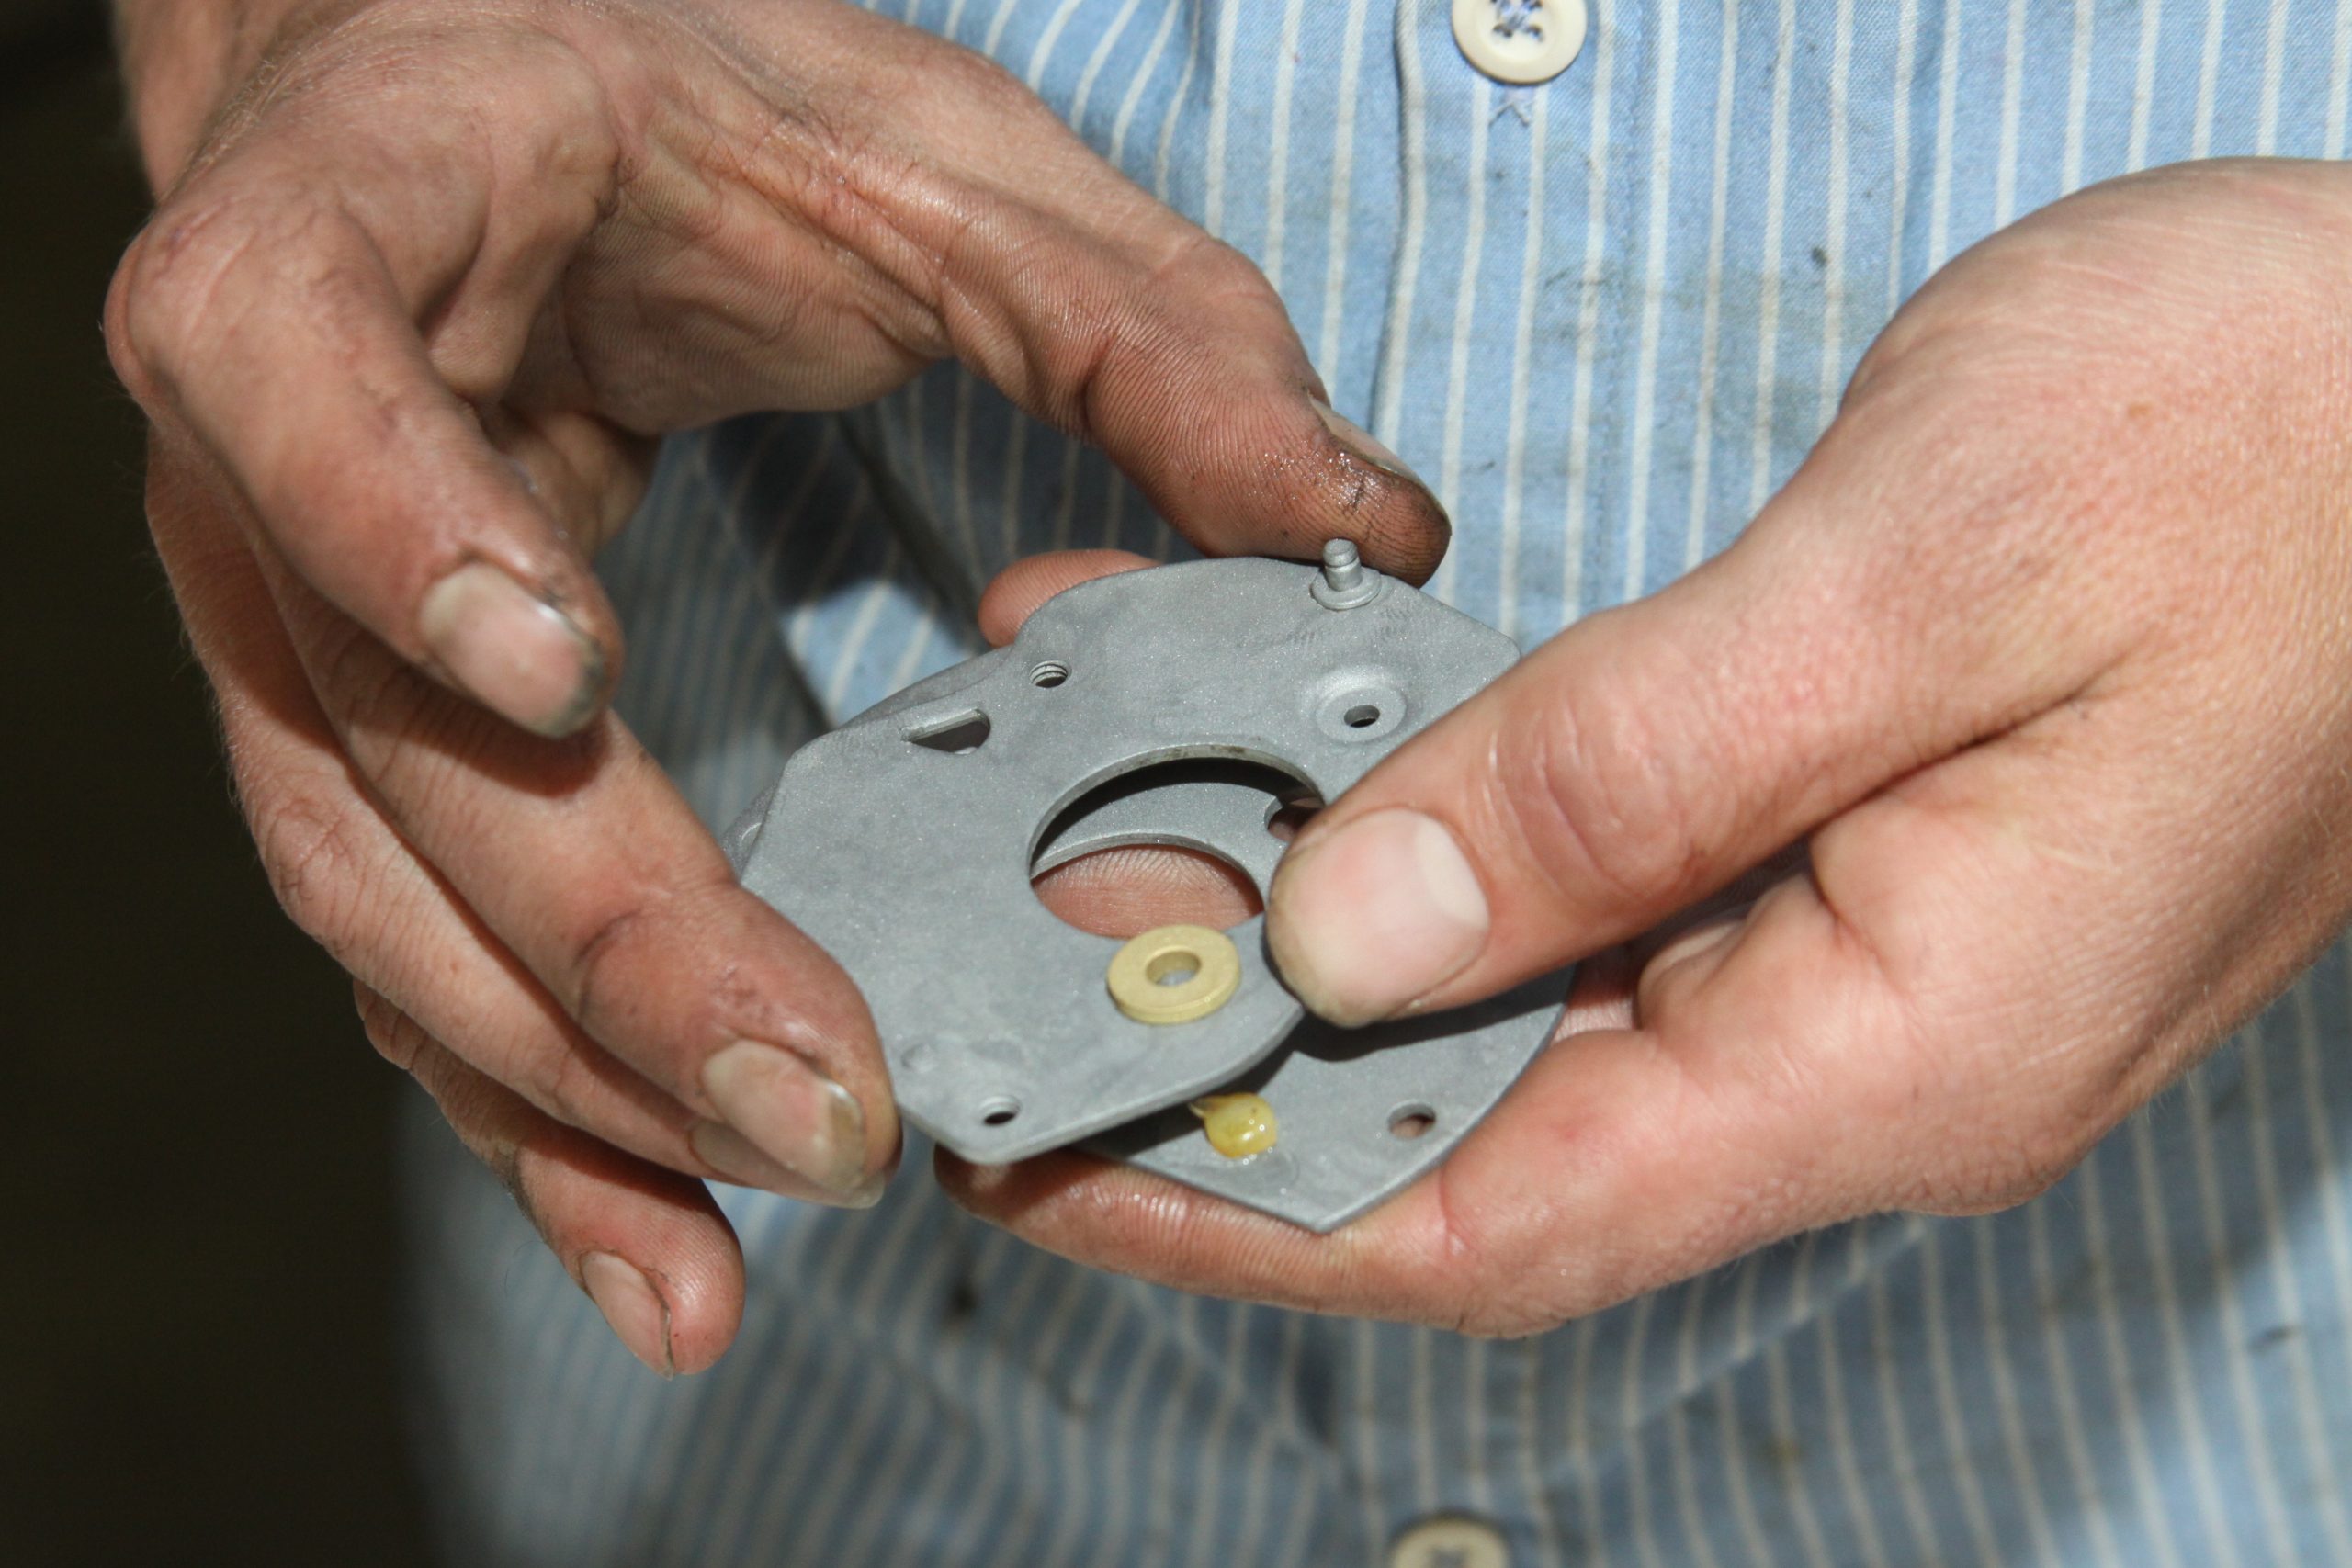
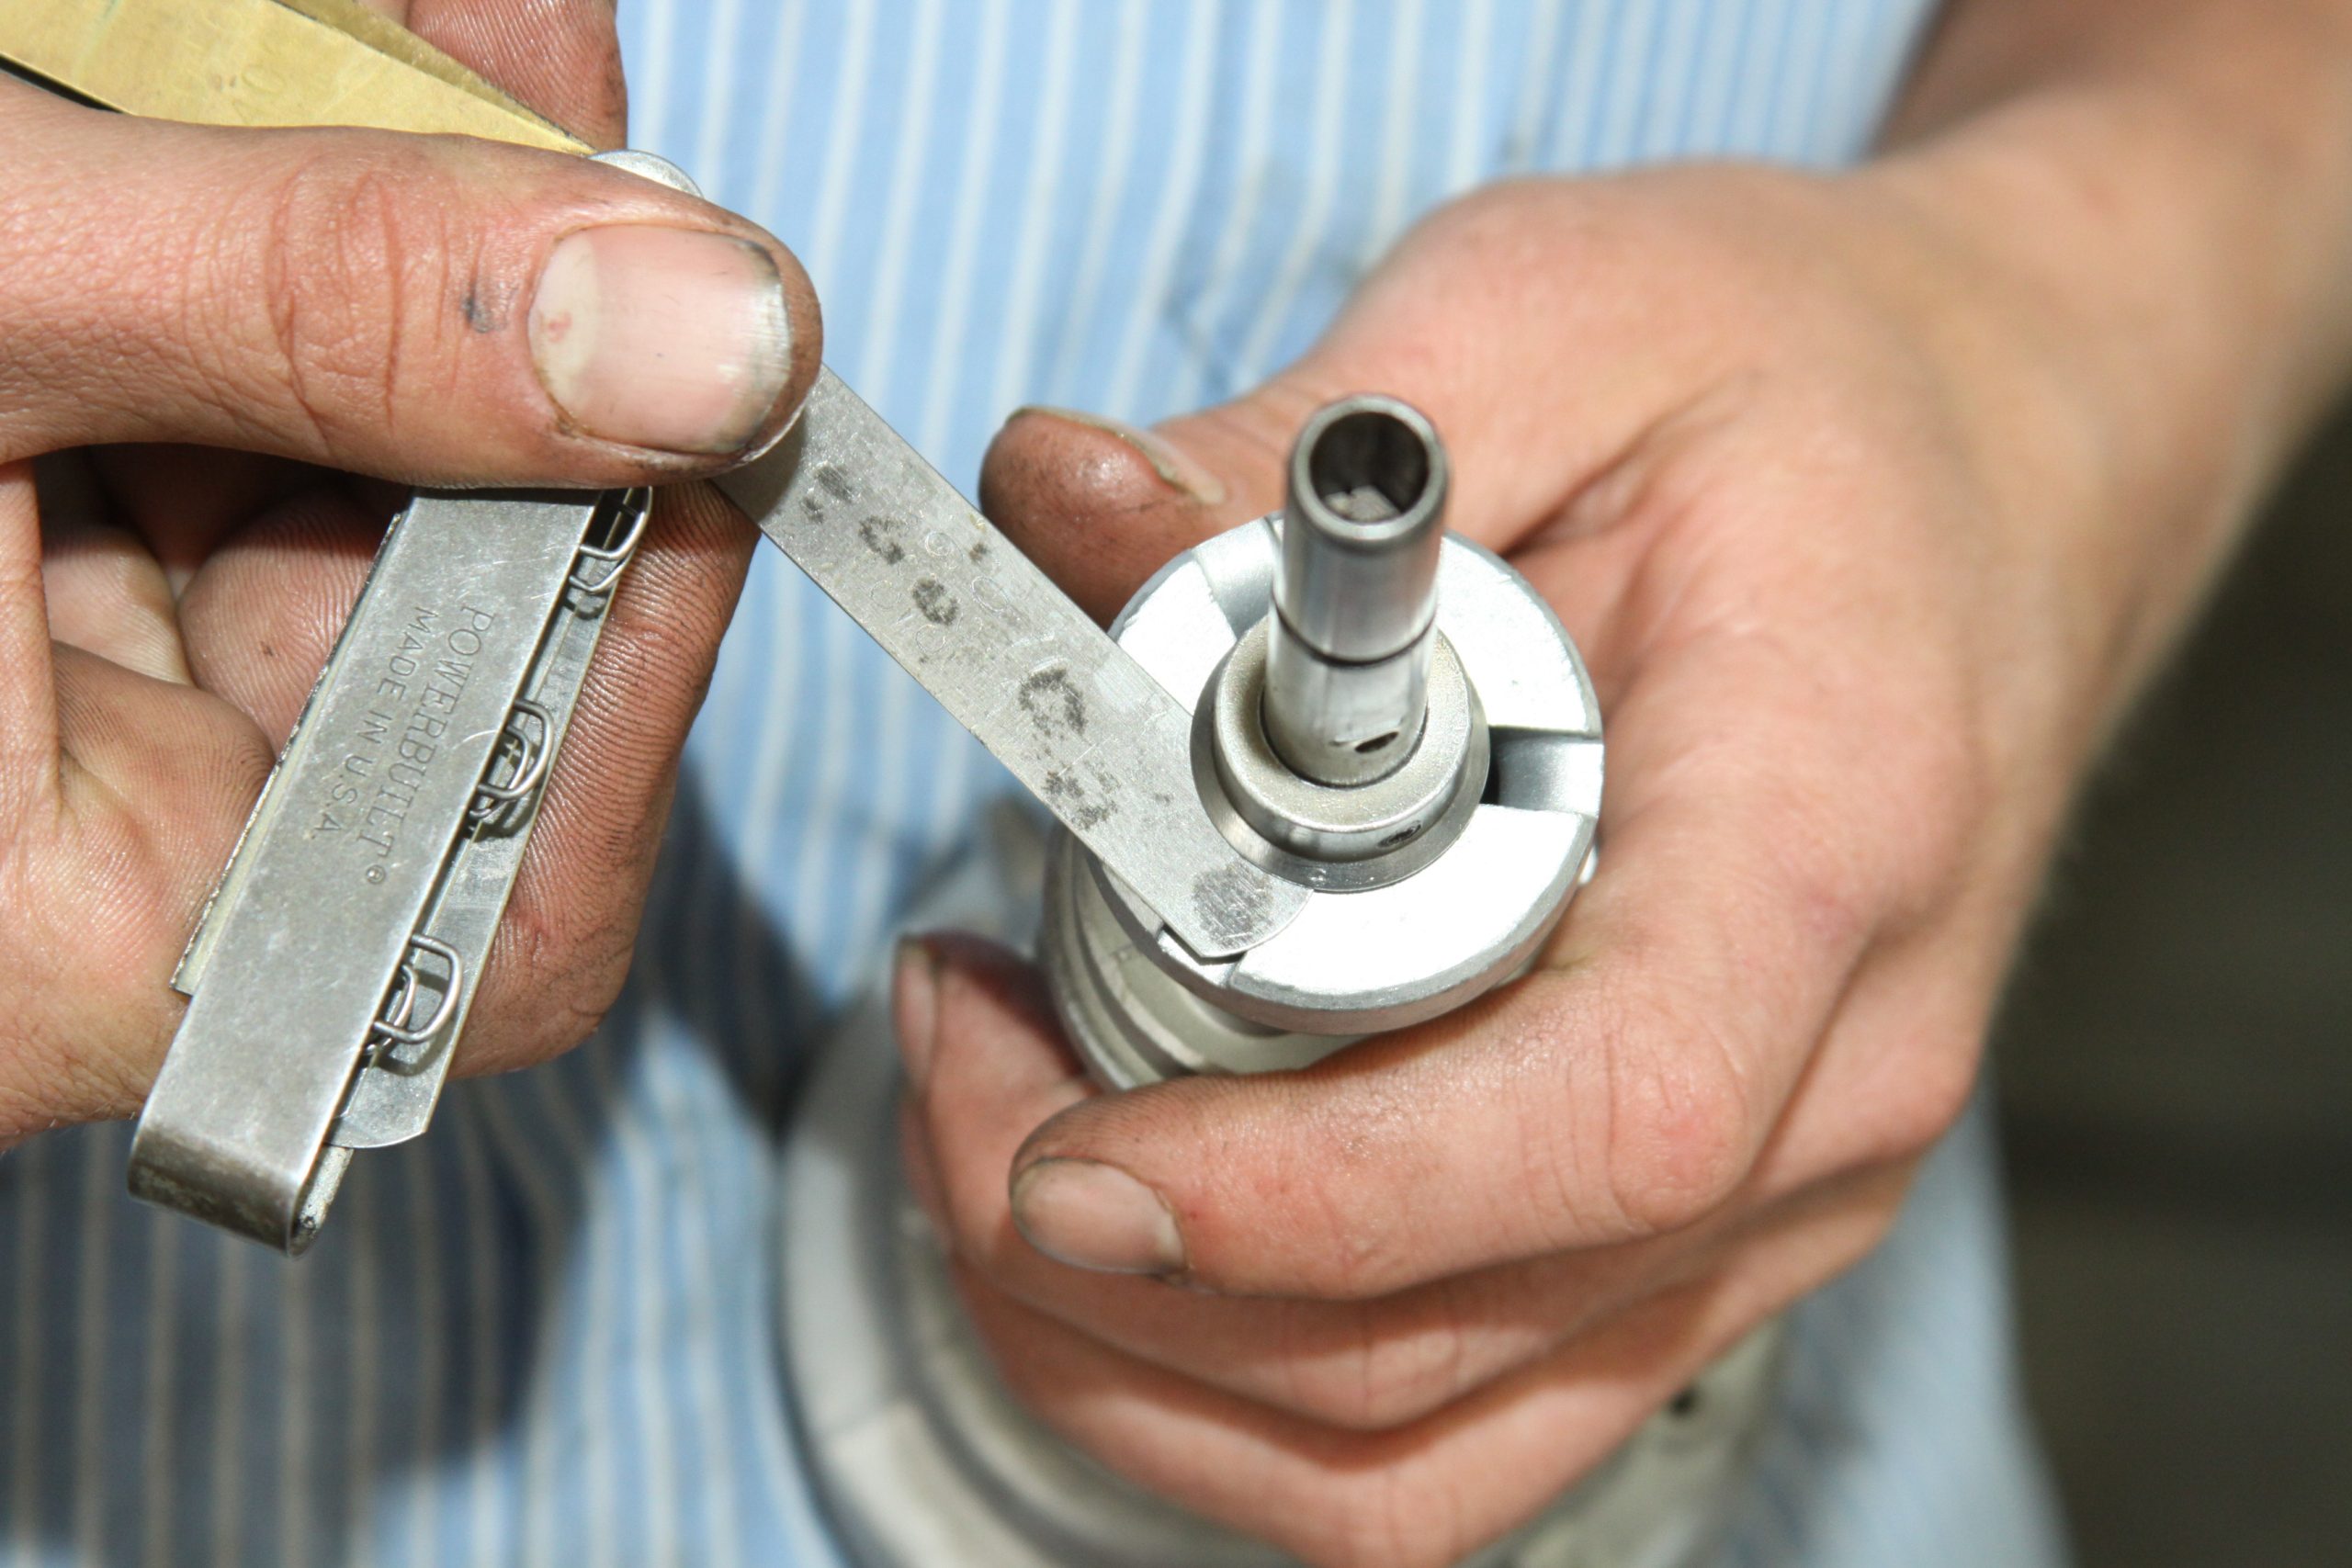
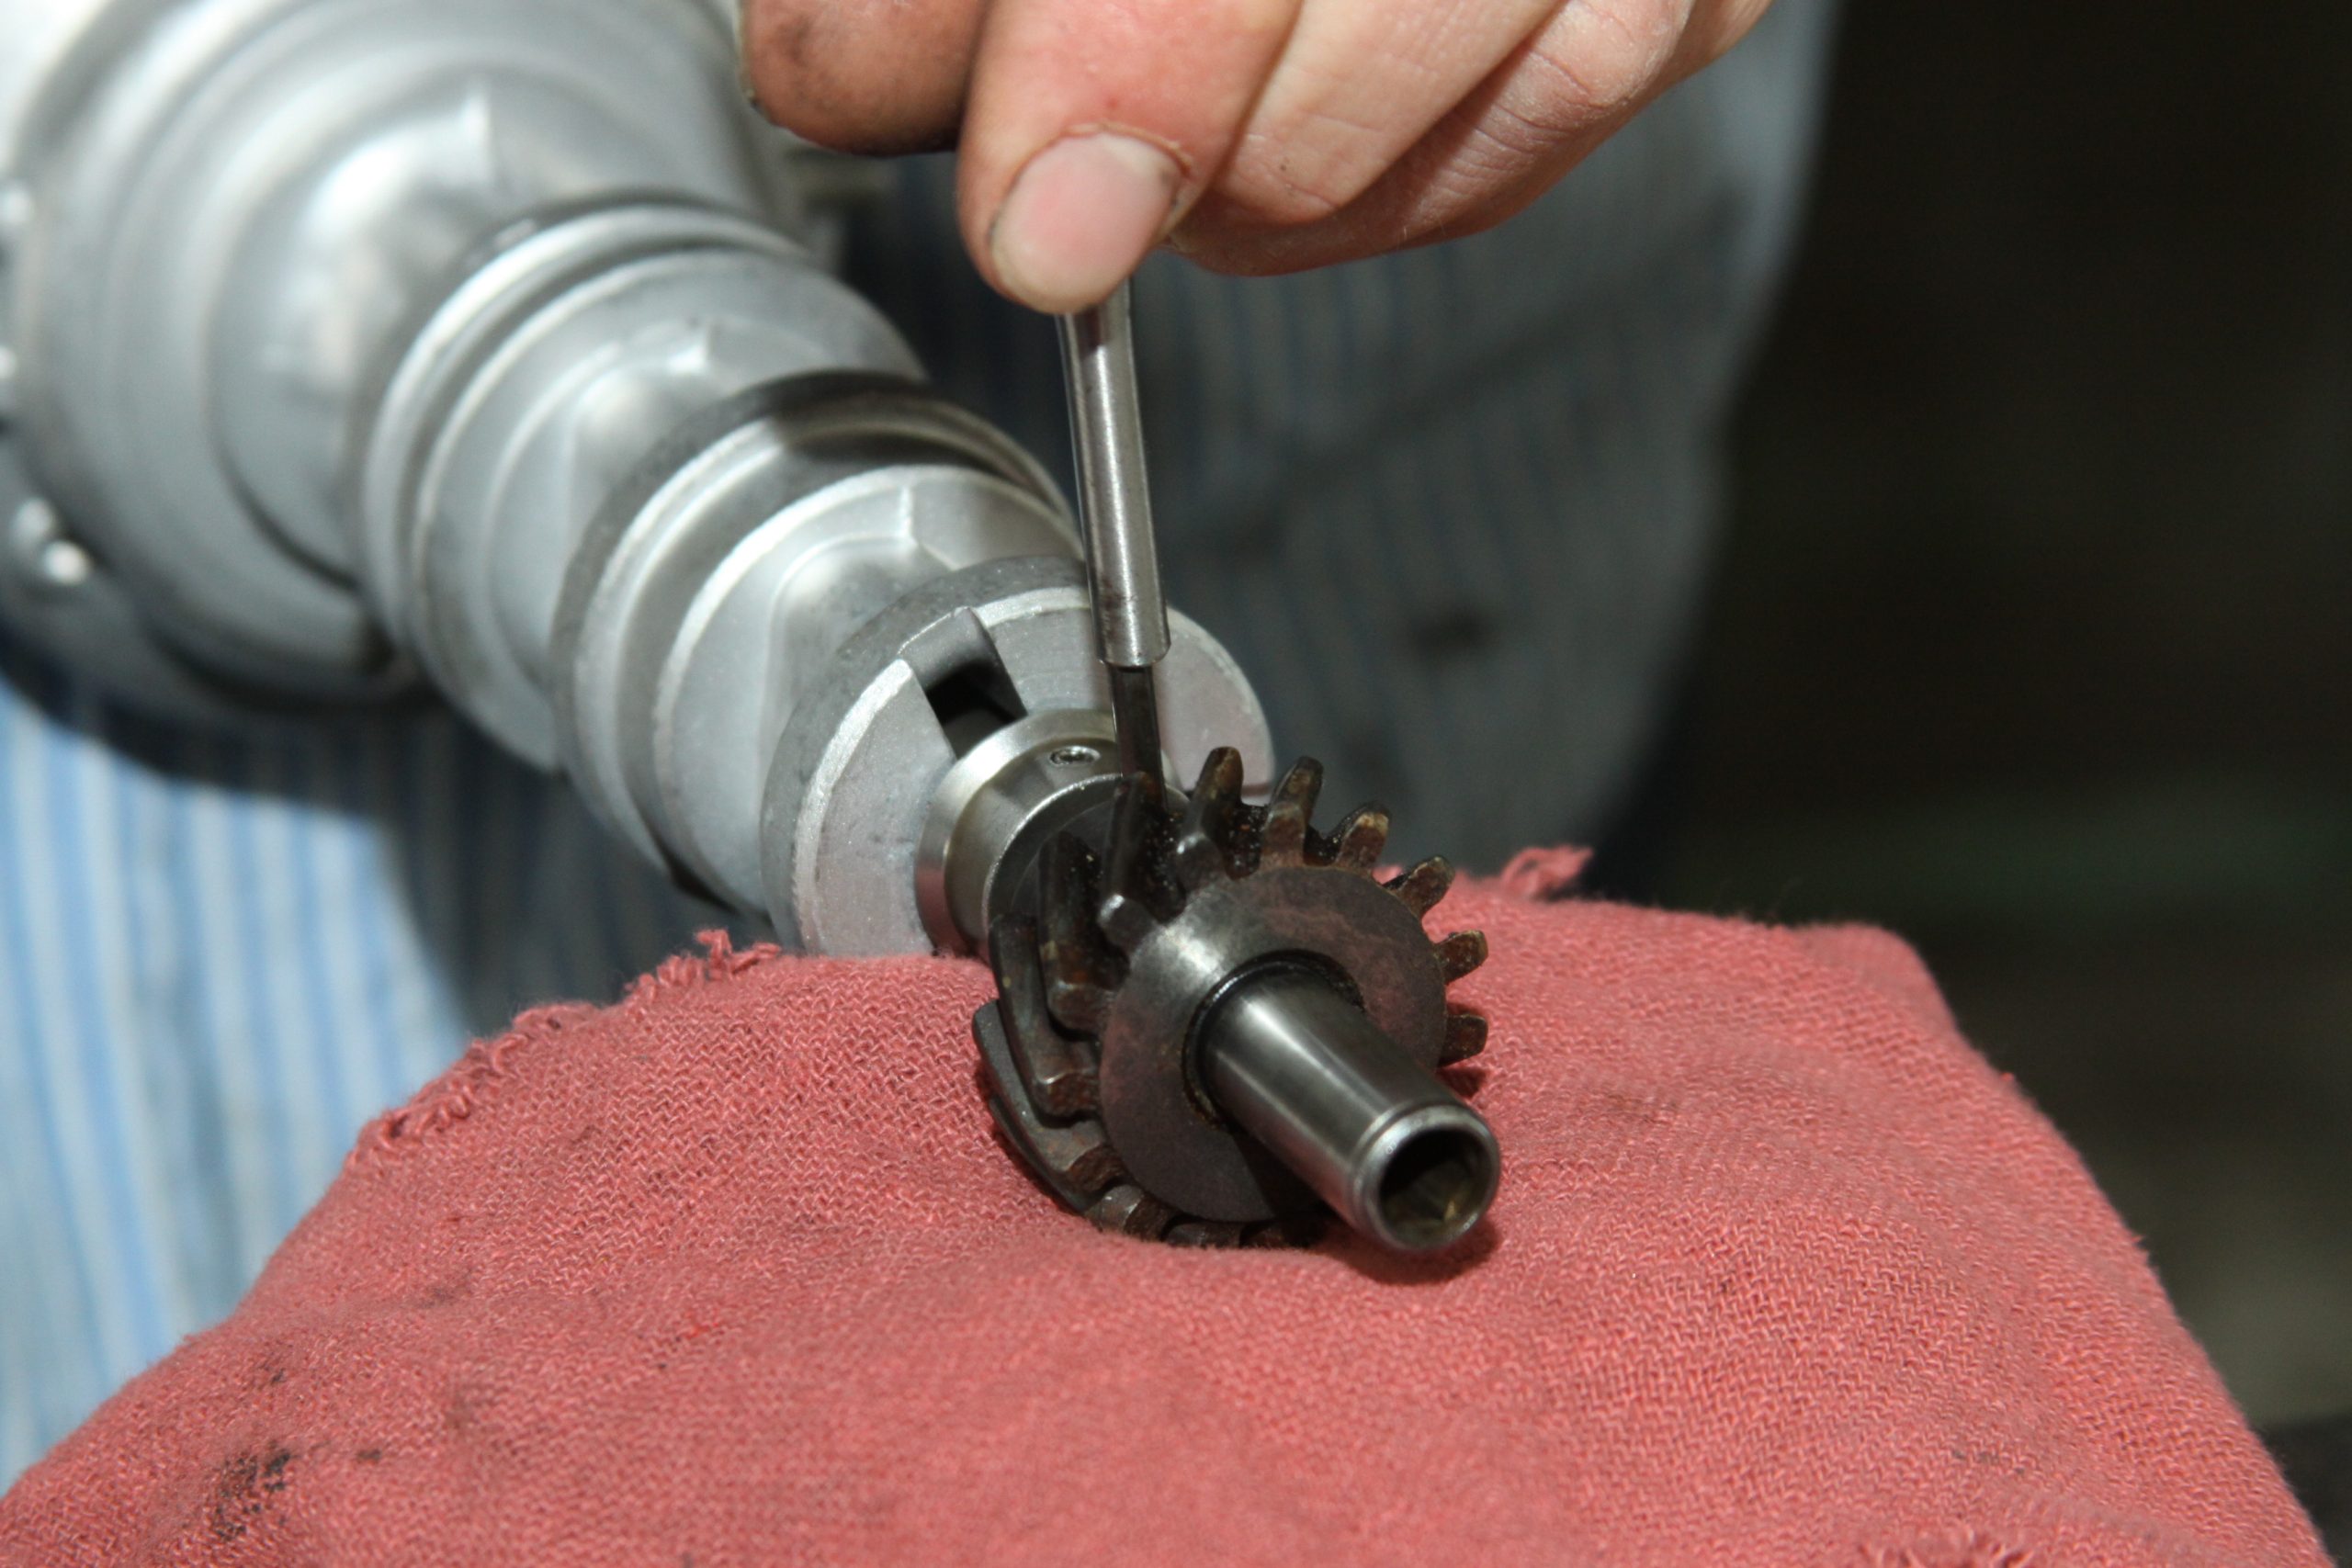
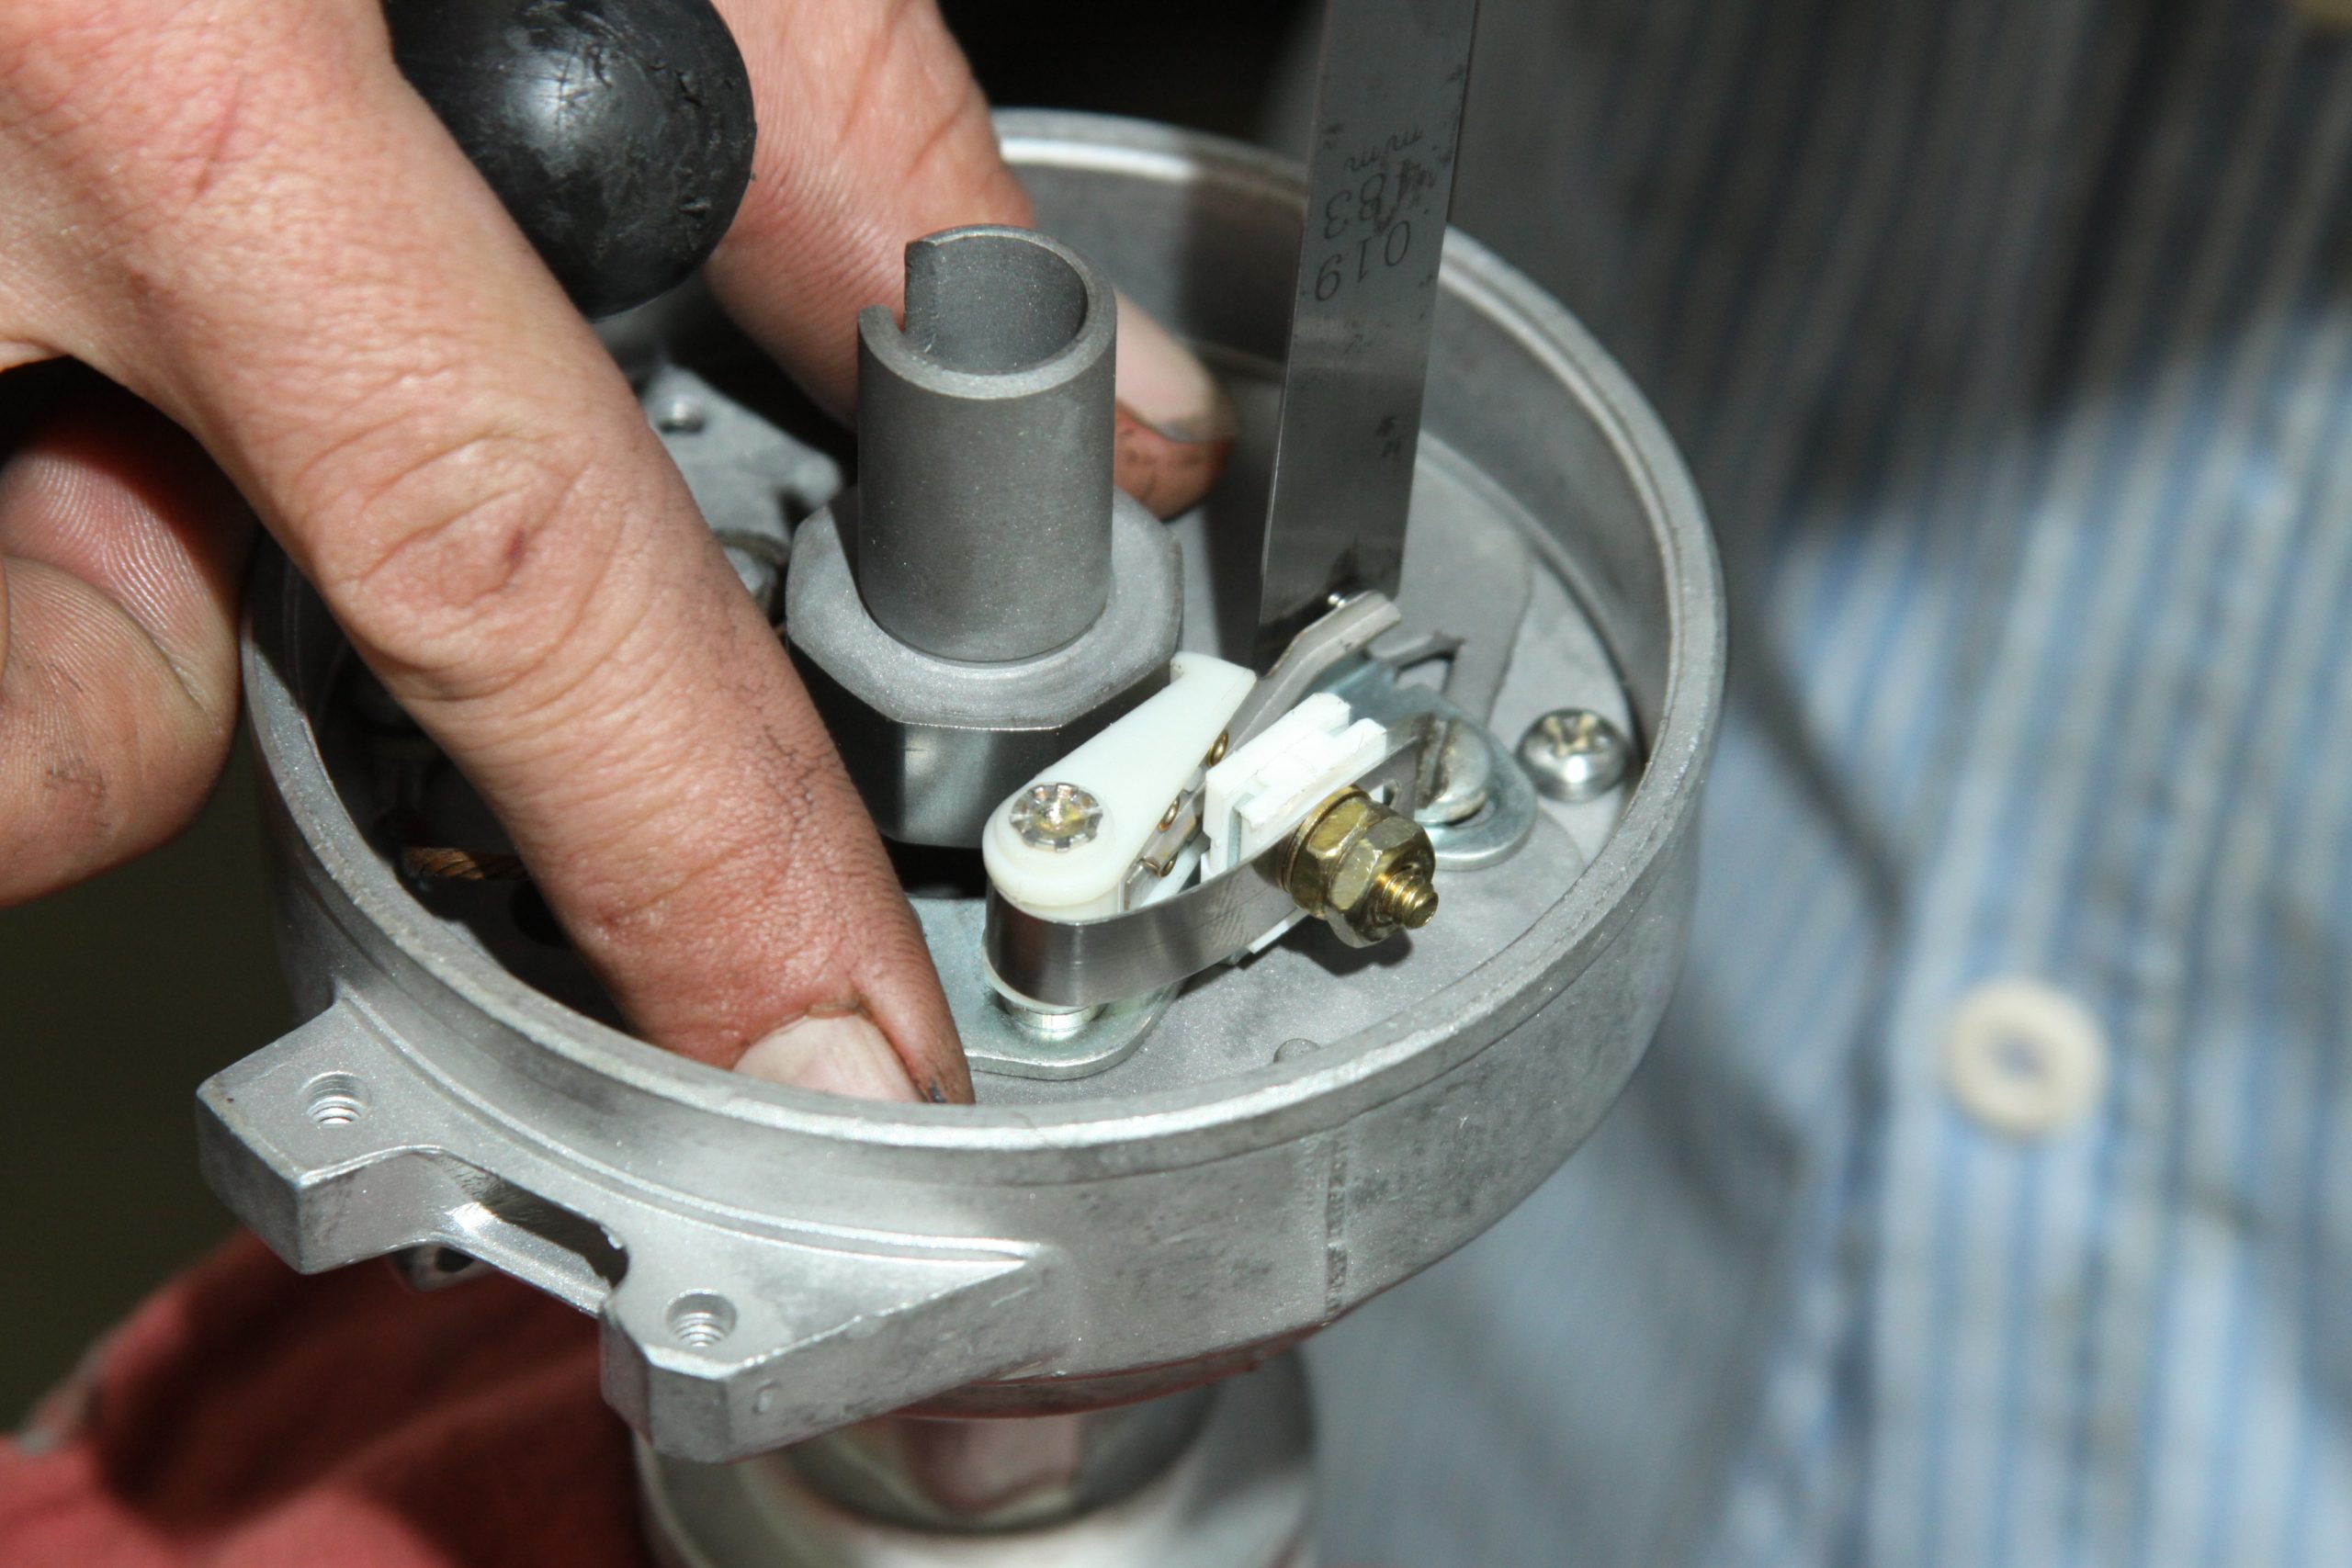
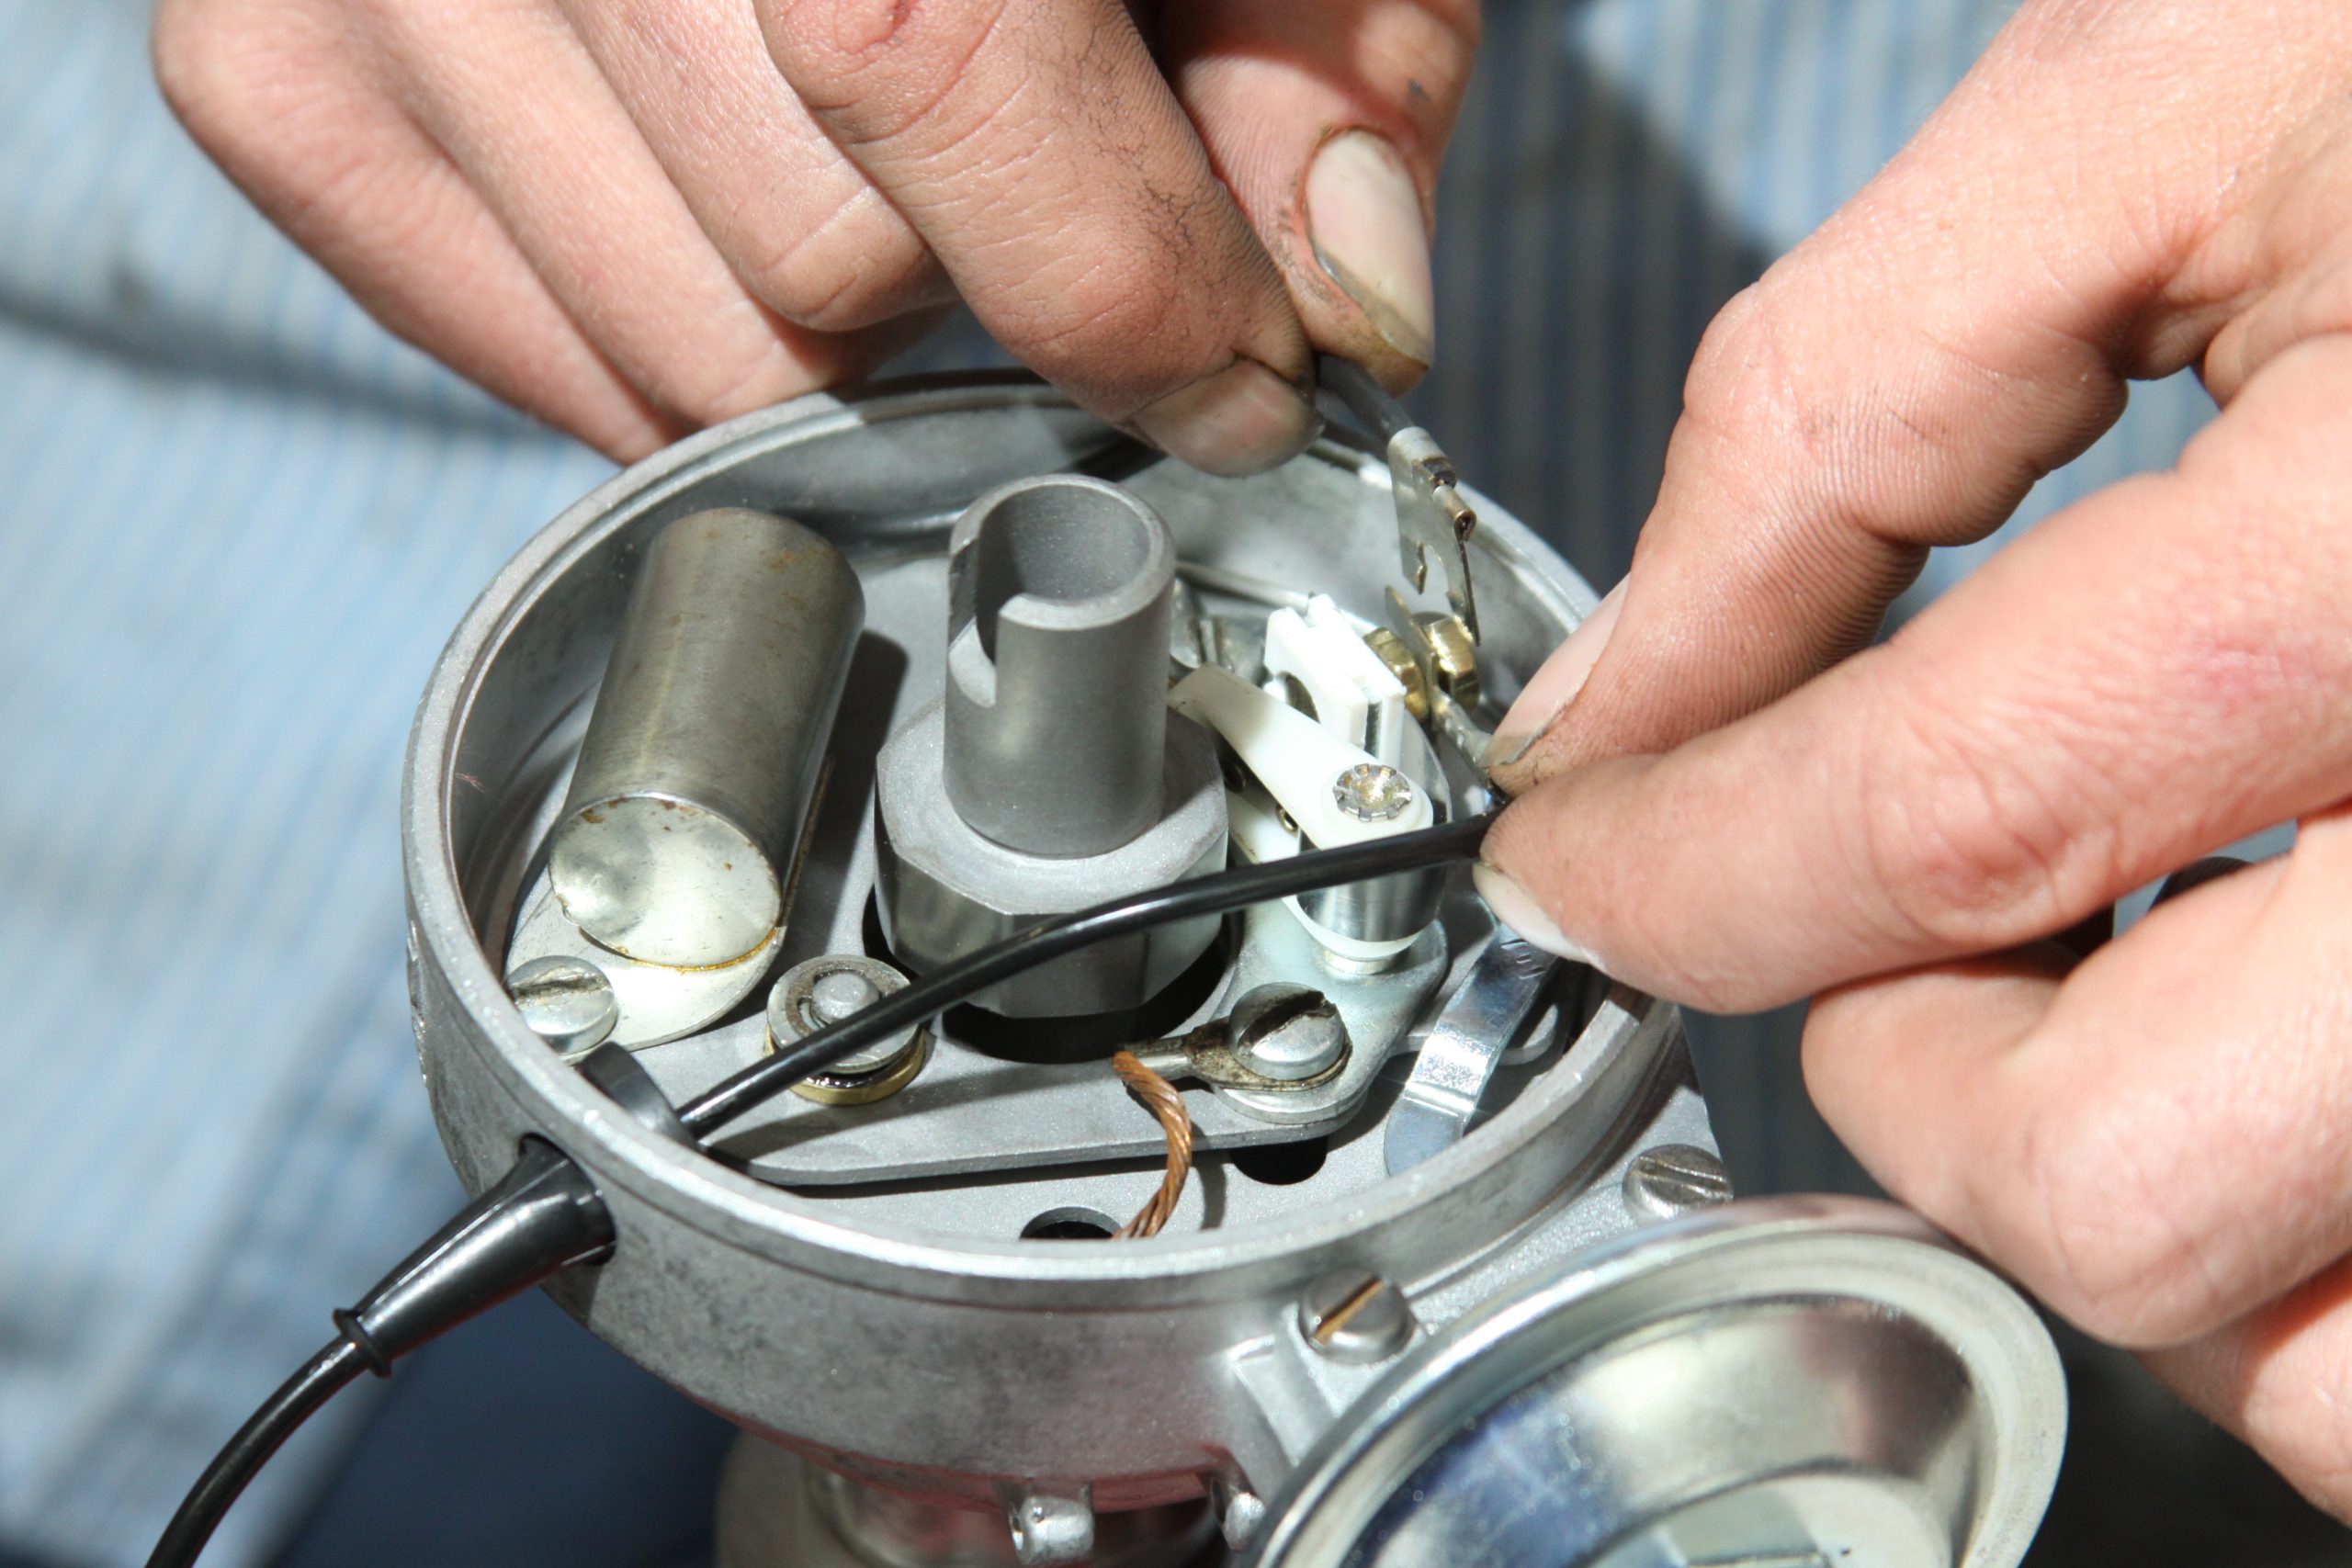
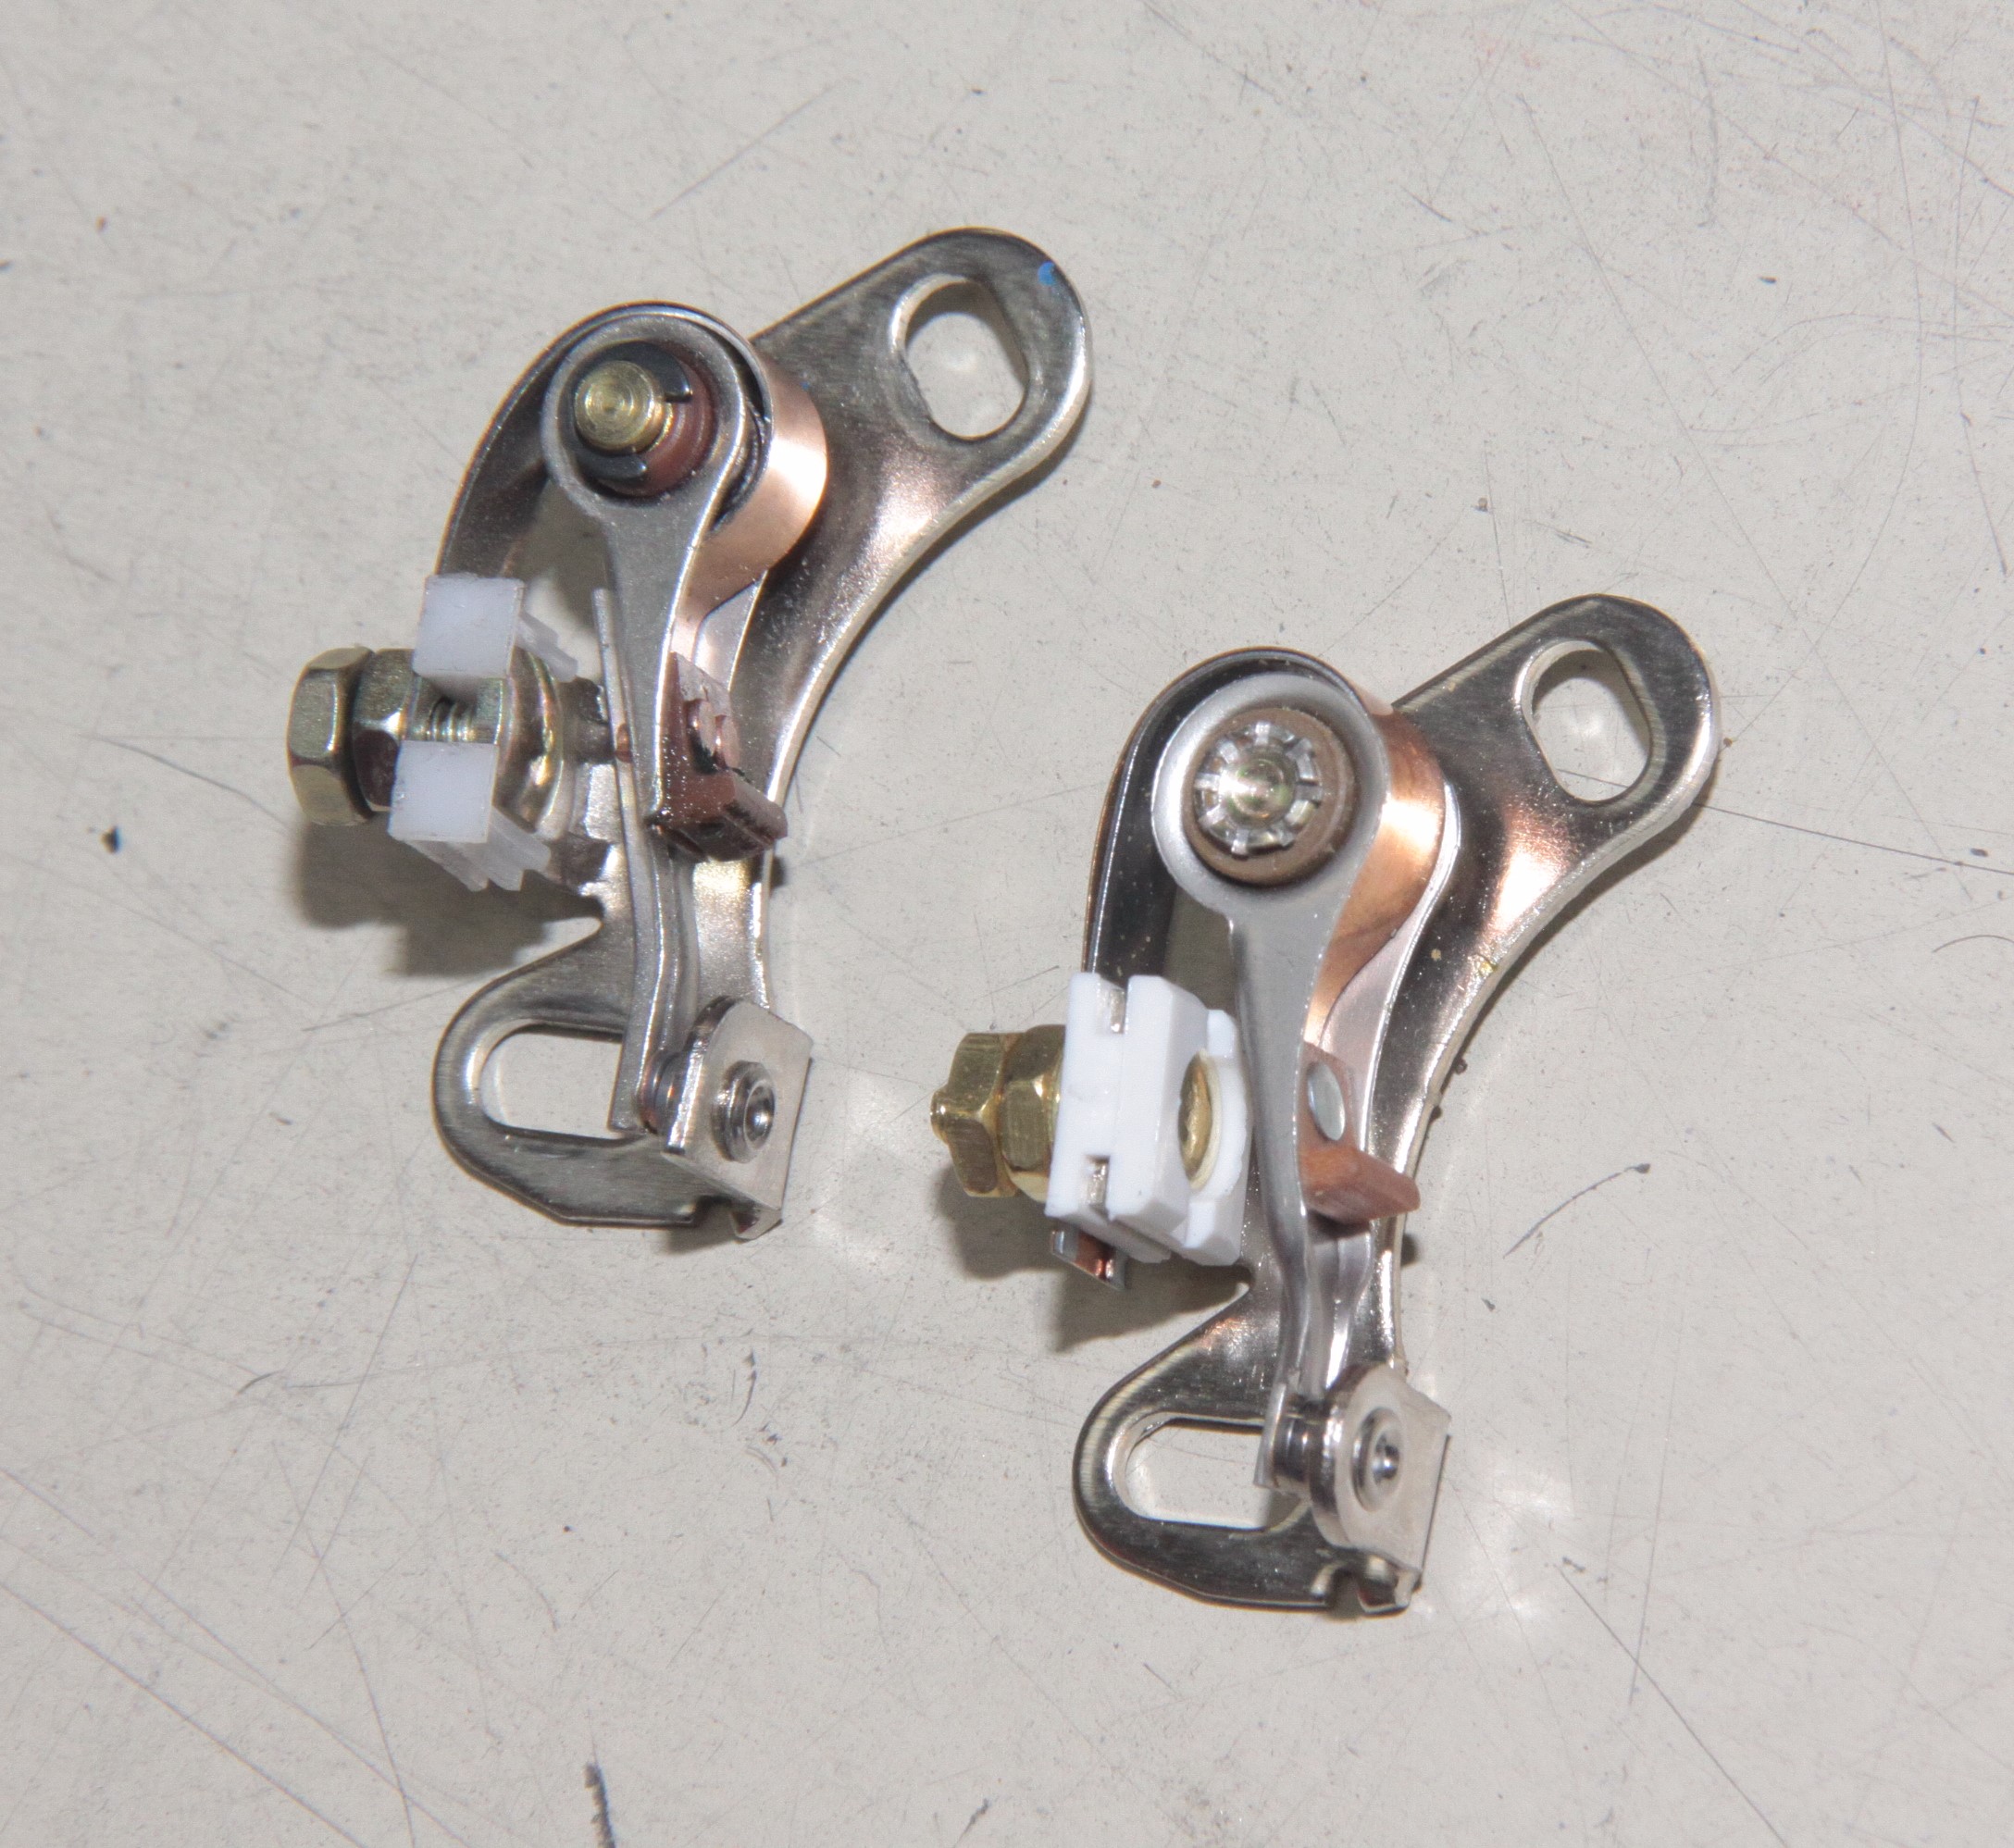
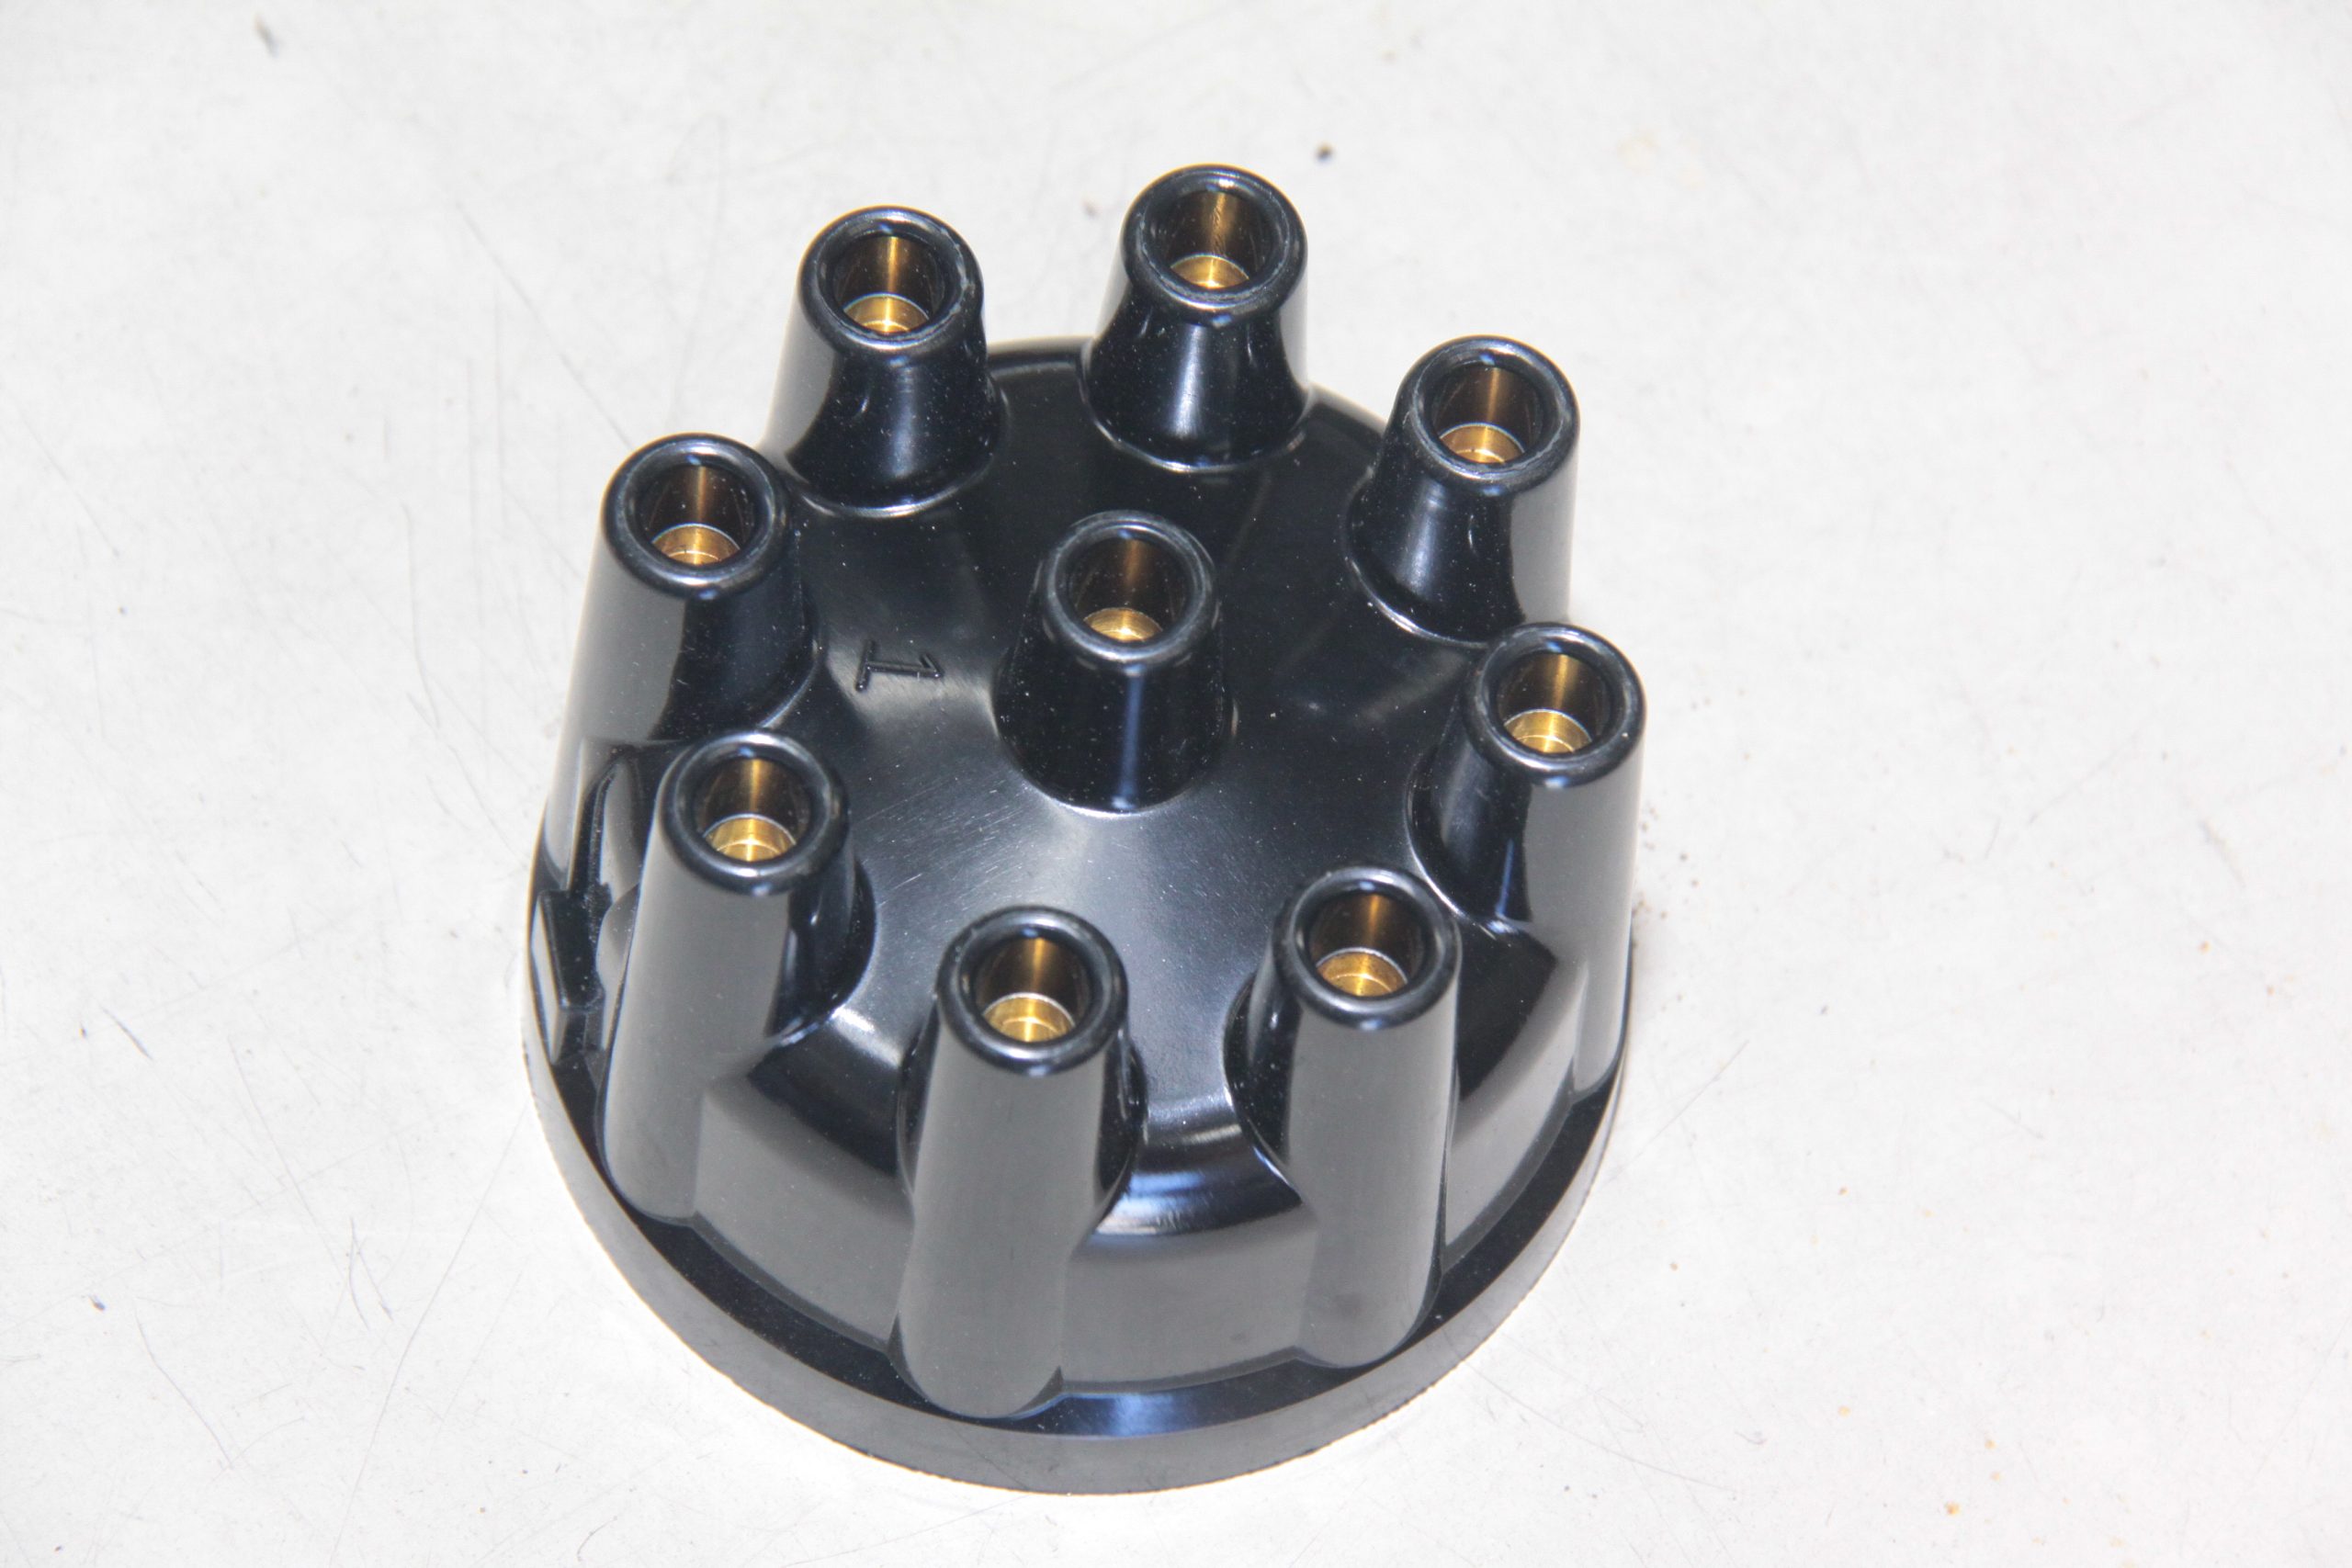
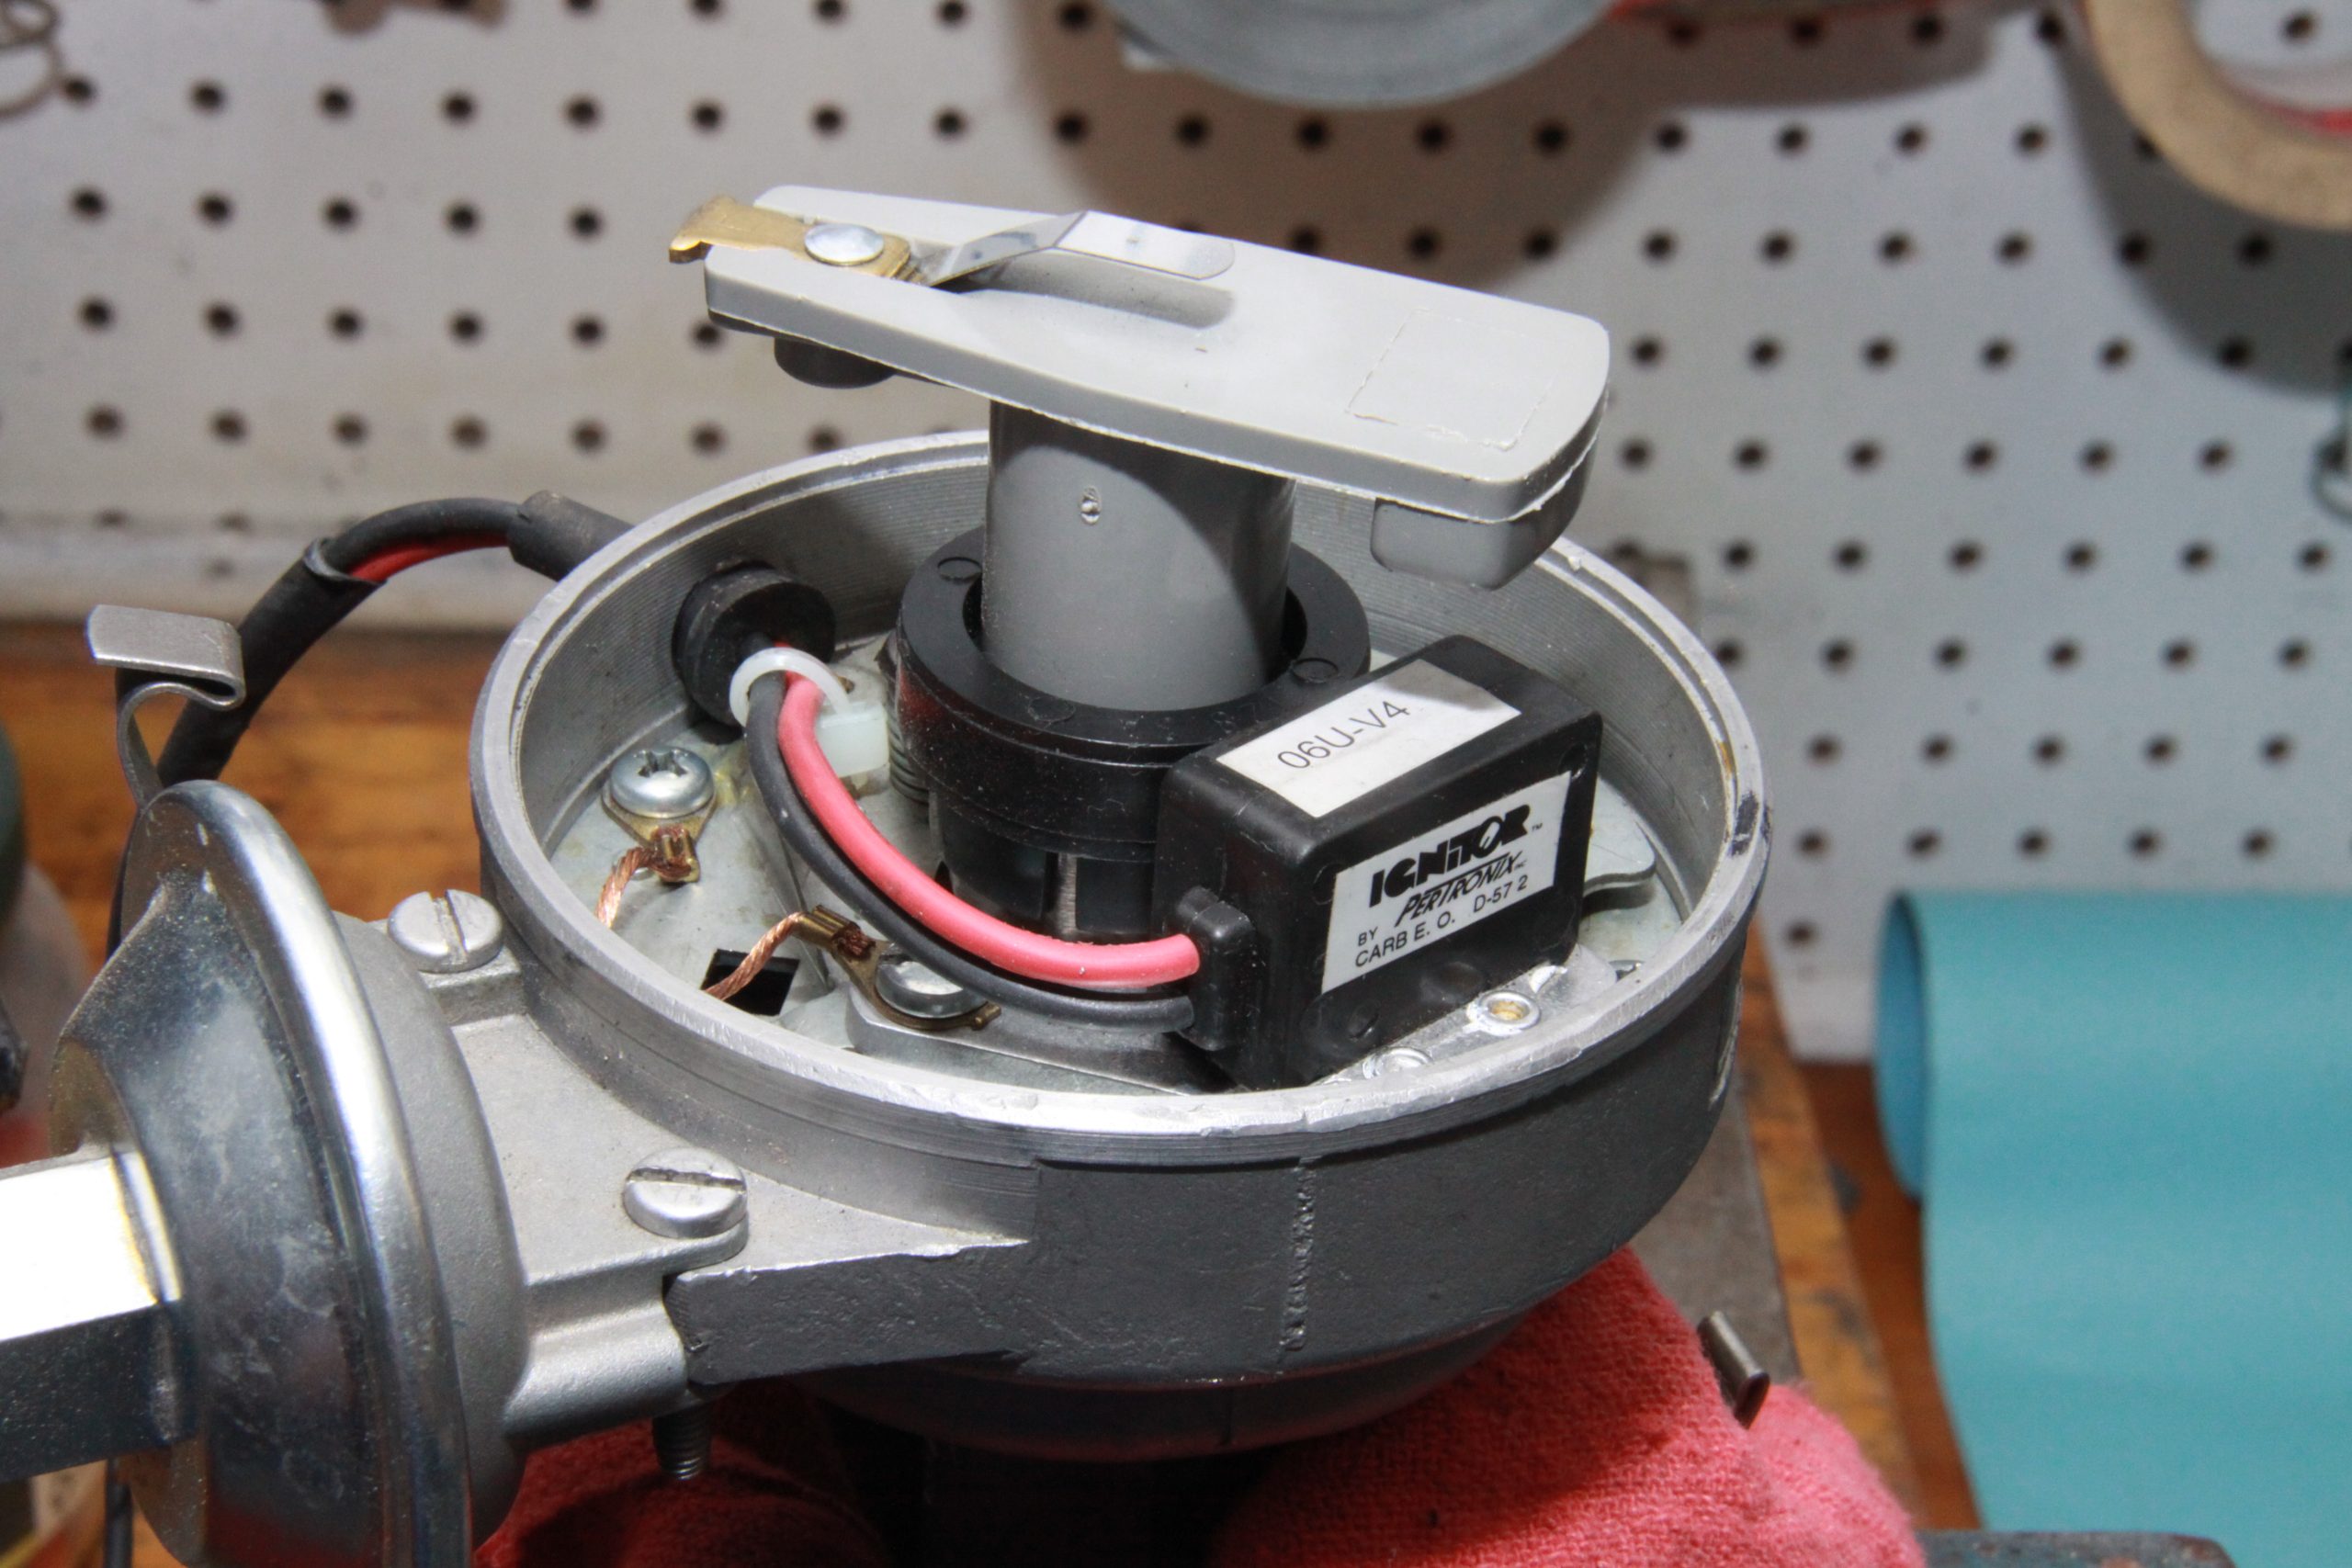
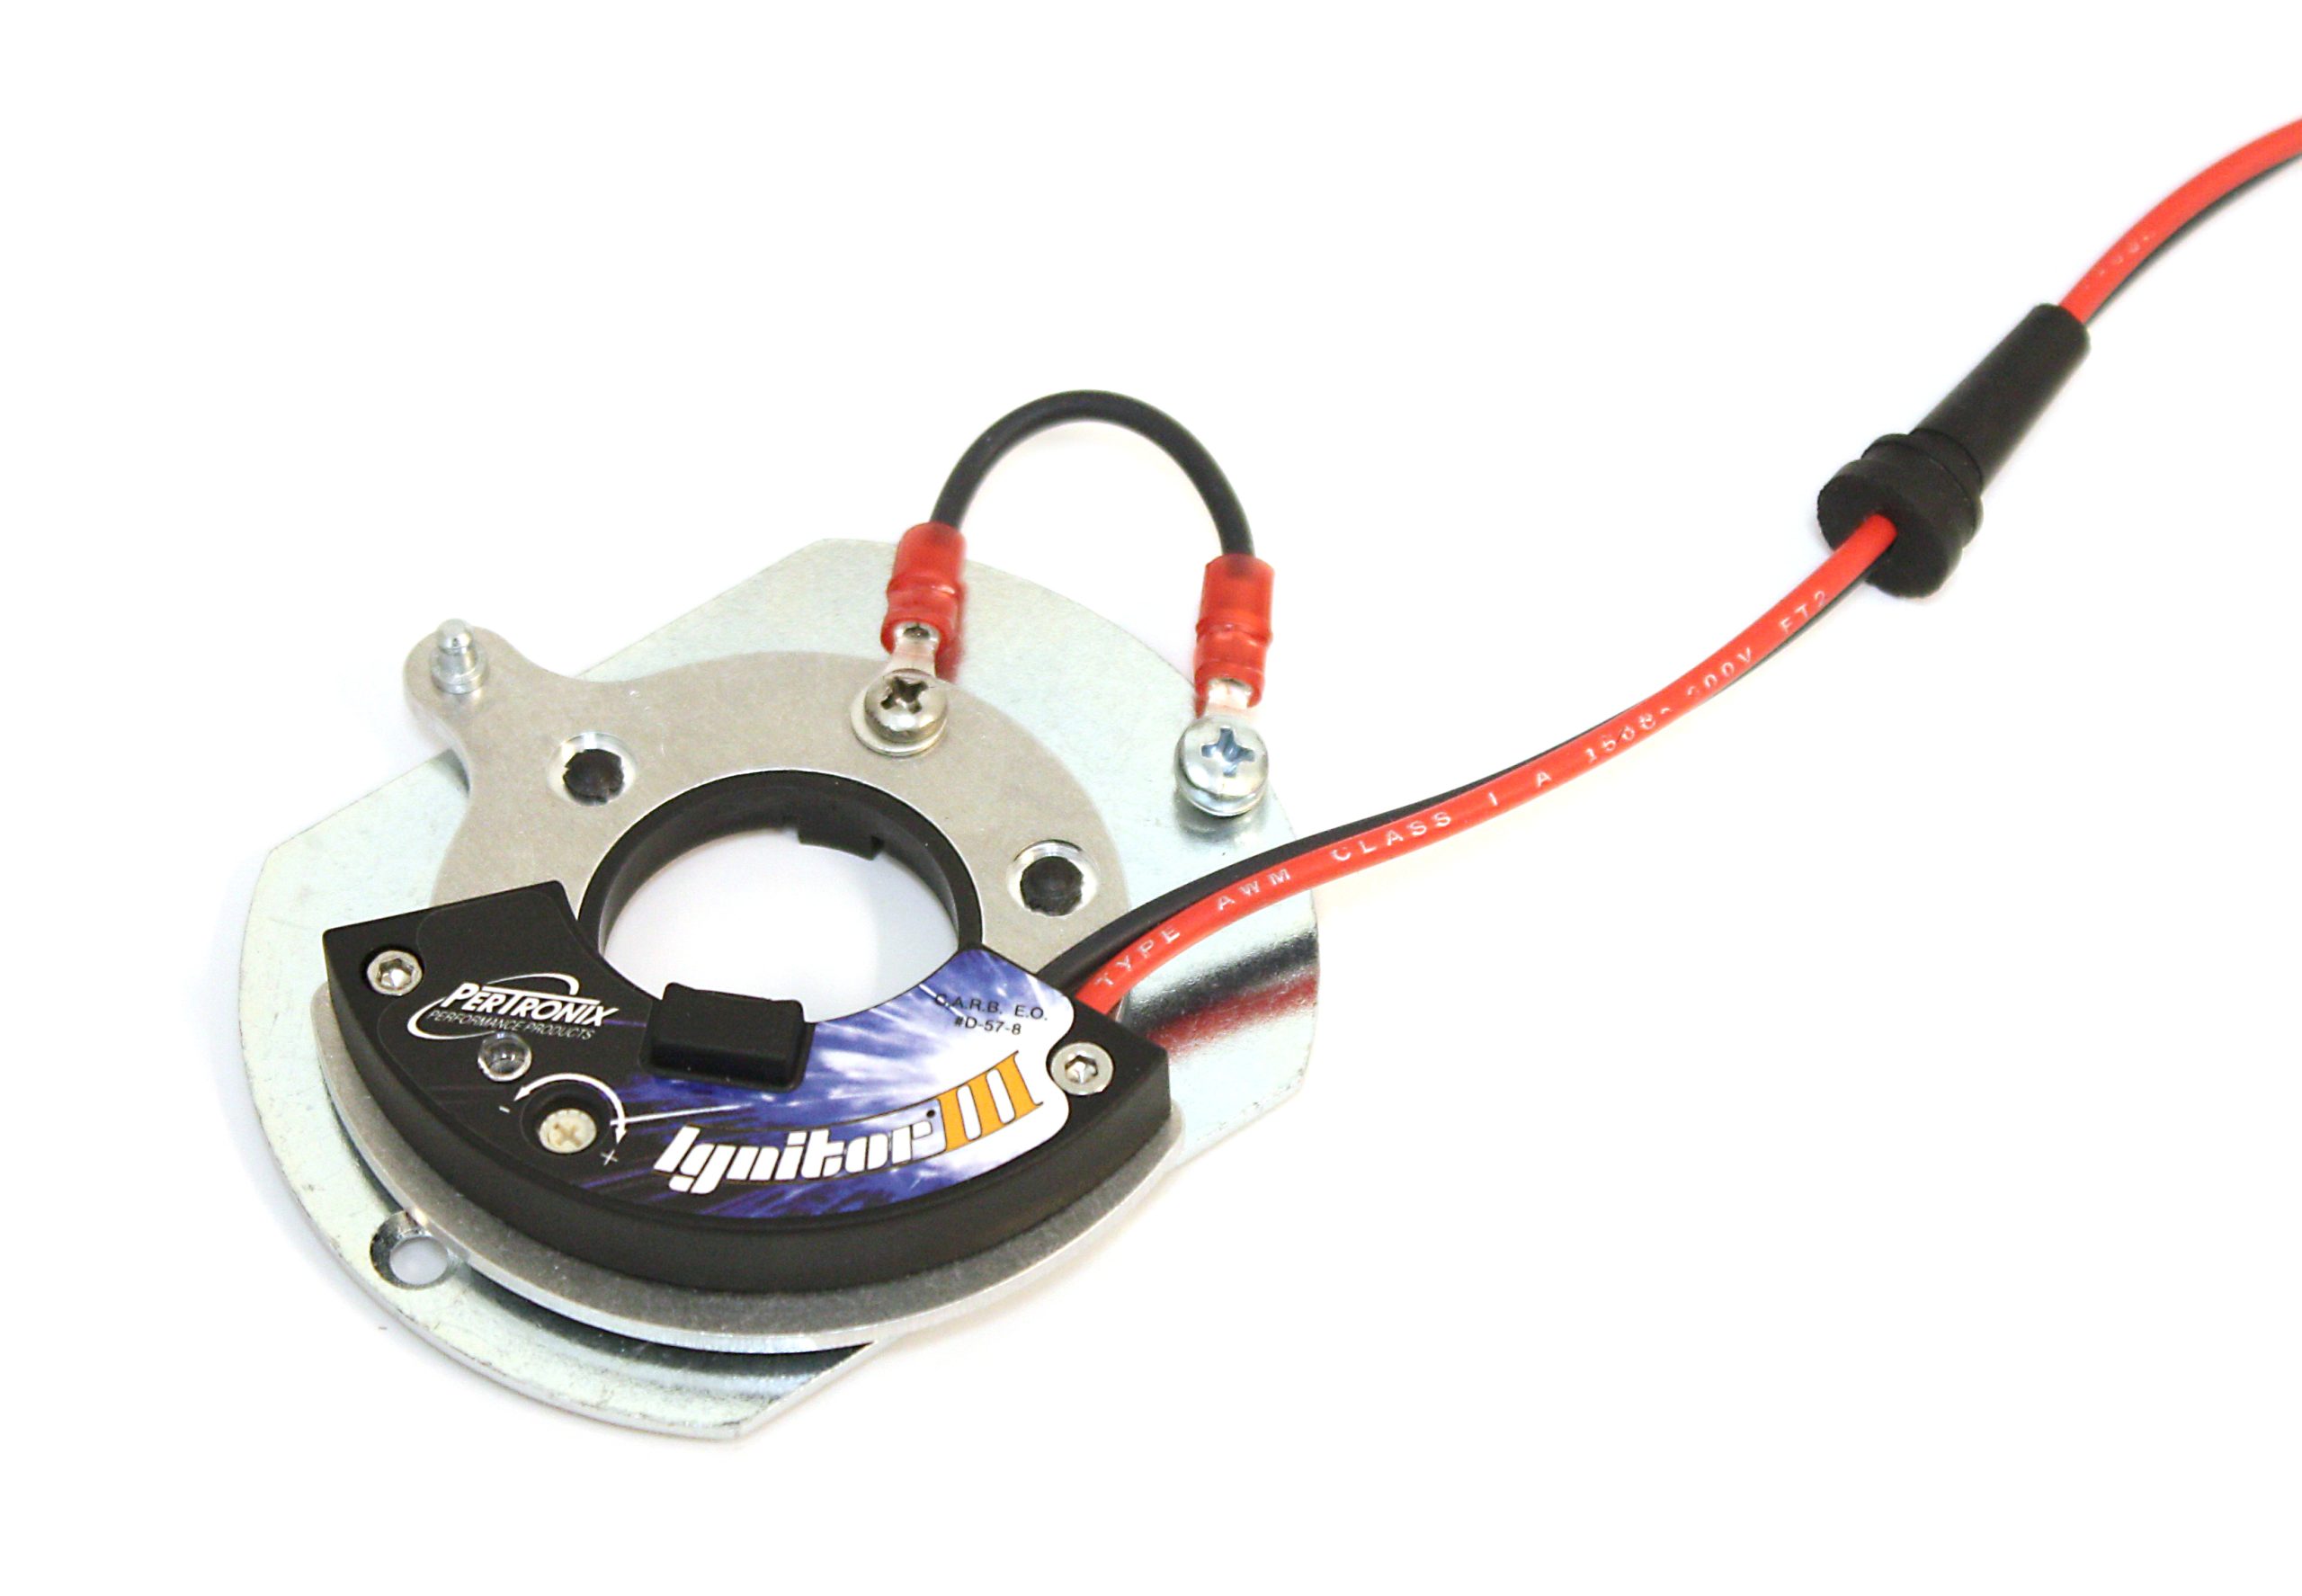
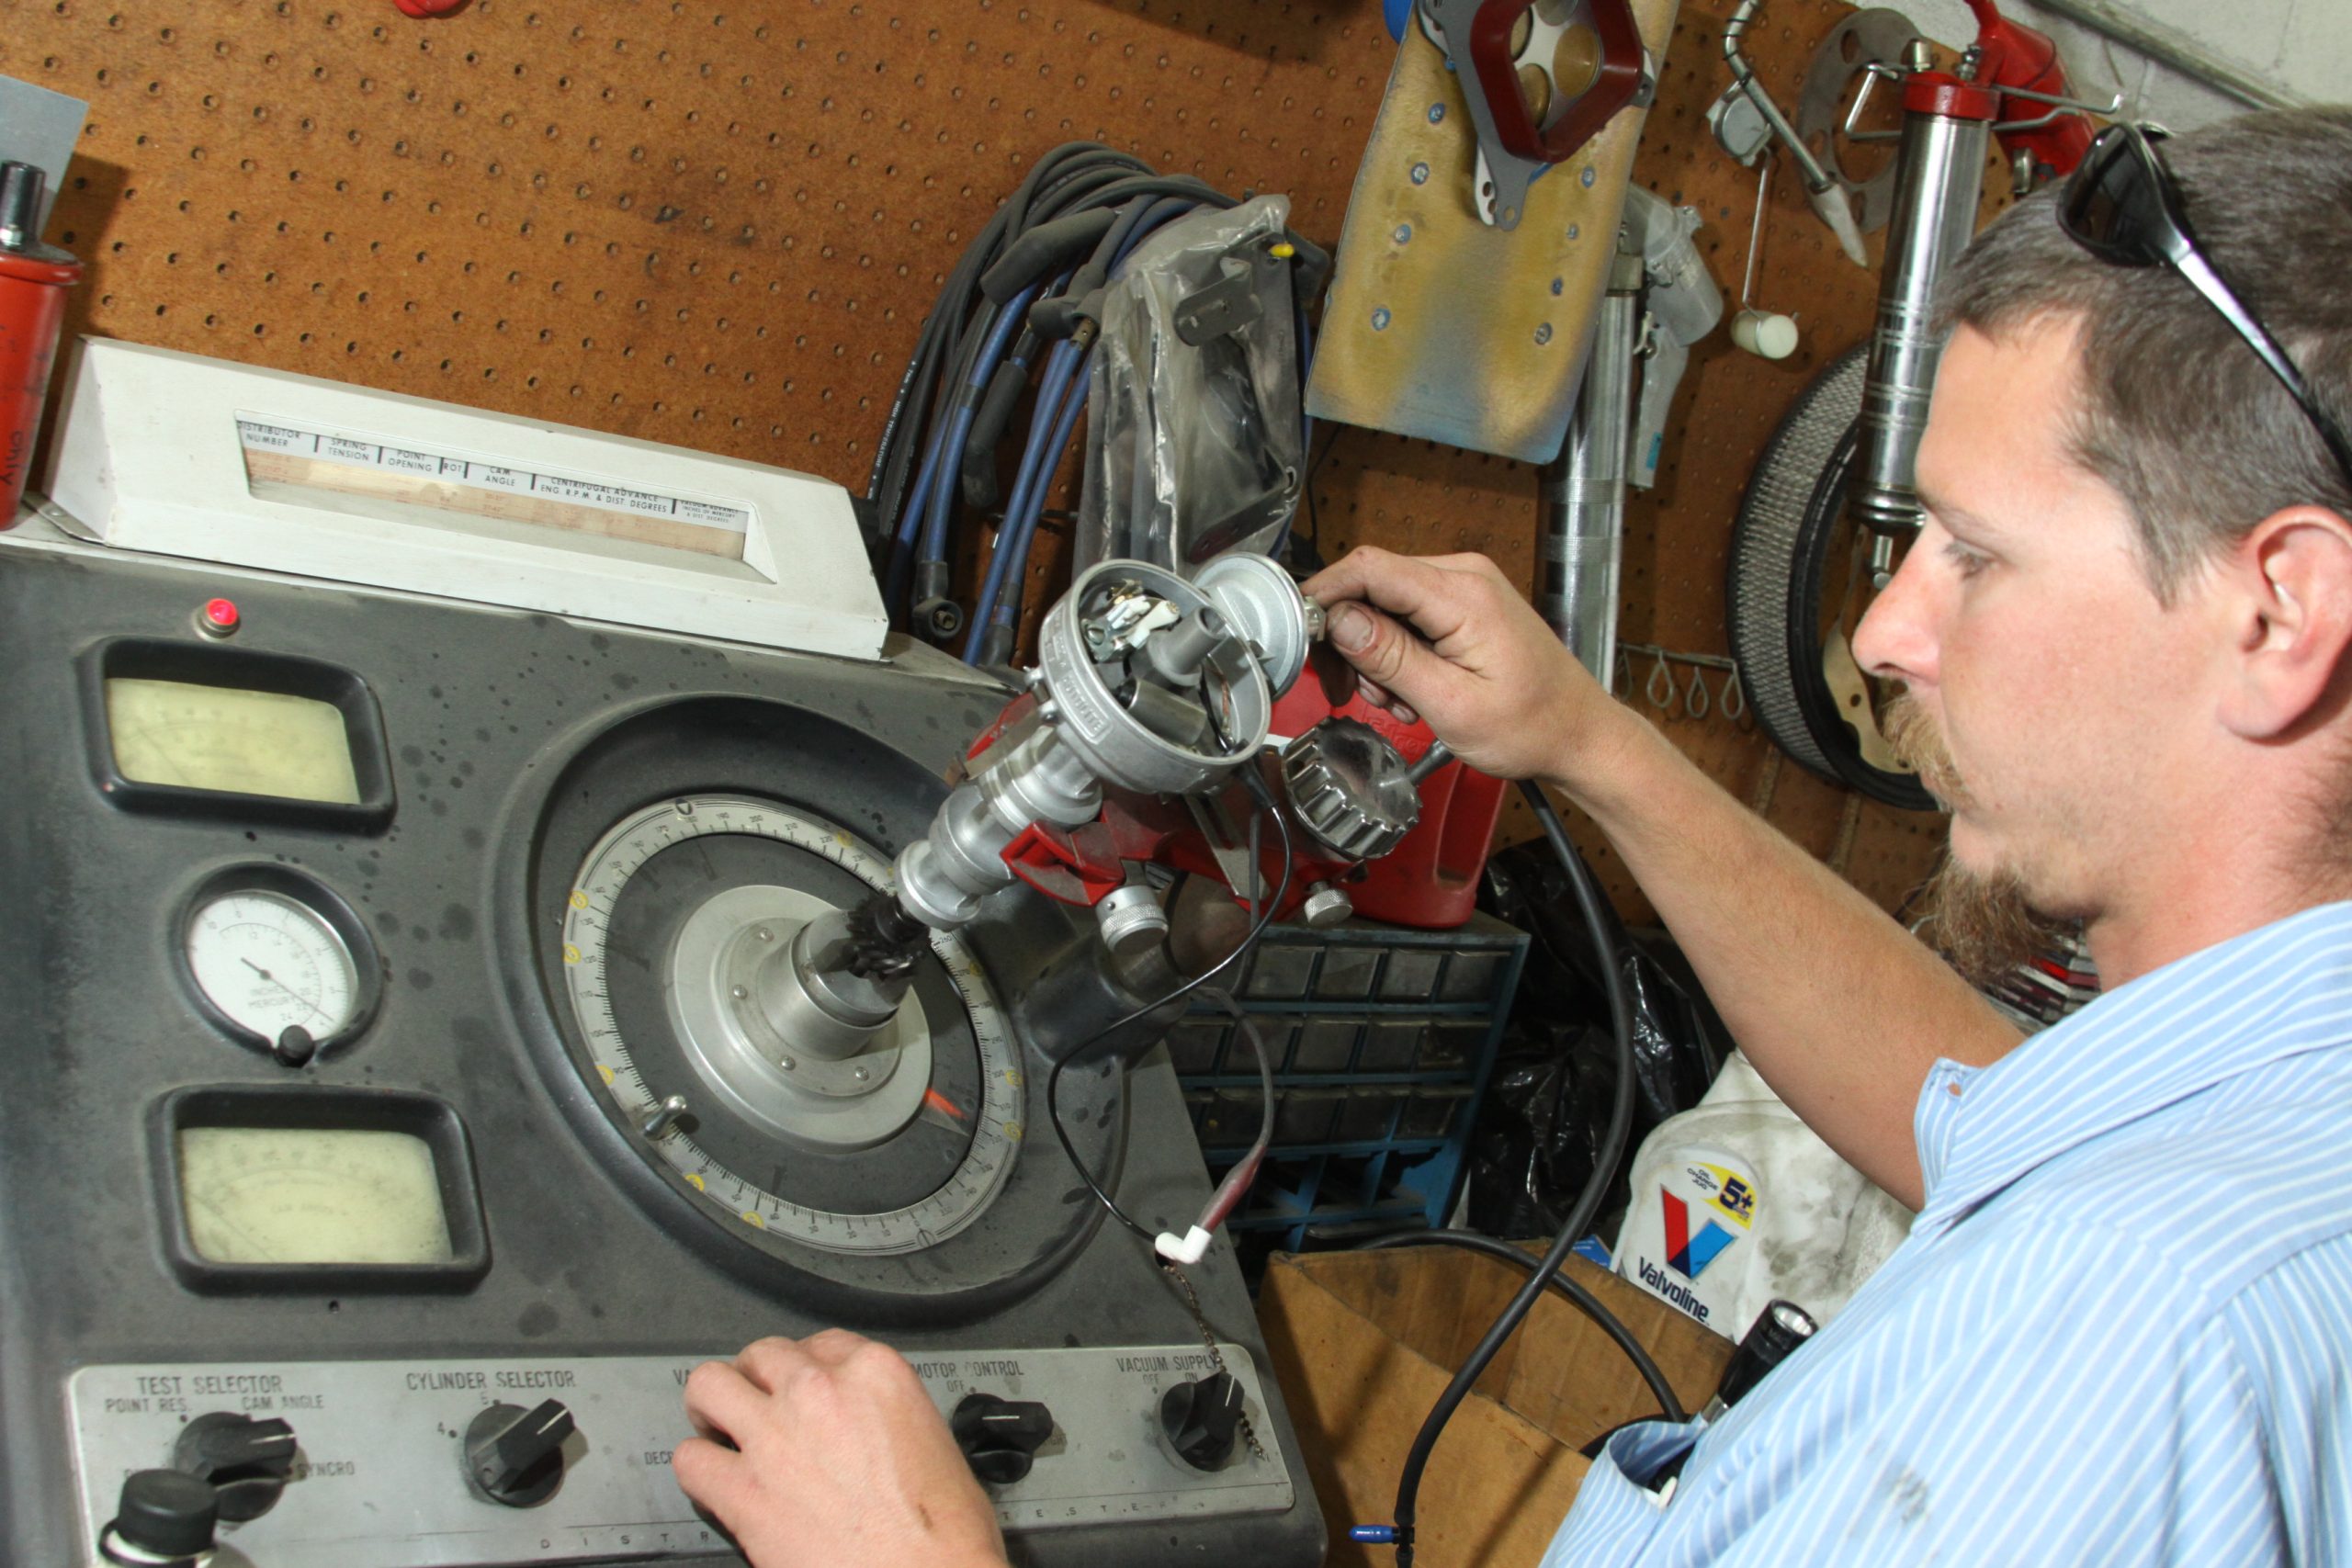
This is a typical Autolite single-point distributor with a factory vacuum advance unit. (Image/Jim Smart)Ford distributor identification is straightforward, with the part number (black arrow) and the date code (red arrow) stamped on the housing. Prior to 1965, Ford distributors were equipped with a service oil wick (white arrow). (Image/Jim Smart)This is an Autolite C4AF points distributor with vacuum advance for 1962-64 small block Ford V8s. Also shown are a Pertronix Ignitor module, an aftermarket vacuum advance, and shaft bushings. The bushings, which have long been challenging to get, are now widely available. Keep in mind there are two shaft sizes—.468-inch for 1962-64 and .531-inch for 1965-up. (Image/Jim Smart)These are all of the parts that make up a 1965-up Ford single-point distributor. The vacuum advance canister on the left is the factory part, the one on the right is aftermarket. (Image/Jim Smart)This is the dual-point Ford distributor for high-performance applications like the 289 High Performance engine. It’s fitted with factory replacement parts like phenolic pivots and large, vented ignition points. (Image/Jim Smart)Beginning in 1969, Ford dual-point distributors were equipped with vacuum advance, primarily for emissions reduction. (Image/Jim Smart)The OEM Ford breaker plate is easy to service. The nylon rub “buttons” and pivot are wear items. When you replace them, use high-temperature lubricant for smooth operation. (Image/Jim Smart)This is the OEM Ford vacuum advance unit. The rate of advance is adjusted by adding or subtracting shims (black arrow). Ford called these shims “adjustment washers.” Add shims to slow the rate of advance or remove shims to increase the rate of advance—they control spring pressure against the diaphragm. The advance rate is how quickly vacuum advance rolls in as you start out. (Image/Jim Smart)Aftermarket and later Ford OEM vacuum advance units are adjusted with an Allen wrench as shown. Turn the Allen wrench clockwise to slow the rate of advance and counterclockwise to speed up the rate of advance. (Image/Jim Smart)Distributor shaft bushings are from left B8QH-12120-A (.468-inch I.D.), C5AZ-12120-A, and C5AZ-12132-A (both .531-inch I.D.). Selection depends upon shaft diameter and generation. (Image/Jim Smart)We’re going to disassemble an early 1962-64 Autolite C4AF single-point Ford distributor. It begins with the removal of the mechanical advance retaining clip. (Image/Jim Smart)Here is the mechanical advance mechanism, which includes the flyweights and springs. Spring tension determines the rate of centrifugal advance. The light spring is the primary advance spring while the heavier spring is the secondary spring. The arms are bent in or out to adjust spring tension. (Image/Jim Smart)The flyweights slide off the advance mechanism once the springs have been removed. (Image/Jim Smart)The distributor shaft should be easy to remove from the housing unless it’s sludged up. WD-40 will help you free it from the housing. We cleaned the shaft with a wire wheel. (Image/Jim Smart)The distributor drive gear is retained with a tension pin, which is driven out with a punch. The gear has to be driven off of the shaft using a press. (Image/Jim Smart)The distributor shaft collar’s tension pin is driven out with a punch, then the shaft is pressed out of the collar as shown. (Image/Jim Smart)This is the 1965-up C5AF Autolite single-point distributor housing (in this image C8TF). These housings can be fitted with either one or two shaft bushings. This one has two—the C5AZ-12120-A main bushing (arow) and the smaller C5AZ-12132-A bushing located at the bottom of the housing. The bushings can be driven out with a hydraulic press if they need to be replaced. Never use a hammer and a drift. (Image/Jim Smart)Disassembly is much the same as what we showed with the C4AF distributor, so we’ll skip that here. As you can see, the shaft is machined with a barber pole style oil channel, which carries engine oil to the shaft and bushings. Generously lube this shaft with engine assembly lube and slide it into the housing. (Image/Jim Smart)The mechanical advance head is lubricated for smooth operation, then fitted on the shaft. You want this guy to swivel smoothly on the shaft. (Image/Jim Smart)The mechanical advance springs are of different tensions and installed as shown. Remember, the light spring is the primary advance spring while the heavier spring is the secondary spring. Don’t mix them up. (Image/Jim Smart)This retaining clip is reinstalled and secured to the shaft. A felt lubrication pad is fitted above this clip and saturated with 10W weight engine oil. You use engine assembly lube inside the cam button before installing the felt pad. (Image/Jim Smart)This is an original Ford breaker plate. it rides on these nylon buttons, which must be lubricated with high temperature grease. The OEM plates are the best choice if you can find any that are not worn out. (Image/Jim Smart)The breaker plate drops in as shown and is secured with two machine screws. (Image/Jim Smart)Distributor shaft endplay between the collar and housing should be .024- to .035-inch according to Ford Performance. Once seated in the block, the distance between the drive gear and block should be .005-inch. (Image/Jim Smart)The distributor drive gear is pressed onto the shaft with a press. If you’ve opted for a roller camshaft, you will need a bronze or composite drive gear. The factory iron gear is fine with a flat tappet iron camshaft because they have the same hardness. The retaining pin is reinstalled as shown. (Image/Jim Smart)Because installing and adjusting ignition point gap tends to be a lost art, we’re going to show you how to do it. Run the screws down snug, but not tight. Fit a clean thickness gauge between the point contacts and set the gap at .018-.020-inch. Before you remove the gauge, tighten the screws and check the gap again. (Image/Jim Smart)The vacuum advance unit is installed next. The arm is secured to the breaker plate with a C-clip, and the canister is secured to the housing with fine-thread screws. (Image/Jim Smart)Connect the ignition and condenser leads, then snug the brass nut. (Image/Jim Smart)Ignition points are not created equal. Here are two examples—OEM Ford points on the left and low-buck aftermarket points on the right. The Ford points have a phenolic pivot and large copper contact points. The larger the contacts, the better. The aftermarket points have a plastic pivot and rubbing block, which will not last. Your best option is Accel’s ignition points. They have a composite pivot and rubbing block along large copper contact points. (Image/Jim Smart)Never cut corners with distributor caps. Get one with brass or copper terminals, which offers the best protection against misfire and crossfire. (Image/Jim Smart)If you don’t want to mess with points, you can convert your classic Ford distributor to electronic ignition with a retrofit Pertronix Ignitor kit. This is the original Pertronix Ignitor, which you can identify by the black housing. (Image/Jim Smart)The Pertronix Ignitor II goes the original Ignitor one better with Adaptive Dwell technology that maintains peak spark energy throughout the entire RPM range. The Ignitor II develops four times more available energy between 3,000 and 5,000 RPM while continuously adjusting spark timing for peak performance. (Image/Jim Smart)The Pertronix Ignitor III offers multi-spark technology and an adjustable digital rev limiter with a memory function that stores your settings, eliminating unintended any changes to the rev limit. Adaptive dwell maintains peak energy throughout the entire RPM range. Opt for a 40,000-volt Pertronix Flame Thrower ignition coil with any Pertronix ignition. That will provide a very consistent spark to virtually eliminate misfire. (Image/Jim Smart)Every distributor rebuild deserves a professional advance recurving. Both vacuum and mechanical advance have to be curved (tuned) to the type of engine and intended use. This can be a labor intensive process involving springs and shims to get the curve dialed in. (Image/Jim Smart)
Jim Smart is a veteran automotive journalist, technical editor, and historian with hundreds of how-to and feature articles to his credit. Jim's also an enthusiast, and has owned and restored many classic vehicles, including an impressive mix of vintage Ford Mustangs.
Comments
2 responses to “Rebuild and Recurve: New Life for Classic Ford Points Distributors”
Great article. However, given today’s modern fuel with probably 10% of ethanol, what street driven engines ignition curves is considered typical for older engines with oem iron heads? In my case 9:6 compression automatic transmission using original gears of 3:25? Back in the day, 36-38 at 3,000 rpm?
Thank you for all you do
Nice article Ford Tech 40 years